Over the weekend I hung my first theater projector, the BenQ W1070 1080P 3D Home Theater Projector (White), using the BenQ 5J.J4N10.001 Universal Ceiling Mount, both available of course through Amazon.com. While I didn’t expect the installation to be overly complex, I did employ a slow and methodical planning approach before drilling large holes into the new knockdown theater ceiling.
After unboxing the projector and the universal ceiling mount kit, I looked at the instructions, the parts, and the underside of the projector. If you’re reading this, it’s probably because you’re in the same boat I was in – the diagrams don’t closely resemble the configuration of what you’ve got with the W1070. Furthermore, reading some of the reviews on Amazon seems to suggest this universal ceiling mount kit doesn’t work with the W1070 without some modifications to the mounting hardware. I read tales of cutting and filing as well as adding longer bolts, tubing, and washers to compensate for the placement of the mounting holes on the W1070. Not to worry, none of that excess is needed. If you concentrate more on the written instructions rather than the diagrams for mounting the hardware to the projector, it all actually works and fits together as designed with no modifications necessary. The one exception to this is that not all of the parts provided in the kit are used. This perhaps is what leads to some of the initial confusion in the first place. The diagrams suggest a uniform placement of four (4) mounting brackets on the underside of the projector in a ‘cross’ pattern. While this may be the case for some projectors, it’s not at all a representation of the W1070 integration.
For openers, the BenQ W1070 has only three (3) mounting holes meaning only three (3) mounting brackets will be used and not all four (4). Furthermore, the mounting holes are not placed uniformly around the perimeter of the projector. That, combined with the uneven surface of the projector can lead to uncertainty that these products were meant for each other and if so, then how. Simply follow the directions and screw the three brackets into place while allowing a little give so that you can swing the brackets into a correct position. I say _A_ correct position because there are nearly countless positions in which you can configure them and it will still work correctly resulting in a firm mount to the ceiling.
The image below shows an example of how I configured mine:
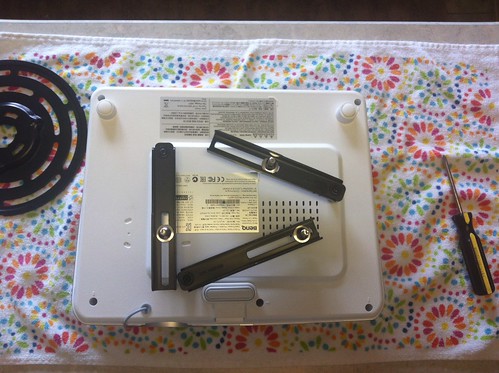
Next, place the mounting plate on top of the mounting brackets. Slide the mounting screws in the brackets, and gently swing the brackets themselves, so that the screws can extend through one of the channels in the mounting plate. Gently remove the mounting plate and torque the screws attaching the bracket to the projector.
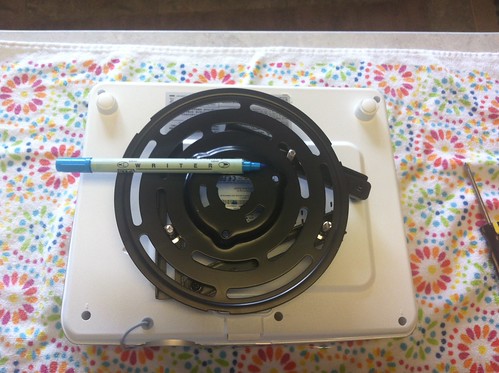
I took some additional steps which may not have been necessary with modern projector technology but nonetheless the methodical approach helps me sleep better at night and reassures me I’m not destroying my ceiling in the wrong spot. I used a felt tip marker to mark a center point on the projector relative to the telescoping pole that will mount to the plate.
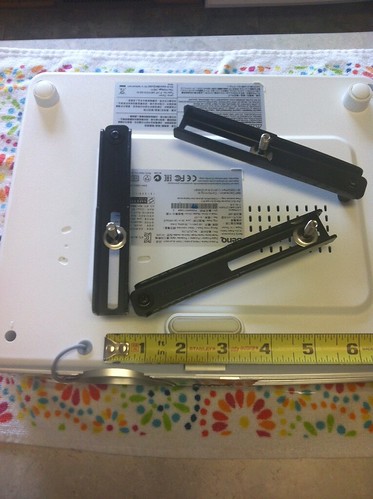
I then temporarily removed the mounting plate to measure the telescoping ceiling mount offset relative to the front and center of the projector lens. This measuring translates into the offset for the ceiling mount relative to the center of the room and distance to the projection wall. Performed correctly, it allowed me to mount the front of the lens 10’10” from the projection wall (sweet spot for my calculated screen size, seating, zoom, etc.) as well as mount the lens exactly in the middle of the room from a side to side lateral perspective.
In closing, the only other thing I’d add here is that if your lag bolts are not hitting studs in the ceiling, don’t bother with the plastic sheetrock inserts. While they may work, I don’t trust them for the amount of money I spent on the projector and I certainly don’t want the projected image wiggling because the projector isn’t firmly mounted to the ceiling. Only one of my lag bolts hit a stud. For the remaining bolts, I went to home depot and purchased some low cost anchor bolts (these are the ones I used along with a fender washer) good for 100lbs. each. Suffice to say, the projector is now firmly hung from the ceiling.


Thank you for the detailed instructions. Would like to see some pictures of the installation and final result. Trying to understand if I need the 4″ or the extension mount with 14″+
Great. Thanks for the tutorial.
maybe i’m being an idiot here 🙂 do the arms remain “loose” that attach to projector? meaning, they are still able to slide? if not, how do they tighten up?
Hi Mark,
The arms are loose for adjustment, but tighten everything up once the arms are in the right position so that the final projector installation doesn’t wiggle when hanging from the ceiling.
Thanks, that was usefull!!
Precise answers