During the past couple of months, I’ve had the opportunity to participate in both the vSphere 7 and Project Pacific beta programs. While the vSphere 7 beta was fairly straightforward (no intent to downplay the incredible amount of work that went into one of VMware’s biggest and most anticipated releases in company history), Project Pacific bookends the start of my Kubernetes journey – something I’ve wanted to get moving on once the busy hockey season concluded (I just wrapped up my 4th season coaching at the Peewee level).
For myself, the learning process can be broken down into two distinct parts:
- Understanding the architecture and deploying Kubernetes on vSphere. Sidebar: Understanding the Tanzu portfolio (and the new names for VMware modern app products). To accomplish this In vSphere 7, we need to deploy NSX-T and then enable Workload Management in the UI. That simplification easily represents several hours of work when you consider planning and in my case, failing a few times. I’ve seen a few references made on how easy this process is. Perhaps if you already have a strong background in NSX-T. I found it challenging during the beta.
- Day 1 Kubernetes. The supervisor cluster is up and running (I think). Now how do I use it? YAML? Pods? What’s a persistent volume claim (PVC)? Do I now have a Tanzu Kubernetes Grid Cluster? No, not yet.
This blog post is going to focus mainly on part 1 – deployment of the Kubernetes platform on vSphere 7, learning the ropes, and some of the challenges I overcame to achieve a successful deployment.
During the Project Pacific beta, we had a wizard which deployed most of the NSX-T components. The NSX-T Manager, the Edges, the Tier-0 Gateway, the Segment, the uplinks, it was all handled by the wizard. I’m an old hand with vShield Manager and NSX Manager after that for vCloud Director, but NSX-T is a beast. If you don’t know your way around NSX-T yet, the wizard was a blessing because all we had to do was understand what was needed, and then supply the correlating information to the wizard. I think the wizard also helped drive the beta program to success within the targeted start and end dates (these are typical beta program constraints).
When vSphere 7 went GA, a few notable things had changed.
- Licensing. Kubernetes deployment on vSphere 7 requires VMware vSphere Enterprise Plus with Add-on for Kubernetes. Right now I believe the only path is through VMware Cloud Foundation (VCF) 4.0 licensing.
- Unofficially you can deploy Kubernetes on vSphere 7 without VCF. All of the bits needed already exist in vCenter, ESXi, and NSX-T 3.0. But as the Kubernetes features seem to be buried in the ESXi license key, it involves just a bit of trickery. More on that in a bit.
- Outside of VCF, there is no wizard based installation like we had in the Project Pacific beta. It’s a manual deployment and configuration of NSX-T. To be honest and from a learning perspective, this is a good thing. There’s no better way to learn than to crack open the books, read, and do.
So here’s VMware’s book to follow:
vSphere with Kubernetes Configuration and Management (PDF, online library).
It’s a good guide and should cover everything you need from planning to deployment of both NSX-T as well as Kubernetes. If you’re going to use it, be aware that it does tend to get updated so watch for those changes to stay current. To that point, I may make references to specific page numbers that could change over time.
I’ve made several mentions of NSX-T. If you haven’t figured it out by now, the solution is quite involved when it comes to networking. It’s important to understand the networking architecture and how that will overlay your own network as well as utilize existing infrastructure resources such as DNS, NTP, and internet access. When it comes to filling in the blanks for the various VLANs, subnets, IP addresses, and gateways, it’s important to provide the right information and configure correctly. Failure to do so will either end up in a failed deployment, or a deployment that from the surface appears successful but Kubernetes work later on fails miserably. Ask me how I know.
There are several network diagrams throughout VMware’s guide. You’ll find more browsing the internet. I borrowed this one from the UI.
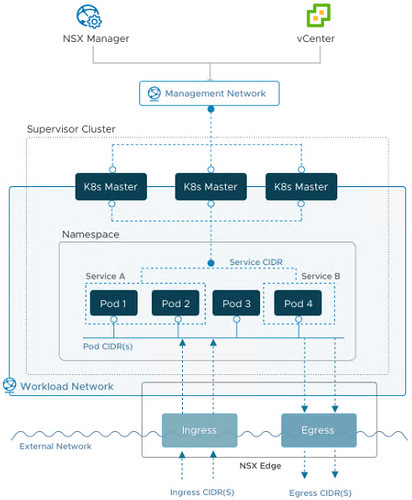
They all look about the same. Don’t worry so much about the internal networking of the supervisor cluster or even the POD or Service CIDRs. For the most part these pieces are autonomous. The workload enablement wizard assigns these CIDR blocks automatically so that means if you leave them alone, you can’t possibly misconfigure them.
What is important can be boiled down to just three required VLANs. Mind you I’m talking solely about Kubernetes on vSphere in the lab here. For now, forget about production VCF deployments and the VLAN requirements it brings to the table (but do scroll down to the end for a link to a click through demo of Kubernetes with VCF).
Just three VLANs. It does sound simple but where some of the confusion may start is terminology – depending on the source, I’ve seen these VLANs referred to in different ways using different terms. I’ll try and simply as much as I can.
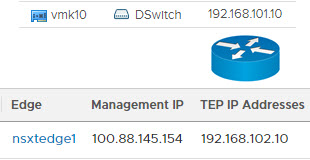
- ESXi host TEP VLAN – Just a private empty VLAN. Must route to Edge node TEP VLAN. Must support minimum 1600 MTU (jumbo frames) both intra VLAN as well as routing jumbo frames to the Edge node TEP VLAN. vmk10 is tied to this VLAN.
- Edge node TEP VLAN– Another private empty VLAN. Must route to ESXi host TEP VLAN. Must support minimum 1600 MTU (jumbo frames) both intra VLAN as well as routing jumbo frames to the ESXi host TEP VLAN. The Edge TEP is tied to this VLAN.
A routed tunnel is established between the ESXi host tunnel endpoints on vmk10 (and vmk11 if you’re deploying with redundancy in mind) and each Edge node TEP interface. If jumbo frames aren’t making it unfragmented through this tunnel, you’re dead in the water. - The third VLAN is what VMware calls the Tier 0 gateway and uplink for transport node on page 49 of their guide. I’ve seen this called the Overlay network. I’ve seen this called the Edge uplink network. The Project Pacific beta quickstart guide called it the Edge Logical Router uplink VLAN as well as the Workload Network VLAN. Later in the wizard it was simply referred to as the Uplink VLAN. Don’t ever confuse this with the TEP VLANs. In all diagrams it’s going to be the External Network or the network where the DevOps staff live. The Tier-0 gateway provides the north/south connectivity between the external network and the Kubernetes stack (which also includes a Tier-1 gateway). Another helpful correlation: The Egress and Ingress CIDRs live on this third VLAN. You’ll find out sooner or later that existing resources must exist on this external network just as DNS, NTP, and internet access.
All of the network diagrams I’ve seen, including the one above, distinguish between the external network and the management network. For the home labbers out there, these two will most often be the same network. In my initial deployment, I made the mistake of deploying Kubernetes with a management VLAN and a separate DevOps VLAN that had no route to the internet. Workload enablement was successful but I found out later that applying a simple YAML resulted in endless failed pods being created. This is because the ESXi host based image fetcher container runtime executive (CRX) had no route to the internet to access public repository images (a firewall blocking traffic can cause this as well). I was seeing errors such as the following in /var/log/spherelet.log on the vSphere host where the pod was placed:
Failed to resolve image: Http request failed. Code 400: ErrorType(2) failed to do request: Head https://registry-1.docker.io/v2/library/nginx/manifests/alpine: dial tcp 34.197.189.129:443: connect: network is unreachable
spherelet.log:time="2020-03-25T02:47:24.881025Z" level=info msg="testns1/nginx-3a1d01bf5d03a391d168f63f6a3005ff4d17ca65-v246: Start new image fetcher instance. Crx-cli cmd args [/bin/crx-cli ++group=host/vim/vmvisor/spherelet/imgfetcher run --with-opaque-network nsx.LogicalSwitch --opaque-network-id a2241f05-9229-4703-9815-363721499b59 --network-address 04:50:56:00:30:17 --external-id bfa5e9d2-8b9d-4b34-9945-5b7452ee76a0 --in-group host/vim/vmvisor/spherelet/imgfetcher imgfetcher]\n"
The NSX-T Manager and Edge nodes both have management interfaces that tie to the management network, but much like vCenter and ESXi management interfaces, these are for management only and are not in the data path nor are they a part of the Geneve tunnel. As such, the management work does not require jumbo frames.
Early on in the beta, I took some lumps trying to deploy Kubernetes on vSphere. These attempts were unsuccessful for a few reasons and 100% of the cause was networking problems.
First networking problem: My TEP VLANs were not routed. That was purely my fault for not understanding in full the networking requirements for the two TEP VLANs. Easy fix – I contacted my lab administrator and had him add two default gateways, one for each of the TEP VLANs. Problem solved.
Second networking problem: My TEP VLANs supported jumbo frames at Layer 2 (hosts on the same VLAN can successfully send and receive unfragmented jumbo frames all day), but did not support the routing of jumbo frames. (Using vmkping with the -d switch is very important in testing for jumbo frame success the command looks something like vmkping -I vmk10 <edge TEP IP> -S vxlan -s 1572 -d). In other words, when trying to send a jumbo frame from an ESXi host TEP to an Edge TEP on the other VLAN, standard MTU frames make it through, but jumbo frames are dropped at the physical switch interface which was performing the intra switch intervlan routing.
A problem with jumbo frames can manifest itself into somewhat of a misleading problem and resulting diagnosis. When a jumbo frames problem exists between the two TEP VLANs:
- A workload enablement appears successful and healthy in the UI
- The Control Plane Node IP Address is pingable
- The individual supervisor cluster nodes are reachable on their respective IP addresses and accept kubectl API commands
- The Harbor Image Registry is successfully deployed
But…
- The Control Plane Node IP Address is not reachable over https in a web browser
- The Harbor Image Registry is unreachable via web browser at its published IP address
These are symptoms of an underlying jumbo frames problem but they can be misidentified as a load balancer issue.
I spent some time on this because my lab administrator assured me jumbo frames were enabled on the physical switch. It took some more digging to find out intervlan routing of jumbo frames was a separate configuration on the switch. To be fair, I didn’t initially ask for this configuration (I didn’t know what I didn’t know at the time). Once that configuration was made on the switch, jumbo frames were making it to both ends of the tunnel was traversed VLANs. Problem solved.
Just one more note on testing for intervlan routing of jumbo frames. Although the switch may be properly configured and jumbo frames are making it through between VLANs, I have found that sending vmkping commands with jumbo frames to the switch interfaces themselves (this would be the default gateway for the VLAN) can be successful and it can also fail. I think it all depends on the switch make and model. Call it a red herring and try not to pay attention to it. What’s important is that the jumbo frames ultimately make it through to the opposite tunnel endpoint.
Third networking problem: The third critical VLAN mentioned above (call it the overlay, call it the Edge Uplink, call it the External Network, call it the DevOps network), is not well understood and is implemented incorrectly. There are few ways you can go wrong here.
- Use the wrong VLAN – in other words a VLAN which has no reachable network services such as DNS, NTP, or a gateway to the internet. You’ll be able to deploy the Kubernetes framework but the deployment of pods requiring access to a public image repository will fail. During deployment, failed pods will quickly stack up in the namespace.
- Using the correct VLAN but using Egress and Ingress CIDR blocks from some other VLAN. This won’t work and it is pretty well spelled out everywhere I’ve looked that the Egress and Ingress CIDR blocks need to be on the same VLAN which represents the External Network. Among other things, the Egress portion is used for outbound traffic through the Tier-0 Gateway to the external network. The image fetcher CRX is one such function which uses Egress. The Ingress portion is used for inbound traffic from the External Network through the Tier-0 Gateway. In fact, the first usable IP address in this block ends up being the Control Plane Node IP Address for the Supervisor Cluster where all the kubectl API commands come through. If you’ve just finished enabling workload management and your Control Plane Node IP Address is not on your external network, you’ve likely assigned the wrong Egress/Ingress CIDR addresses.

Fourth networking problem: The sole edge portgroup that I had created on the distributed switch needs to be in VLAN Trunking mode (1-4094), not VLAN with a specified tag. This one can be easy to miss and early in the beta I missed it. I followed the Project Pacific quickstart guide but don’t ever remember seeing the requirement. It is well documented now on page 55 of the VMware document I mentioned early on.
To summarize the common theme thus far, networking, understanding the requirements, mapping to your environment, and getting it right for a successful vSphere with Kubernetes deployment.
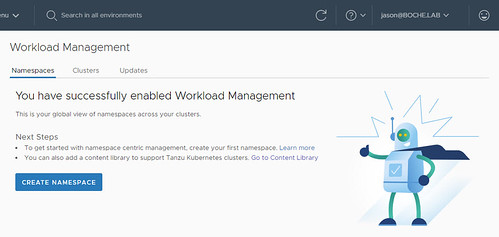
Once the beta had concluded and vSphere 7 was launched, I was anxious to deploy Kubernetes on GA bits. After deploying and configuring NSX-T in the lab, I ran into the licensing obstacle. During the Project Pacific beta, license keys were not an issue. The problem is when we try to enable Workload Management after NSX-T is ready and waiting. Without the proper licensing, I was greeted with This vCenter does not have the license to support Workload Management. You won’t see this in a newly stood up greenfield environment if you haven’t gotten a chance to license the infrastructure. Where you will see it is if you’ve already licensed your ESXi hosts with Enterprise Plus licenses for instance. Since Enterprise Plus licenses by themselves are not entitled to the Kubernetes feature, they will disable the Workload Management feature.

The temporary workaround I found is to simply remove the Enterprise Plus license keys and apply the Evaluation License to the hosts. Once you do this and refresh the Workload Management page, the padlock disappears and I was able to continue with the evaluation.

Unfortunately the ESXi host Evaluation License keys are only good for 60 days. As of this writing, vSphere 7 has not yet been GA for 60 days so anyone who stood up a vSphere 7 GA environment on day 1 still has a chance to evaluate vSphere with Kubernetes.
One other minor issue I’ve run into that I’ll mention has to do with NSX-T Compute Managers. A Compute Manager in NSX-T is a vCenter Server registration. You might be familiar with the process of registering a vCenter Server with other products such as storage array or data protection software. This really is no different.
However, a problem can present itself whereby a vCenter Server has been register to an NSX-T Manager previously, that NSX-T Manager is decommissioned (improperly), and then an attempt is made sometime later to register the vCenter Server with a newly commissioned NSX-T Manager. The issue itself is a little deceptive because at first glance that subsequent registration with a new NSX-T Manager appears successful – no errors are thrown in the UI and we continue our work setting up the fabric in NSX-T Manager.
What lurks in the shadows is that the registration wasn’t entirely successful. The Registration Status shows Not Registered and the Connection Status shows Down. It’s a simple fix really – not something ugly that you might expect in the CLI. Simply click on the Status link and you’re offered an opportunity to Select errors to resolve. I’ve been through this motion a few times and the resolution is quick and effortless. Within a few seconds the Registration Status is Registered and the Connection Status is Up.

Deploying Kubernetes on vSphere can be challenging, but in the end it is quite satisfying. It also ushers in Day 1 Kubernetes. Becoming a kubectl Padawan. Observing the rapid deployment and tear down of applications on native VMware integrated Kubernetes pods. Digging into the persistent storage aspects. Deploying a Tanzu Kubernetes Grid Cluster.
Day 2 Kubernetes is also a thing. Maintenance, optimization, housekeeping, continuous improvement, backup and restoration. Significant dependencies now tie into vSphere and NSX-T infrastructure. Keeping these components healthy and available will be more important than ever to maintain a productive and happy DevOps organization.
I would be remiss if I ended this before calling out a few fantastic resources. David Stamen’s blog series Deploying vSphere with Kubernetes provides a no nonsense walk through highlighting all of the essential steps from configuring NSX-T to enabling workload management. He wraps up the series with demo applications and a Tanzu Kubernetes Grid Cluster deployment.
It should be no surprise that William Lam’s name comes up here as well. William has done some incredible work in the areas of automated vSphere deployments for lab environments. In his Deploying a minimal vSphere with Kubernetes environment article, he shows us how we can deploy Kubernetes on a two or even one node vSphere cluster (this is unsupported of course – a minimum of three vSphere hosts is required as of this writing). This is a great tip for those who want to get their hands on vSphere with Kubernetes but have a limited number of vSphere hosts in their cluster to work with. I did run into one caveat with the two node cluster in my own lab – I was unable to deploy a Tanzu Kubernetes Grid Cluster. After deployment and power on of the the TKG control plane VM, it waits indefinitely to deploy the three worker VMs. I believe the TKG cluster is looking for three supervisor control plane VMs. Nonetheless, I was able to deploy applications on native pods and it demonstrates that William’s efforts enable the community at large to do more with less in their home or work lab environments. If you find his work useful, make a point to reach out and thank him.
How to Validate MTU in an NSX-T Environment – This is a beautifully written chapter. Round up the usual vmkping suspects (Captain Louis Renault, Casablanca). You’ll find them all here. The author also utilizes esxcli (general purpose ESXi CLI), esxcfg-vmknic (vmkernel NIC CLI), nsxdp-cli (NSX datapath), and edge node CLI for diagnostics.
NSX-T Command Line Reference Guide – I stumbled onto this guide covering nsxcli. Although I didn’t use it for getting the Kubernetes lab off the ground, it looks very interesting and useful for NSX-T Datacenter so I’m bookmarking it for later. What’s interesting to note here is nsxcli CLI is run from the ESXi host via installed kernel module, as well as from the NSX-T Manager and the edge nodes.
What is Dell Technologies PowerStore – Part 13, Integrating with VMware Tanzu Kubernetes Grid – Itzik walks through VMware Tanzu Kubernetes Grid with vSphere 7 and Tanzu Kubernetes clusters. He walks through the creation of a cluster with Dell EMC PowerStore and vVols.
Lastly, here’s a cool click-through demo of a Kubernetes deployment on VCF 4.0 – vSphere with Kubernetes on Cloud Foundation (credit William Lam for sharing this link).
With that, I introduce a new blog tag: Kubernetes
Peace out.


Hi Jason,
Great post, thank you for sharing and also for the shoutout.
One minor correction, the minimal vSphere with K8s actually shows how to deploy it on a single node (not 2-Node)
Even better William. I’ll update.
Thanks a lot! This article helps me to fix problems and run kubernetes on vSphere!
A great Post !
Unfortunately, my Juniper switch can not route Jumbe frame with -d option between the ESXi and Edge TEP.
Very helpful post! I’m not new to NSX-T, but new to the Kubernetes deployment, and I’m going through the trial and errors of deployment and guessing the network portions right. Pretty sure your explanation of issue number 3 will be my remedy. Waiting on my newly provisioned larger edge uplink subnets so I can reconfigure and carve out smaller CIDRs from those for the K8s ingress/egress configuration now. Thanks again!
Thank you Jason for the post. I was struggling with the error “vCenter is not licensed for workload”.