Top 10 Free vSphere ESX Tools and Utilities by KendrickColeman.com

May 19th, 2010 by jason No comments »

KendrickColeman.com has compiled a nice list of no-cost VMware vSphere utilities. A grading scale was disclosed to provide a value ranking of the utilities.  Information like this is valuable because I often see questions raised in the virtualization community about low-cost or no-cost ways to do this or that with VMware virtual infrastructure (backup is a frequent request).  I will be the first to admit that lab time is precious.  KendrickColeman.com has used their free time to install, test, and summarize each application for the benefit of the community.  Nice job and on behalf of the virtualization community, Thank You!

Speaking of free, KendirckColeman.com has also pointed to a VMTN forum member who stumbled onto a way to use a free ESXi 4.0 license key to permanently license ESX 4.0.  Interesting find there.

Minneapolis VMUG / Veterans Sock Drive Benefit Friday

May 18th, 2010 by jason No comments »

Friendly reminder that from 1-5pm this Friday, the Minneapolis VMware User Group will hold a quarterly meeting in Bloomington.  I expect a lot of VDI content.  The meeting details can be found here.

Location:
Hilton Minneapolis
Bloomington Ballroom Foyer A
3900 American Boulevard West
Bloomington, MN 55437

In addition…

VMware is proud to work with the Minnesota Assistance Council For Veterans (MACV) by supporting a one day SOCK DRIVE BLITZ at the VMware User Group Meeting (VMUG). 

On Friday 21 May 2010 MACV and VMware will be collecting packages of new white cotton socks (primarily men’s sizes) as part of the MACV Veterans Standdown. The socks collected will then be distributed to homeless veterans in need at the Various standdown events across Minnesota throughtout the year. 

SOCK DRIVE BENEFITTING HOMELESS VETERANS

Items Needed for donations:
Packages of new white cotton socks
(primarily men’s sizes)

Minnesota Assistance Council for Veterans (MACV) is a 501(c) 3 non-profit organization assisting veterans (and their families) in crisis throughout Minnesota for over 18 years including those who are experiencing homelessness. MACV is the only organization of its kind in the State of Minnesota completely dedicated to serving the needs of veterans, and is nationally recognized for its model and success.

P2V Milestone

May 15th, 2010 by jason No comments »

If you’re reading this, that’s good news because it means last night’s P2V completed successfully.  I took the last remaining non-virtualized physical infrastructure server in the lab and made it a virtual machine.  Resource and role wise, this was the largest physical lab server next to the ESX hosts themselves.

Resources:

  • HP Proliant DL380 G3
  • Dual Intel P4 2.8GHz processors
  • 6GB RAM
  • 1/2 TB  local storage
  • Dual Gb NICs
  • Dual fibre channel HBAs

Roles:

  • Windows Server 2003 R2 Enterprise Edition SP2
  • File server
    • binaries
    • isos
    • my documents
    • thousands of family pictures
    • videos
  • Print server
  • IIS web server
    • WordPress blog
    • ASP.NET based family web site
    • other hosted sites
  • DHCP server
  • SQL 2005 server
    • vCenter
    • VUM
    • Citrix Presentation Server
  • MySQL server
    • WordPress blog
  • Backup Sever
  • SAN management

I’m shutting down this last remaining physical server as well as the tape library.  They’ll go in the pile of other physical assets which are already for sale or they will be donated as sales for 32-bit server hardware are slow right now.  This is a milestone because this server, named SKYWALKER – you may have heard me mention it from time to time, has been a physical staple in the lab for as long as the lab has existed (circa 1995).  Granted it has gone through several physical hardware platform migrations, its logical role is historic and its composition has always been physical.  To put it into perspective, at one point in time SKYWALKER was a Compaq Prosignia 300 server with a Pentium Pro processor and a single internal Barracuda 4.3GB SCSI drive.  Before my abilities to acquire server class hardware, it was hand-me-down whitebox parts from earlier gaming rigs.

The P2V (using VMware Converter) took a little over 5 hours for 500GB of storage.  So the only physical servers remaining in the lab are the ESX hosts themselves.  2 DL385 G2s and 2 DL385s which typically remain powered down, earmarked for special projects.  A successful P2V is a great start to a weekend if you ask me.  Now I’m off to my daughter’s T-ball game. 🙂

Microsoft Exchange 2003 to Exchange 2010 Upgrade Notes

May 14th, 2010 by jason No comments »

Last weekend I successfully upgraded, ahem, migrated the lab infrastructure from Microsoft Exchange 2003 to Exchange 2010.  This upgrade has been on my agenda for quite some time but I had been delaying it mainly due to lack of time and thorough knowledge of the steps.  I had a purchased the Microsoft Exchange Server 2010 Administrator’s Pocket Consultant (ISBN: 978-0-7356-2712-3) in January and marked up a few pages with a highlighter.  However, the deeper I got in the book, the more daunting the task seemed to have become, even for a simple one-server environment like mine.  In my mind, Exchange has always been somewhat of a beast, with increasing levels of difficulty as new editions emerged.  The pocket consultant series of books are wonderfully technical, but they haven’t been able to fit in my pocket for about a decade. They contain so much content that it has become difficult to rely on them as a CliffsNotes guide for platform upgrades, especially when it comes to Exchange.

Then two things happened miraculously at the same time.  First, I was invited to a private beta test of a virtualization related iPad application.  As part of this test, I needed to be able to send email from my iPad.  I had been unsuccessful thus far in getting Microsoft Exchange ActiveSync to work with the iPad (even after following Stephen Foskett’s steps) and could only assume that it was due to several years of wear and tear on my Exchange 2003 Server.  I needed to get that upgrade to Exchange 2010 done quickly.  Second, the May 2010 issue of Windows IT Pro magazine showed up in my mailbox.  To my delight, it was chock full of Exchange 2010 goodness, including a cover story of “Exchange 2003 to Exchange 2010 Step-by-Step Exchange Migration”. I’m pretty sure this was divine intervention with the message being “Get it done this weekend, you can do this.”

The upgrade article by Michael B. Smith started on page 26 and was 100% in scope.  The focus was a single server Exchange environment upgrade from 2003 to 2010.  I read the seven page artile in its entirety, marking up key “to-do” steps with a highlighter.  Following are some things I learned along the way:

  1. Naturally the Exchange server is virtualized on VMware vSphere.
  2. My Exchange environment is built upon a foundation that dates back as far as Exchange 5.5 (pre-Active Directory).  There would be no in place upgrades.  Exchange hasn’t provided an upgrade since Exchange 2003.  That suited me just fine as the Exchange 2003 server has been through so much neglect, although it had gotten pretty slow, it’s a miracle it was still functional.  The Exchange migration will consist of bringing up a fresh OS with a new installation of Exchange, and then migrating the mailboxes and services, and then retiring the old Exchange Server.  Microsoft calls this a migration rather than an upgrade.
  3. Exchange must be running in Native mode.  Not a problem, I was already there.
  4. Pre-migration, there exists a hotfix from Microsoft which is recommended to be installed on the Exchange 2003 server.  http://support.microsoft.com/kb/937031/
  5. The Schema Master mast be running Windows Server 2003 SP1 or higher.
  6. There needs to be at least one Global Catalog server at Windows Server 2003 SP1 or higher in the Exchange site.
  7. The AD forest needs to be at Server 2003 Forest Functional Level or higher.
  8. The AD domain needs to be at Server 2003 Domain Functional Level or higher.
  9. For migration flexibility purposes, Exchange 2003 and Exchange 2010 both support DFL and FFL up to Server 2008 R2.
  10. Exchange 2010 requires 64-bit hardware.  No problem, that requirement was met with vSphere .
  11. Exchange 2010 can be installed on Windows Server 2008 or Windows Server 2008 R2.  I naturally opted for R2.  No sense in deploying a two-year old OS when a more current one exists and is supported.  Plus, I personally need more exposure to 2008 and R2… 2003 is getting long in the tooth.
  12. Copy the Exchange DVD to a data/utility drive on the server.  Reason being, you can drop the most recent rollup available into the \Updates\ folder and basically perform a slipstream installation of Exchange with the most recent rollup applied out of the gate.  As of this writing, the most current is Rollup 3.
  13. Here’s a big time saver, install the server roles and features Exchange 2010 requires using the provided script on the DVD:
    \scripts\ServerManagerCmd -ip Exchange-Typical.xml -restart
    Other sample pre-requisite installer scripts can be found here.
  14. The 2007 Office System Converter: Microsoft Filter Pack (x64) is required to be installed.  This is downloadable from Microsoft’s website.  A little strange, but I’ll play along.  It’s required for the Exchange full-text search engine to search Office format documents.
  15. Run the following commands for good measure. It may or may not be required depending on what’s been done to the server so far:
    sc config NetTcpPortSharing start= auto
    net start NetTcpPortSharing
  16. Setup logs for Exchange are found in C:\ExchangeSetupLogs\  The main one is ExchangeSetup.log.  Hopefully you won’t have to rely on these logs and you are blessed with a trouble-free installation.
  17. There are the usual Active Directory preparatory steps to expand the Schema which seem to have increased in quantity but I could be hallucinating:
    1. setup.com /PrepareLegacyExchangePermissions
    2. setup.com /PrepareSchema
    3. setup.com /PrepareAD
    4. setup.com /PrepareAllDomains
  18. Installation can be invoked by CLI with setup.com /mode:install /roles:ca,ht,mb however, I chose a GUI installation which was more intuitive for me.
  19. The article stated the installation would take at least 20 minutes on fast hardware.  My installation took less than 15 minutes on a VM hosted by four year old servers attached to fibre channel EMC Celerra storage – bitchin.
  20. A Send connector is required before Exchange 2010 will route mailto the internet.
  21. Exchange 2010 ships with two Receive connectors but they must be configured before they will accept anonymous email from the internet.
  22. Exchange 2010 is managed by the Exchange Management Console which is called the EMC for short.  That will be easy to remember.
  23. Exchange 2010 is also managed by PowerShell scripts (also called an Exchange Management Shell, or EMS for short).  There are some configuration tasks which can only be made via PowerShell script and not via the EMC.
  24. Lend your end users and Helpdesk staff a hand by creating a meta-refresh document in C:\inetpub\wwwroot\ which points to https://<mail_server_fqdn>/owa effectively teleporting them into Outlook Web App (did you catch the name change? no more Outlook Web Access)
  25. Mailboxes are no longer moved online due to their potential size and problems which may occur if a mailbox is accessed during migration.  Mailbox migrations are now handled via EMC by way of a Move Request (either local [same org] or remote[different org]).  When a move request is submitted, the process begins immediately but may take some time to complete obviously based on the size of the mailbox as well as the quantity of mailboxes multiple selected for the move request.  Tony Redmond wrote a decent article on how this is done.  Scheduled move requests can be instantiated via PowerShell script.
  26. One of the final steps of a successful migration is properly decommissioning the old Exchange 2003 environment.  This is where things got a little hairy, and I half wasn’t surprised.  Upon attempting to uninstall Exchange 2003 to properly remove its tentacles from Active Directory and the Exchange organization, I was greeted by two errors in the following message:
    5-9-2010 9-16-31 PM
    In the legacy Exchange 2003 System Manager, there are two Recipient Update policies which exist.  Going from memory, one was for the domain which I was able to remove easily, and one was an Enterprise policy which cannot be removed via the System Manager.  Follow the instructions near the end of this article for the procedure to modify Active Directory with adsiedit.
    The second error message deals with removal of the legacy Routing Group Connector.  There were actually two which needed to be removed.  The only way to remove the Routing Group Connector is via PowerShell and it is also described towards the end of this article.
  27. After addressing the issues above, the uninstaller ran briefly and then failed for an unknown reason.  Upon attempting to re-run the uninstall, I noticed the ability uninstall Exchange 2003 via Add/Remove Programs in the Control Panel had disappeared, as if it was successfully uninstalled. Clearly it was not as the Exchange services still existed, were running, and I could launch System Manager and manage the organization.
  28. ActiveSync doesn’t work out of the box on privileged administrator level accounts due to security reasons.  If you accept the risk, this behavior can be changed by enabling the inheritance checkbox on the user account security property sheet.

I’m pretty happy with the results.  The process took took quite a few steps but I am nonetheless pleased.  Careful work following a very nicely outlined procedure by Michael B. Smith has yielded both a snappy-fast Exchange 2010 server on Windows Server 2008 R2 as well as ActiveSync integration with my iPad.  Exchange 2010 is a beast.  I can’t imagine tackling an Exchange project for anything larger than the smallest of environments.  I’m not sure how I can have so many years experience managing my own small Exchange environment yet still lack the confidence in the technology.  I guess it mostly runs itself and as I said earlier, it’s quite resilient meaning it doesn’t require much care and feeding from me.  And thank God for that.

NetApp disk replacement – so easy a caveman and his tech savvy neighbor can do it

May 13th, 2010 by jason No comments »

The NetApp filer in the lab recently encountered a failed disk.  With the failed disk confirmed dead and removed, and the replacement disk added, I made my first attempt at replacing a failed disk in a NetApp filer.

fas3050clow*> disk assign 0a.29
disk 0a.29 (S/N 3HY0T1GG00007342W9NJ) is already owned by system cr2conffd03 (ID
 84173417).
disk assign: Assign failed for one or more disks in the disk list.

Detour.  The following parsed output confirmed this disk had ownership information from a previous filer in its DNA:

fas3050clow*> disk show -a
  DISK       OWNER                  POOL   SERIAL NUMBER
———— ————-          —–  ————-
0a.29        cr2conffd03(84173417)   Pool0  3HY0T1GG00007342W9NJ

Quick help from the community set me in the right direction.  A few commands accomplished the required task:

fas3050clow*> priv set advanced
fas3050clow*> disk assign 0a.29 -s unowned -f
Note: Disks may be automatically assigned to this node, since option disk.auto_a
ssign is on.
fas3050clow*> disk assign 0a.29
Thu May 13 13:30:56 CDT [fas3050clow: diskown.changingOwner:info]: changing owne
rship for disk 0a.29 (S/N 3HY0T1GG00007342W9NJ) from unowned (ID -1) to fas3050c
low (ID 101175198)
Thu May 13 13:30:56 CDT [fas3050clow: HTTPPool00:warning]: HTTP XML Authenticati
on failed from 192.168.110.71.
fas3050clow*> Thu May 13 13:30:56 CDT [fas3050clow: diskown.RescanMessageFailed:
warning]: Could not send rescan message to fas3050clow. Please type disk show on
 the console of fas3050clow for it to scan the newly inserted disks.
Thu May 13 13:30:56 CDT [fas3050clow: raid.assim.label.upgrade:info]: Upgrading
RAID labels.
Thu May 13 13:30:57 CDT [fas3050clow: disk.fw.downrevWarning:warning]: 1 disks h
ave downrev firmware that you need to update.
Thu May 13 13:31:00 CDT [fas3050clow: monitor.globalStatus.ok:info]: The system’
s global status is normal.

Shortly after, the firmware on the replacement disk was automatically upgraded:

Thu May 13 13:31:18 CDT [fas3050clow: dfu.firmwareDownloading:info]: Now downloa
ding firmware file /etc/disk_fw/X274_SCHT6146F10.NA16.LOD on 1 disk(s) of plex [
Pool0]…

I confirmed via NetApp System Manager (my GUI crutch), that the replaced disk is now a spare for the two aggregates configured on/owned by the head.  I then updated the storage array spreadsheet I maintain which tracks disks, spares, arrays, luns, aggregates, volumes, exports, groups, pools, etc. for the various lab storage.

One additional item I learned from a NetApp Engineer is that spares are not to remain static.  Rather, the role is designed to float around to different disks as failures can and will occur.  This is a habit I’m learning to break which contradicts management of older storage arrays where spares instantiated to active duty were later deactivated when a failed disk was replaced.

As Erick Moore suggests in the comments, don’t forget to exit privileged mode when done:

fas3050clow*> priv set

Jason Langer, the spreadsheet is really nothing special. Merely a tool I use to keep track of the storage configurations. Following is a screenshot:

SnagIt Capture

NetApp Deduplication

May 10th, 2010 by jason No comments »

NetApp FAS 3050cQuick tip if you use NetApp filer storage and you’d like to enable Deduplication (dedupe) and actually have it work as it was designed: Size the volumes and aggregates according to NetApp Deduplication for FAS and V-Series Deployment and Implementation Guide (TR-3505). What happens if you don’t provide enough breathing room for dedupe to run? In my experience, it runs for a second or two and completes successfully, but it does not deduplicate any data.

The deduplication metadata overhead space required boils down to a few variables: Data ONTAP version, volumes, and data within the volumes.  All three make up the calculation.  Specifically look at the tail end of section 3.3 on pages 17-18. 

For Data ONTAP 7.3.x, which is what I have on the NetApp FAS 3050c filer, the following calculation applies:

1. Volume deduplication overhead – for each volume with deduplication enabled, up to 2% of the logical amount of data written to that volume will be required in order to store volume dedupe metadata.  This is free space needed in the volume.

2. Aggregate deduplication overhead – for each aggregate that contains any volumes with dedupe enabled, up to 4% of the logical amount of data contained in all of those volumes with dedupe enabled will be required in order to store the aggregate dedupe metadata.  This is free space needed in the aggregate.

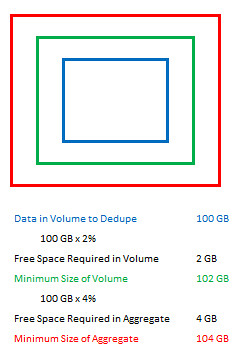
An example used in the document:

If 100GB of data is to be deduplicated within a single volume, then there should be 2GB worth of available space within the volume and 4GB of space available within the aggregate.

Could be visualized as:

 5-10-2010 8-34-44 PM

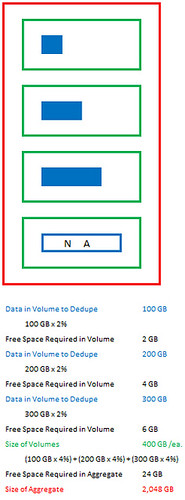
A second example with multiple volumes:

Consider a 2TB aggregate with 4 volumes each 400GB’s in size within the aggregate where three volumes are to be deduplicated, with 100GB of data, 200GB of data and 300GB of data respectively. The volumes will need 2GB, 4GB, and 6GB of space within the respective volumes; and, the aggregate will need a total of 24GB ((4% of 100GB) + (4% of 200GB) + (4%of 300GB) = 4+8+12 = 24GB) of space available within the aggregate.

Could be visualized as:

5-10-2010 8-55-30 PM

If you’ve got a filer in which to carve out some storage which needs to be deduplicated, you can go about the calculation from a few different directions. 

  • You can start with the aggregate whose size will be determined by spindles and protection level, then plug the remaining numbers to come up with a volume size and maximum data set size. 
  • Or maybe you already have the size of the data set which needs to be deduplicated.  In this case, you can work the other way and determine the size of the volume required (leaving 2% available) as well as the size of the aggregate (leaving 4% available).

I take full credit for the MS Excel diagrams above. Eat your heart out Hany Michael 🙂

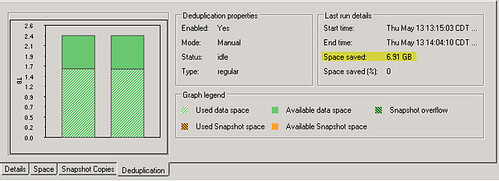
Update 5/13/10:  Here’s another item I stumbled on… Once dedupe completes, it may not reflect any savings in the “Space saved” field highlighted below.  In my case, this occurred because the iSCSI LUN carved out of the volume was not thin provisioned. 

5-13-2010 6-38-08 PM

Vaughn Stewart of NetApp explained it as follows:

With NetApp, thick provisioned LUNs reserve space in the FlexVol. In other words it is a storage accounting function and not a fully written out file (like a VMDK).

If data in the LUN is deduped, the savings cannot be displayed if the thick LUN reservation is in place. Toggle the LUN to thin and savings should magically appear.

There is absolutely no change in the data layout or performance with thick or thin LUNs (thus why you can toggle the function).

This was resolved by editing the LUN properties and unchecking the “Reserved” box, and then rerunning the deduplication process on the volume.

QuickPress – VMs Per…

May 7th, 2010 by jason No comments »

I’m trying out my frist QuickPress. Let’s see how this turns out.
Right off the bat, I’m missing the autocomplete feature for Tags. As it turns out, typing more than three lines in the small content box isn’t much fun.

On with the VMware content… This all comes from the VMware vSphere Configuration Maximums document.  I’ve bolded some of what I’d call core stats which capacity planners or architects would need to be aware of on a regular basis:

15,000 VMs registered per Linked-mode vCenter Server
10,000 powered on VMs per Linked-mode vCenter Server
4,500 VMs registered per 64-bit vCenter Server
4,000 VMs concurrently scanned by VUM (64-bit)
3,000 powered on VMs per 64-bit vCenter Server
3,000 VMs registered per 32-bit vCenter Server
3,000 VMs connected per Orchestrator
2,000 powered on VMs per 32-bit vCenter Server
1,280 powered on VMs per DRS cluster
320 VMs per host (standalone)
256 VMs per VMFS volume
256 VMs per host in a DRS cluster
200 VMs concurrently scanned by VUM (32-bit)
160 VMs per host in HA cluster with 8 or fewer hosts (vSphere 4.0 Update 1)
145 powered on Linux VMs concurrently scanned per host
145 powered on Linux VMs concurrently scanned per VUM server
145 VMs per host scanned for VMware Tools
145 VMs per host scanned for VMware Tools upgrade
145 VMs per host scanned for virtual machine hardware
145 VMs per host scanned for virtual machine hardware upgrade
145 VMs per VUM server scanned for VMware Tools
145 VMs per VUM server scanned for VMware Tools upgrade
100 VMs per host in HA cluster with 8 or fewer hosts (vSphere 4.0)
72 powered on Windows VMs concurrently scanned per VUM server
40 VMs per host in HA cluster with 9 or more hosts
10 powered off Windows VMs concurrently scanned per VUM server
6 powered on Windows VMs concurrently scanned per host
6 powered off Windows VMs concurrently scanned per host
5 VMs per host concurrently remediated

Got all that?

Update 5/10/10: Added the row 160 VMs per host in HA cluster with 8 or fewer hosts (vSphere 4.0 Update 1) – Thanks for the catch Matt & Joe!