The NetApp filer in the lab recently encountered a failed disk. With the failed disk confirmed dead and removed, and the replacement disk added, I made my first attempt at replacing a failed disk in a NetApp filer.
fas3050clow*> disk assign 0a.29
disk 0a.29 (S/N 3HY0T1GG00007342W9NJ) is already owned by system cr2conffd03 (ID
84173417).
disk assign: Assign failed for one or more disks in the disk list.
Detour. The following parsed output confirmed this disk had ownership information from a previous filer in its DNA:
fas3050clow*> disk show -a
DISK OWNER POOL SERIAL NUMBER
———— ————- —– ————-
0a.29 cr2conffd03(84173417) Pool0 3HY0T1GG00007342W9NJ
Quick help from the community set me in the right direction. A few commands accomplished the required task:
fas3050clow*> priv set advanced
fas3050clow*> disk assign 0a.29 -s unowned -f
Note: Disks may be automatically assigned to this node, since option disk.auto_a
ssign is on.
fas3050clow*> disk assign 0a.29
Thu May 13 13:30:56 CDT [fas3050clow: diskown.changingOwner:info]: changing owne
rship for disk 0a.29 (S/N 3HY0T1GG00007342W9NJ) from unowned (ID -1) to fas3050c
low (ID 101175198)
Thu May 13 13:30:56 CDT [fas3050clow: HTTPPool00:warning]: HTTP XML Authenticati
on failed from 192.168.110.71.
fas3050clow*> Thu May 13 13:30:56 CDT [fas3050clow: diskown.RescanMessageFailed:
warning]: Could not send rescan message to fas3050clow. Please type disk show on
the console of fas3050clow for it to scan the newly inserted disks.
Thu May 13 13:30:56 CDT [fas3050clow: raid.assim.label.upgrade:info]: Upgrading
RAID labels.
Thu May 13 13:30:57 CDT [fas3050clow: disk.fw.downrevWarning:warning]: 1 disks h
ave downrev firmware that you need to update.
Thu May 13 13:31:00 CDT [fas3050clow: monitor.globalStatus.ok:info]: The system’
s global status is normal.
Shortly after, the firmware on the replacement disk was automatically upgraded:
Thu May 13 13:31:18 CDT [fas3050clow: dfu.firmwareDownloading:info]: Now downloa
ding firmware file /etc/disk_fw/X274_SCHT6146F10.NA16.LOD on 1 disk(s) of plex [
Pool0]…
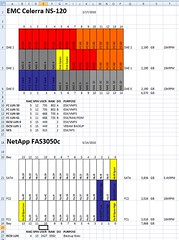
I confirmed via NetApp System Manager (my GUI crutch), that the replaced disk is now a spare for the two aggregates configured on/owned by the head. I then updated the storage array spreadsheet I maintain which tracks disks, spares, arrays, luns, aggregates, volumes, exports, groups, pools, etc. for the various lab storage.
One additional item I learned from a NetApp Engineer is that spares are not to remain static. Rather, the role is designed to float around to different disks as failures can and will occur. This is a habit I’m learning to break which contradicts management of older storage arrays where spares instantiated to active duty were later deactivated when a failed disk was replaced.
As Erick Moore suggests in the comments, don’t forget to exit privileged mode when done:
fas3050clow*> priv set
Jason Langer, the spreadsheet is really nothing special. Merely a tool I use to keep track of the storage configurations. Following is a screenshot:


Technically all you needed to do was replace the failed disk, then assign it to the SAN head that you wanted to own the disk. If you didn’t have any unowned disk you could just assign all unowned disk to that system. There is no reason to go into “priv set advanced” to make all of this happen.
san1> disk assign all -o “san1”
san1> disk zero spares
It is also best practice to pre-zero your spare disk as the second command listed shows. Also make certain you type “priv set” to get out of advanced mode.
Thanks for the tip Erick. Assigning of the disk failed, complaining the disk belonged to another filer.
Gotcha. When we replace a failed disk we usually see something like this in the /etc/messages file:
Mon May 3 09:53:44 MST [sanName: raid.disk.missing:info]: Disk 1b.99 Shelf 6 Bay 3 [NETAPP X268_HGEMIT75SSX A90A] S/N [P8H5MU9E] is missing from the system
Then once the replacement is inserted:
Mon May 3 10:01:27 MST [sanName: unowned.disk.reminder:info]: 1 disks are currently unowned. Use ‘disk assign’ to assign the disks to a filer.
Interesting that you didn’t get this behavior. Did you manually fail the disk?
Hey Jason,
Mind sharing that storage array spreadsheet you made the comment about? 🙂
TIA,
-Jason
Definitely an atypical replacement experience to be honest (speaking as someone who replaced 100+ disks as a customer and now as a vendor SE has a lot of NetApp customers).
The general process usually is….
-get an email about a failed disk (RAID rebuild starts right now)
-new disk shows up with 4 hours or next day (by which time the rebuild is usually already done)
-walk out to NetApp and pull the disk with the orange light (helps not to be colorblind)
-put in the new disk
-look in System Manager just to confirm your system sees all its disks
Almost ridicously simple to be honest most of the time…. (disk auto-assignment usually assigns the replacement disk to the same controller as the failed disk)
It is very odd that you got a spare that wasn’t zeroed and was still assigned to another system (they should always be zeroed — i.e. NetApp isn’t supposed to ship customers replacement disks with other customers data on them (even if said data is pretty much unreadable without having the WAFL patents ;-).
I’m confident in NetApp that the replacement disk did not contain customer data. It was likely a lab pull. This drive replacement was a special circumstance.
Jason Langer, the spreadsheet is really nothing special. Merely a tool I use to keep track of the storage configurations. I’ve updated the post with a screenshot.
Sorry for the late reply, YES they were disks from a lab pull. I pulled them from my lab. And Andrew is spot on as usual. Only in cases where disks have been previously owned by a different controller will this procedure have to be performed and that was what happened in this case. Normally it is just look for the light, and pull. Now the only caveat is if you dont have auto assign enabled then you will have to assign ownership to a disk.
More on disk ownership here: http://bit.ly/bi3dDx