Collecting diagnostic information for VMware vCloud Director

December 12th, 2011 by jason 1 comment »

I’ve gone a few rounds with VMware vCloud Director in as many weeks recently.  I’ve got an upcoming blog post on a vCenter Proxy Service issue I’ve been dealing with but until I collect the remaining details on that, I thought I’d point out VMware KB 1026312 Collecting diagnostic information for VMware vCloud Director.  This knowledge base article details the steps required to collect the necessary support logs for both vCD versions 1.0 and 1.5.

The vmware-vcd-support script collects host log information as well as these vCloud Director logs. The script is located in the following folders:

For vCloud Director 1.0, run /opt/vmware/cloud-director/bin/vmware-vcd-support

For vCloud Director 1.5, run /opt/vmware/vcloud-director/bin/vmware-vcd-support

Once executed, the script will bundle the following log files from /opt/vmware/vcloud-director/logs/ into a .tgz tarball saving it in the directory from which the script was run (providing there is enough storage available):

  1. cell.log – Console output from the vCloud Director cell.
  2. diagnostics.log – Cell diagnostics log. This file is empty unless diagnostics logging is enabled in the local logging configuration.
  3. vcloud-container-info.log – Informational log messages from the cell. This log also shows warnings or errors encountered by the cell.
  4. vcloud-container-debug.log – Debug-level log messages from the cell.
  5. vcloud-vmware-watchdog.log – Informational log messages from the cell watchdog. It records when the cell crashes, is restarted, etc.

On the subject of vCD log files, also mentioned in the KB article is VMware KB 1026815 Configuring logging for VMware vCloud Director.  The information in this article is useful for specifying the quantity and size of vCD log files to be maintained on the cell server.

Once the log files have been collected, you may analyze them offline or upload them to VMware’s FTP site in association with an SR by following VMware KB 1008525 Uploading diagnostic information to VMware.

BrownBag Blow Out – vSphere Lab Give Away

December 9th, 2011 by jason No comments »

Snagit CaptureCody Bunch over at ProfessionalVMware has pulled together a whole bunch of fantastic lab resources which he plans to give away to one lucky contest winner at the BrownBag Blow Out – vSphere Lab Give Away.  This is a great opportunity to walk away with books, videos, 1×1 VCAP training, storage, laptop PC, VMware Workstation, VMware exam vouchers, a brand new v3 vCalendar from you-know-who, and maybe more (I hear Cody has a book coming…)

Contest Rules:

1) Create and send a 1 – 3 minute video, explaining who you are and how you think the lab would help you.

2) Shipping to US addresses only.

3) Employees of prize vendors and Cody’s tight friends are ineligible.

4) Entries must be received by midnight 12/13.

5) Winner will be announced between 12/14 and 12/16.

6) The very best of luck to all contestants and may the luckiest and most deserving person win. If you sue Cody or cause trouble for him you will be the biggest loser.

Head on over there now & submit your entry!

Mostafa Khalil Makes Twitter Debut With VMware Nostalgia

December 7th, 2011 by jason No comments »

SnagIt CaptureFor the Twitter folks… (The Real) Mostafa Khalil (@MostafaVMW, VCDX #2) is now on Twitter.  I’d recommend following him as there are some amazing changes brewing on the vSphere storage horizon.  Hopefully he’ll privilege us on a semi regular basis with bits from his great storage mind.

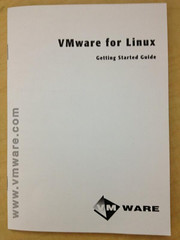
For the non Twitter folks…  Seven days ago, Mostafa posted the picture shown below.  It’s the Getting Started Guide for VMware Workstation 1.0 for Linux. It comes to us from the year 1999.

SnagIt Capture

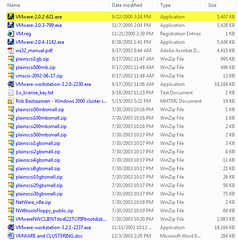
Seeing this is enough to make a vEvangelist tear up.  I’d love to get my hands on this product at some point and take it for a spin.  Perhaps I’ll have a chance if the VMTN Subscription makes its return.  My VMware journey didn’t start until a year later with Workstation 2.0.2 for Windows.  Look at the file size – 5MB.

SnagIt Capture

Expanding vCloud Director Transfer Server Storage

December 5th, 2011 by jason No comments »

Installing vCloud Director 1.5 can be like installing a VCR.  For the most part, you can get through it without reading the instructions.  However, there may be some advanced or obscure features (such as programming the clock or automatically recording a channel) which require knowledge you’ll only pick up by referring to the documentation.  Such is the case with vCD Transfer Server Storage.  Page 13 of the vCloud Director Installation and Configuration Guide discusses Transfer Server Storage as follows:

To provide temporary storage for uploads and downloads, an NFS or other shared storage volume must be accessible to all servers in a vCloud Director cluster. This volume must have write permission for root. Each host must mount this volume at $VCLOUD_HOME/data/transfer, typically /opt/vmware/vcloud-director/data/transfer. Uploads and downloads occupy this storage for a few hours to a day. Transferred images can be large, so allocate at least several hundred gigabytes to this volume.

This is the only VMware documentation I could find covering Transfer Server Storage.  There is a bit of extra information revealed about Transfer Server Storage upon the initial installation of the vCD cell which basically states that at that point in time you should configure Transfer Server Storage to point to shared NFS storage for all vCD cells to use, or if there is just a single cell, local cell storage may be used:

If you will be deploying a vCloud Director cluster you must mount the shared transfer server storage prior to running the configuration script.  If this is a single server deployment no shared storage is necessary.

Transfer Server Storage is used for uploading and downloading (exporting) vApps.  A vApp is one or more virtual machines with associated virtual disks.  Small vApps in .OVF format will consume maybe 1GB (or potentially less depending on its contents).  Larger vApps could be several hundred GBs or beyond.  By default, Transfer Server Storage will draw capacity from /.  Lack of adequate Transfer Server Storage capacity will result in the inability to upload or download vApps (it could also imply you’re out of space on /).  Long story short, if you skipped the brief instructions on Transfer Server Storage during your build of a RHEL 5 vCD cell, at some point you may run short on Transfer Server Storage and even worse you’d run / out of available capacity.

I ran into just such a scenario in the lab and thought I’d just add a new virtual disk with adequate capacity, create a new mount point, and then adjust the contents of /etc/profile.d/vcloud.sh (export VCLOUD_HOME=/opt/vmware/vcloud-director) to point vCD to the added capacity.  I quickly found out this procedure does not work.  The vCD portal dies and won’t start again.  I did some searching and wound up at David Hill’s vCloud Director FAQ which confirms the transfer folder cannot be moved (Chris Colotti has also done some writing on Transfer Server Storage here in addition to related content I found on the vSpecialist blog).  However, we can add capacity to that folder by creating a new mount at that folder’s location.

I was running into difficulties trying to extend / so I collaborated with Bob Plankers (a Linux and Virtualization guru who authors the blog The Lone Sysadmin) to identify the right steps, in order, to get the job done properly for vCloud Director.  Bob spent his weekend time helping me out with great detail and for that I am thankful.  You rule Bob!

Again, consider the scenario: There is not enough Transfer Server Storage capacity or Transfer Server Storage has consumed all available capacity on /.  The following steps will grow an existing vCloud Director Cell virtual disk by 200GB and then extend the Transfer Server Storage by that amount.  The majority of the steps will be run via SSH, local console or terminal:

  1. Verify rsync is installed. To verify, type rsync followed by enter. All vCD supported versions of RHEL 5 (Updates 4, 5, and 6) should already have rsync installed.  If a minimalist version of RHEL 5 was deployed without rsync, execute yum install rsync to install it (RHN registration required).
  2. Gracefully shut down the vCD Cell.
  3. Now would be a good time to capture a backup of the vCD cell as well as the vCD database if there is just a single cell deployed in the environment.
  4. Grow the vCD virtual disk by 200 GB.
  5. Power the vCD cell back on and at boot time go into single user mode by interrupting GRUB (press an arrow key to move the kernel selection).  Use ‘a‘ to append boot parameters. Append the word single to the end (use a space separator) and hit enter.
  6. Use # sudo fdisk /dev/sda to partition the new empty space:
    1. Enter ‘n’ (for new partition)
    2. Enter ‘p’ (for primary)
    3. Enter a partition number.  For a default installation of RHEL 5 Update 6, 1 and 2 will be in use so this new partition will likely be 3.
    4. First cylinder… it’ll offer a number, probably the first free cylinder on the disk. Hit enter, accept the default.
    5. Last cylinder… hit enter. It’ll offer you the last cylinder available. Use it all!
    6. Enter ‘x’ for expert mode.
    7. Enter ‘b’ to adjust the beginning sector of the partition.
    8. Enter the partition number (3 in this case).
    9. In this step align the partition to a multiple of 128.  It’ll ask for “new beginning of data” and have a default number. Take that default number and round it up to the nearest number that is evenly divisible by 128. So if the number is 401660, I take my calculator and divide it by 128 to get the result 3137.968. I round that up to 3138 then multiply by 128 again = 401664. That’s where I want my partition to start for good I/O performance, and I enter that.
    10. Now enter ‘w’ to write the changes to disk. It’ll likely complain that it cannot reread the partition table but this is safe to ignore.
  7. Reboot the vCD cell using shutdown -r now
  8. When the cell comes back up, we need to add that new space to the volume group.
    1. pvcreate /dev/sda3 to initialize it as a LVM volume. (If you used partition #4 then it would be /dev/sda4).
    2. vgextend VolGroup00 /dev/sda3 to grow the volume.
  9. Now create a filesystem:
    1. lvcreate –size 199G –name transfer_lv VolGroup00 to create a logical volume 199 GB in size named transfer_lv. Adjust the numbers as needed. Notice we cannot use the entire space available due to slight overhead.
    2. mke2fs -j -m 0 /dev/VolGroup00/transfer_lv to create an ext3 filesystem on that logical volume.  The -j parameter indicates journaled, which is ext3.  The -m 0 parameter tells the OS to reserve 0% of the space for the superuser for emergencies. Normally it reserves 5%, which is a complete waste of 5% of your virtual disk.
  10. Now we need to mount the filesystem somewhere where we can copy the contents of /opt/vmware/vcloud-director/data/transfer first.  mount /dev/VolGroup00/transfer_lv /mnt will mount it on /mnt which is a good temporary spot.
  11. Stop the vCloud Director cell service to close any open files or transactions in flight with service vmware-vcd stop.
  12. rsync -av /opt/vmware/vcloud-director/data/transfer/ /mnt to make an exact copy of what’s there. Mind the slashes, they’re important.
  13. Examine the contents of /mnt to be sure everything from /opt/vmware/vcloud-director/data/transfer was copied over properly.
  14. rm -rf /opt/vmware/vcloud-director/data/transfer/* to delete the file and directory contents in the old default location. If you mount over it, the data will still be there sucking up disk space but you won’t be able to see it (instead you’ll see lost+found). Make sure you have a good copy in /mnt!
  15. umount /mnt to unmount the temporary location.
  16. mount /dev/VolGroup00/transfer_lv /opt/vmware/vcloud-director/data/transfer (all one line) to mount it in the right spot.
  17. df -h to confirm the mount point is there and vCD data (potentially along with transient transfer storage files) is consuming some portion of it.
  18. To auto mount correctly on reboot:
    1. nano -w /etc/fstab to edit the filesystem mount file.
    2. At the very bottom add a new line (but no blank lines between) that looks like the rest, but with our new mount point. Use tab separation between the fields. It should look like this:
      /dev/VolGroup00/transfer_lv /opt/vmware/vcloud-director/data/transfer/ ext3 defaults 1 2
    3. Ctrl-X to quit, ‘y’ to save modified buffer, enter to accept the filename.
  19. At this time we can either start the vCD cell with service vmware-vcd start or reboot to ensure the new storage automatically mounts and the cell survives reboots. If after a reboot the vCD portal is unavailable, it’s probably due to a typo in fstab.

This procedure, albeit a bit lengthy and detailed, worked well and was the easiest solution for my particular scenario.  There are some other approaches which would work to solve this problem.  One of them would be almost identical to the above but instead of extending the virtual disk of the vCD cell, we could add a new virtual disk with the required capacity and then mount it up.  Another option would be to build a new vCloud Director server with adequate space and then decommission the first vCD server.  This wasn’t an option for me because the certificate key files for the first vCD server no longer existed.

vSphere 5 Clustering Technical Deepdive Sale

November 26th, 2011 by jason No comments »

I assume you follow Duncan and Frank and read their blogs, but in case you don’t, check out this Crazy Black Friday / Cyber Monday deal!  Between now and Monday 11:59pm PST, prices are slashed on Frank and Duncan’s ebook vSphere 5 Clustering Technical Deepdive.

The sale pricing is as follows:

US – ebook – $ 4.99

UK – ebook – £ 3.99

DE – ebook – € 3.99

FR – ebook – € 3.99

If you’re serious about vSphere 5, you need this book in your technical library.  Even if you’re already a seasoned vSphere expert, there are some major changes in the features which Duncan and Frank deepdive on.  Tis the season for giving so if you already have a copy for yourself, take advantage of these prices to pick up another copy for your favorite co-worker, employee, manager, spouse, or child.  Now is as good a time as any to get the young ones started on VMware virtualization.

Cloning VMs, Guest Customization, & vDS Ephemeral Port Binding

November 25th, 2011 by jason No comments »

I spent a lot of time in the lab over the past few days.  I had quite a bit of success but I did run into one issue in which the story does not have a very happy ending.

The majority of my work involved networking in which I decommissioned all legacy vSwitches in the vSphere 5 cluster and converted all remaining VMkernel port groups to the existing vNetwork Distributed Switch (vDS) where I was already running the majority of the VMs on Static binding port groups.  In the process, some critical infrastructure VMs were also moved to the vDS including the vCenter, SQL, and Active Directory domain controller servers.  Because of this, I elected to implement Ephemeral – no binding for the port binding configuration of the VM port group which all VMs were connected to, including some powered off VMs I used for cloning to new virtual machines.  This decision was made in case there was a complete outage in the lab.  Static binding presents issues where in some circumstances, VMs can’t power on when the vCenter Server (Control Plane of the vDS) is down or unavailable.  Configuring the port group for Ephemeral – no binding works around this issue by allowing VMs to power on and claim their vDS ports when the vCenter Server is down.  There’s a good blog article on this subject by Eric Gray which you can find here.

Everything was working well with the new networking configuration until the following day when I tried deploying new virtual machines by cloning powered off VMs which were bound to the Ephemeral port group.  After the cloning process completed, the VM powered on for the first time and Guest Customization was then supposed to run.  This is where the problems came up.  The VMs would essentially hang just after guest customization was invoked by the vCenter Server.  While watching the remote console of the VM, it was evident that Guest Customization wasn’t starting.  At this point, the VM can’t be powered off – an error is displayed:

Cannot power Off vm_name on host_name in datacenter_name: The attempted operation cannot be performed in the current state (Powered on).

DRS also starts producing occasional errors on the host:

Unable to apply DRS resource settings on host host_name in datacenter_name. The operation is not allowed in the current state.. This can significantly reduce the effectiveness of DRS.

VMware KB 1004667 speaks to a similar circumstance where a blocking task on a VM (in this case a VMware Tools installation) prevents any other changes to it.  This speaks to why the VM can’t be powered off until the VMware Tools installation or Guest Customization process either ends or times out.

Finally, the following error in the cluster Events is what put me on to the suspicion of Ephemeral binding as the source of the issues:

Error message on vm_name on host_name in datacenter_name: Failed to connect virtual device Ethernet0.

Error Stack:

Failed to connect virtual device Ethernet0.

Unable to get networkName or devName for ethernet0

Unable to get dvs.portId for ethernet0

I searched the entire vSphere 5 document library for issues or limitations related to the use of Ephemeral – no binding but came up empty.  This reinforced my assumption that Ephemeral binding across the board for all VMs was a supported configuration.  Perhaps it is for running virtual machines but in my case it fails when used in conjunction with cloning and guest customization.  In the interim, I’ve moved off Ephemeral binding back to Static binding.  Cloning problem solved.

Enabling VMware View PCoIP Copy/Paste

November 22nd, 2011 by jason No comments »

Last month, I started the thread VMware View 5.0 copy/paste operations problem on the VMware Community forums looking for some expertise on a problem I ran into with View 5.0 and PCoIP. I could use the copy/paste function successfully going from my desktop PC to the VDI session. However, the problem was that I could not copy/paste in the opposite direction from the VDI session to my desktop PC. I tried the following entries in the .vmx file of the VDI session:

isolation.tools.copy.disable = false

isolation.tools.paste.disable = false

Update 8/18/15: VMware KB describing VM and host level configuration Clipboard Copy and Paste does not work in vSphere Client 4.1 and later (1026437)

The added configurations above didn’t resolve the issue in any way so I removed them. As the forum thread progressed, some individuals recommended using the VMware View provided GPO templates. Taking a look in the directory c:\Program Files\VMware\VMware View\Server\extras\GroupPolicyFiles\ on the View Connection Server, I found several Active Directory Group Policy templates.SnagIt Capture

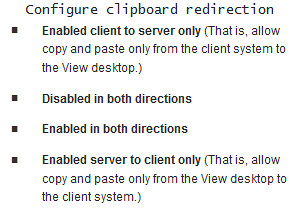
The required policy can be found in the pcoip.adm template. It’s called Configure clipboard redirection (note that for this to work, virtual channels must not be disabled. You can read more about View PCoIP General Session Variables here). I configured the policy for Enabled in both directions and applied the computer portion of the policy to the OU where the VDI session computer account object lives (I disabled the user portion of the GPO).

After forcing GPO updates on the VDI session and reconnecting a few times, copy/paste still didn’t work from the VDI session to my desktop PC. It wasn’t until after a reboot of the VDI session that the policy took effect and copy/paste worked bidirectionally.

Special thanks goes out to the community members who helped me get this sorted: wponder, srodenburg, SrinivasM, cmarkus, and Linjo. You and all of the others who make up the VMTN Community are an asset to VMware and to those seeking assistance.