vSphere 7 is one of the most anticipated releases of VMware’s flagship product ever (prior to that, it’s probably going to be vCenter 2.0 and ESX 3.0 which introduced clustering, DRS, and HA). I spent quite a bit of time with it during beta. Now that it has been GA for a few weeks, I’m having quite a good time with the refresh and the cool new features and enhancements that come with it.
If you’re anything like me, you habitually do two things in the lab:
Configure session.timeout = 0 in /etc/vmware/vsphere-ui/webclient.properties
Stay logged into the vSphere Client for weeks
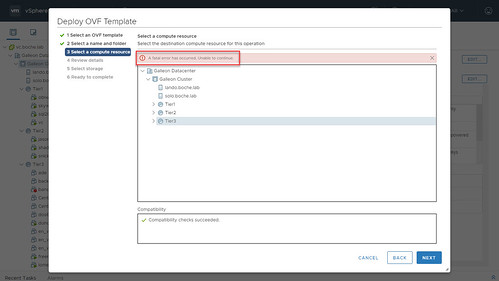
I’ve found in vSphere 7 that can lead to a problem. For instance, I was recently attempting to deploy a vRealize Operations Manager OVF template. At step three Select a compute resource I was presented with the error A fatal error has occurred. Unable to continue.
Indeed I was unable to continue no matter which compute resource I selected.
I cancelled and tried again. Same result.
I cancelled and tried a different OVF template (vCloud Director for Service Providers 10.x). Same result.
This smelled like a vSphere Client issue and my first thought was to recycle the vSphere Client service (vsphere-ui under the hood of the VCSA) and if need be, I’d recycle the VCSA itself.
Before all of that though it occurred to me that this Google Chrome browser tab had been open for probably several days and likewise my vSphere Client session had also been logged in for several days.
Logging out of the vSphere Client session and logging back in proved to resolve the issue. I was able to proceed with deploying the OVF template with no further problems.
On the subject of vSphere 7 UI anomalies, I thought I’d mention another one I ran into a week or two ago and it has to do with the nesting of blue folders on the VMs and Templates view. The basic gist of it is that objects nested three or more layers deep become “hidden” and won’t be displayed in the left side pane of the UI. In the example below, an assortment of virtual machines represent the objects that are nested three levels deep. What we should see in the left pane is that we can drill down further into the V15 (vSphere 6.7u2) folder, but we don’t. This becomes even more evident when the objects that are hidden are nested blue folders themselves. They will simply disappear from view, although they do still exist.
No real worries here as it’s just a UI nuisance which is fairly easy to work around and VMware is already aware of it. I’d expect a patch in a coming release.
Last week I went through the process to upgrade a vCloud Director for Service Providers environment to version 9.5.0.2. All seemed to go well with the upgrade. However, after all was said and done, the vCloud Director web page portal failed to open. It would partially load… but then failed.
I seem to recall this happening at some point in the past but couldn’t remember the root cause/fix nor could I find it documented on my blog. So… time to dig into the logs.
The watchdog log showed the cell services recyling over and over.
[root@vcdcell1 logs]# tail -f vmware-vcd-watchdog.log 2019-03-22 11:25:25 | WARN | Server status returned HTTP/1.1 404 2019-03-22 11:26:25 | ALERT | vmware-vcd-cell is dead but /var/run/vmware-vcd-cell.pid exists, attempting to restart it 2019-03-22 11:26:33 | INFO | Started vmware-vcd-cell (pid=10238) 2019-03-22 11:26:36 | WARN | Server status returned HTTP/1.1 404 2019-03-22 11:27:36 | ALERT | vmware-vcd-cell is dead but /var/run/vmware-vcd-cell.pid exists, attempting to restart it 2019-03-22 11:27:43 | INFO | Started vmware-vcd-cell (pid=10827) 2019-03-22 11:27:46 | WARN | Server status returned HTTP/1.1 404 2019-03-22 11:28:46 | ALERT | vmware-vcd-cell is dead but /var/run/vmware-vcd-cell.pid exists, attempting to restart it
The cell log showed a problem with Transfer Server Storage. Error starting application: Unable to create marker file in the transfer spooling area
[root@vcdcell1 logs]# tail -f cell.log Application Initialization: ‘com.vmware.vcloud.networking-server’ 20% complete. Subsystem ‘com.vmware.vcloud.common-cell-impl’ started Application Initialization: ‘com.vmware.vcloud.common.core’ 12% complete. Subsystem ‘com.vmware.vcloud.common-util’ started Application Initialization: ‘com.vmware.vcloud.cloud-proxy-server’ 42% complete. Subsystem ‘com.vmware.vcloud.common-util’ started Application Initialization: ‘com.vmware.vcloud.networking-server’ 40% complete. Subsystem ‘com.vmware.vcloud.common-util’ started Application Initialization: ‘com.vmware.vcloud.cloud-proxy-server’ 57% complete. Subsystem ‘com.vmware.vcloud.cloud-proxy-services’ started Application Initialization: ‘com.vmware.vcloud.common.core’ 16% complete. Subsystem ‘com.vmware.vcloud.api-framework’ started Application Initialization: ‘com.vmware.vcloud.cloud-proxy-server’ 71% complete. Subsystem ‘com.vmware.vcloud.hybrid-networking’ started Application Initialization: ‘com.vmware.vcloud.cloud-proxy-server’ 85% complete. Subsystem ‘com.vmware.vcloud.hbr-aware-plugin’ started Application Initialization: ‘com.vmware.vcloud.cloud-proxy-server’ 100% complete. Subsystem ‘com.vmware.vcloud.cloud-proxy-web’ started Application Initialization: ‘com.vmware.vcloud.cloud-proxy-server’ complete. Application Initialization: ‘com.vmware.vcloud.common.core’ 20% complete. Subsystem ‘com.vmware.vcloud.common-vmomi’ started Application Initialization: ‘com.vmware.vcloud.common.core’ 25% complete. Subsystem ‘com.vmware.vcloud.jax-rs-activator’ started Application Initialization: ‘com.vmware.vcloud.common.core’ 29% complete. Subsystem ‘com.vmware.pbm.placementengine’ started Application Initialization: ‘com.vmware.vcloud.common.core’ 33% complete. Subsystem ‘com.vmware.vcloud.vim-proxy’ started Application Initialization: ‘com.vmware.vcloud.common.core’ 37% complete. Subsystem ‘com.vmware.vcloud.fabric.foundation’ started Application Initialization: ‘com.vmware.vcloud.common.core’ 41% complete. Subsystem ‘com.vmware.vcloud.imagetransfer-server’ started Application Initialization: ‘com.vmware.vcloud.common.core’ 45% complete. Subsystem ‘com.vmware.vcloud.fabric.net’ started Application Initialization: ‘com.vmware.vcloud.networking-server’ 60% complete. Subsystem ‘com.vmware.vcloud.fabric.net’ started Application Initialization: ‘com.vmware.vcloud.common.core’ 50% complete. Subsystem ‘com.vmware.vcloud.fabric.storage’ started Application Initialization: ‘com.vmware.vcloud.common.core’ 54% complete. Subsystem ‘com.vmware.vcloud.fabric.compute’ started Application Initialization: ‘com.vmware.vcloud.common.core’ 58% complete. Subsystem ‘com.vmware.vcloud.service-extensibility’ started Application Initialization: ‘com.vmware.vcloud.common.core’ 62% complete. Subsystem ‘com.vmware.vcloud.backend-core’ started Application Initialization: ‘com.vmware.vcloud.networking-server’ 80% complete. Subsystem ‘com.vmware.vcloud.backend-core’ started Application Initialization: ‘com.vmware.vcloud.common.core’ 66% complete. Subsystem ‘com.vmware.vcloud.vapp-lifecycle’ started Application Initialization: ‘com.vmware.vcloud.networking-server’ 100% complete. Subsystem ‘com.vmware.vcloud.networking-web’ started Application Initialization: ‘com.vmware.vcloud.networking-server’ complete. Application Initialization: ‘com.vmware.vcloud.common.core’ 70% complete. Subsystem ‘com.vmware.vcloud.content-library’ started Application Initialization: ‘com.vmware.vcloud.common.core’ 75% complete. Subsystem ‘com.vmware.vcloud.presentation-api-impl’ started Application Initialization: ‘com.vmware.vcloud.common.core’ 79% complete. Subsystem ‘com.vmware.vcloud.metrics-core’ started Application Initialization: ‘com.vmware.vcloud.ui.h5cellapp’ 33% complete. Subsystem ‘com.vmware.vcloud.h5-webapp-provider’ started Application Initialization: ‘com.vmware.vcloud.common.core’ 83% complete. Subsystem ‘com.vmware.vcloud.multi-site-core’ started Application Initialization: ‘com.vmware.vcloud.common.core’ 87% complete. Subsystem ‘com.vmware.vcloud.multi-site-api’ started Application Initialization: ‘com.vmware.vcloud.ui.h5cellapp’ 50% complete. Subsystem ‘com.vmware.vcloud.h5-webapp-tenant’ started Application Initialization: ‘com.vmware.vcloud.ui.h5cellapp’ 66% complete. Subsystem ‘com.vmware.vcloud.h5-webapp-auth’ started Application Initialization: ‘com.vmware.vcloud.ui.h5cellapp’ 83% complete. Subsystem ‘com.vmware.vcloud.h5-swagger-doc’ started Application Initialization: ‘com.vmware.vcloud.ui.h5cellapp’ 100% complete. Subsystem ‘com.vmware.vcloud.h5-swagger-ui’ started Application Initialization: ‘com.vmware.vcloud.ui.h5cellapp’ complete. Application Initialization: ‘com.vmware.vcloud.common.core’ 91% complete. Subsystem ‘com.vmware.vcloud.rest-api-handlers’ started Application Initialization: ‘com.vmware.vcloud.common.core’ 95% complete. Subsystem ‘com.vmware.vcloud.jax-rs-servlet’ started Application Initialization: ‘com.vmware.vcloud.common.core’ 100% complete. Subsystem ‘com.vmware.vcloud.ui-vcloud-webapp’ started Application Initialization: ‘com.vmware.vcloud.common.core’ complete. Successfully handled all queued events. Error starting application: Unable to create marker file in the transfer spooling area: /opt/vmware/vcloud-director/data/transfer/cells/8a483603-43b8-4215-b33f-48270582f03d
To be honest, the NFS server which hosts Transfer Server Storage in this environment isn’t always reliable but upon checking, it was up and healthy. Furthermore, I was able to manually create a test file within this Transfer Server Storage space from the vCD cell itself.
Walking the directory structure and looking at permissions, a few things didn’t look right.
[root@vcdcell1 data]# ls -l -h total 4.0K drwx——. 3 vcloud vcloud 27 Mar 22 11:39 activemq drwxr-x—. 2 vcloud vcloud 6 Mar 15 04:58 generated-bundles drwxr-x—. 2 vcloud vcloud 4.0K Mar 15 04:58 transfer [root@vcdcell1 data]# pwd /opt/vmware/vcloud-director/data [root@vcdcell1 data]# [root@vcdcell1 data]# [root@vcdcell1 data]# [root@vcdcell1 data]# cd transfer/ [root@vcdcell1 transfer]# ls -l -h total 1.0K drwx——. 2 1002 1002 64 Mar 22 11:38 cells -rw——-. 1 root root 386 Mar 21 11:51 responses.properties [root@vcdcell1 transfer]# cd cells/ [root@vcdcell1 cells]# ls -l -h total 512 -rw——-. 1 1002 1002 0 May 27 2018 8a483603-43b8-4215-b33f-48270582f03d.old -rw-r–r–. 1 root root 6 Mar 22 11:38 jgbtest.txt
Looking at some of the pieces above, I seem to recall vcloud is supposed to be the owner and group for the vCD file and directory structure. I further verified this by restoring my old vCD cell from a previous snapshot and spot checking. So let’s fix it using the chown example on page 53 of the vCloud Director Installation and Upgrade Guide.
[root@vcdcell1 cells]# chown -R vcloud:vcloud /opt/vmware/vcloud-director [root@vcdcell1 cells]# [root@vcdcell1 cells]# [root@vcdcell1 cells]# ls -l -h total 512 -rw——-. 1 vcloud vcloud 0 May 27 2018 8a483603-43b8-4215-b33f-48270582f03d.old -rw-r–r–. 1 vcloud vcloud 6 Mar 22 11:38 jgbtest.txt
The watchdog daemon followed up by restarting vCD cell. With the correct permissions now, a new cell file was successfully created and the vCD cell successfully started. I deleted the .old cell file and of course my jgbtest.txt file.
[root@vcdcell1 cells]# ls -l -h total 512 -rw——-. 1 vcloud vcloud 0 Mar 22 12:23 8a483603-43b8-4215-b33f-48270582f03d -rw——-. 1 vcloud vcloud 0 May 27 2018 8a483603-43b8-4215-b33f-48270582f03d.old -rw-r–r–. 1 vcloud vcloud 6 Mar 22 11:38 jgbtest.txt
How did this happen? I’m pretty sure it was my own fault. Last week I was also doing some deployment testing with the vCD appliance. At the time I felt it was safe for this test cell to use the same Transfer Server Storage NFS mount (so that I wouldn’t have to go through the steps to create another one). Upon further investigation, the vCD appliance cell tattooed the folders and files with the 1002 owner and group seen above.
All is well with the vCD world now and I’ve got it documented so the next time my vCD web portal doesn’t load, I’ll know just where to look.
VMware introduced a new storage feature in vSphere 6.0 which was designed as a flexible option to better handle certain storage problems. Cormac Hogan did a fine job introducing the feature here. Starting with vSphere 6.0 and continuing on in vSphere 6.5, each block storage device (VMFS or RDM) is configured with an option called action_OnRetryErrors. Note that in vSphere 6.0 and 6.5, the default value is off meaning the new feature is effectively disabled and there is no new storage error handling behavior observed.
This value can be seen with the esxcli storage nmp device list command.
If vSphere loses access to a device on a given path, the host will send a Test Unit Ready (TUR) command down the given path to check path state. When action_OnRetryErrors=off, vSphere will continue to retry for an amount of time because it expects the path to recover. It is important to note here that a path is not immediately marked dead when the first Test Unit Ready command is unsuccessful and results in a retry. It would seem many retries in fact and you’ll be able to see them in /var/log/vmkernel.log. Also note that a device typically has multiple paths and the process will be repeated for each additional path tried assuming the first path is eventually marked as dead.
Starting with vSphere 6.7, action_OnRetryErrors is enabled by default.
If vSphere loses access to a device on a given path, the host will send a Test Unit Ready (TUR) command down the given path to check path state. When action_OnRetryErrors=on, vSphere will immediately mark the path dead when the first retry is returned. vSphere will not continue the retry TUR commands on a dead path.
This is the part where VMware thinks it’s doing the right thing by immediately fast failing a misbehaving/dodgy/flaky path. The assumption here is that other good paths to the device are available and instead of delaying an application while waiting for path failover during the intensive TUR retry process, let’s fail this one bad path right away so that the application doesn’t have to spin its wheels.
However, if all other paths to the device are impacted by the same underlying (and let’s call it transient) condition, what happens is that each additional path iteratively goes through the process of TUR, no retry, immediately mark path as dead, move on to the next path. When all available paths have been exhausted, All Paths Down (APD) for the device kicks in. If and when paths to an APD device become available again, they will be picked back up upon the next storage fabric rescan, whether that’s done manually by an administrator, or automatically by default every 300 seconds for each vSphere host (Disk.PathEvalTime). From an application/end user standpoint, I/O delay for up to 5 minutes can be a painfully long time to wait. The irony here is that VMware can potentially turn a transient condition lasting only a few seconds into a more of a Permanent Device Loss like condition.
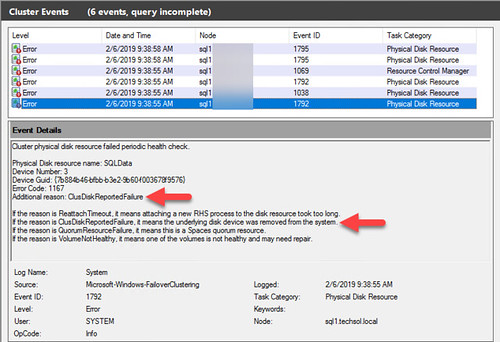
All of the above leads me to a support escalation I got involved in with a customer having an Active/Passive block storage array. Active/Passive is a type of array which has multiple storage processors/controllers (usually two) and LUNs are distributed across the controllers in an ownership model whereby each controller owns both the LUNs and the available paths to those LUNs. When an active controller fails or is taken offline proactively (think storage processor reboot due to a firmware upgrade), the paths to the active controller go dark, the passive controller takes ownership of the LUNs and lights up the paths to them – a process which can be measured in seconds, typically more than 2 or 3, often much more than that (this dovetails into the discussion of virtual machine disk timeout best practices). With action_OnRetryErrors=off, vSphere tolerates the transient path outage during the controller failover. With action_OnRetryErrors=on, it doesn’t – each path that goes dark is immediately failed and we have APD for all the volumes on that controller in a fraction of a second.
The problem which was occurring in this customer escalation was a convergence of circumstances:
The customer was using vSphere 6.7 and its defaults action_OnRetryErrors=on
The customer was using an Active/Passive storage array
The customer virtualized Microsoft Windows SQL cluster servers (cluster disk resources are extremely sensitive to APDs in the hypervisor and immediately fail when it detects a dependent cluster disk has been removed – a symptom introduced by APD)
The customer was testing controller failovers
Windows failover clusters have zero tolerance for APD disk
To resolve the problem in vSphere 6.7, action_OnRetryErrors needs to be disabled for each device backed by the Active/Passive storage array. This must be performed on every host in the cluster having access to the given devices (again, these can be VMFS volumes and/or RDMs). There are a few ways to go about this.
To modify the configuration without a host reboot, take a look at the following example. A command such as this would need to be run on every host in the cluster, and for each device (ie. in an 8 host cluster with 8 VMFS/RDMs, we need to identify the applicable naa.xxx IDs and run 64 commands. Yes, this could be scripted. Be my guest.):
I don’t prefer that method a whole lot. It’s tedious and error prone. It could result in cluster inconsistencies. But on the plus side, a host reboot isn’t required, and this setting will persist across reboots. That also means a configuration set at this device level will override any claim rules that could also apply to this device. Keep this in mind if a claim rule is configured but you’re not seeing the desired configuration on any specific device.
The above could also be scripted for a number of devices on a host. Here’s one example. Be very careful that the base naa.xxx string matches all of the devices from one array that should be configured, and does not modify devices from other array types that should not be configured. Also note that this script is a one liner but for blog formatting purposes I manually added a line break starting with esxcli.:
for i in `ls /vmfs/devices/disks | grep -v ":" | grep -i naa.6000D31`; do echo $i;
esxcli storage nmp satp generic deviceconfig set -c disable_action_OnRetryErrors -d $i; done
Now to verify:
for i in `ls /vmfs/devices/disks | grep -v ":" | grep -i naa.6000D31`; do echo $i;
esxcli storage nmp device list | grep -A2 $i | egrep -io action_OnRetryErrors=\\w+; done
I like adding a SATP claim rule using a vendor device string a lot better, although changes to claim rules for existing devices generally requires a reboot of the host to reclaim existing devices with the new configuration. Here’s an example:
When a new claim rule is added, claim rules can be reloaded with the following command.
esxcli storage core claimrule load
Keep in mind the new claim rule will only apply to unclaimed devices. Newly presented devices will inherit the new claim rule. Existing devices which are already claimed will not until the next vSphere host reboot. Devices can be unclaimed without a host reboot but all I/O to the device must be halted – somewhat of a conundrum if we’re dealing with production volumes, datastores being used for heartbeating, etc. Assuming we’re dealing with multiple devices, a reboot is just going to be easier and cleaner.
I like claim rules here better because of the global nature. It’s one command line per host in the cluster and it’ll take care of all devices from the Active/Passive storage array vendor. No need to worry about coming up with and testing a script. No need to worry about spending hours identifying the naa.xxx IDs and making all of the changes across hosts. No need to worry about tagging other storage vendor devices with an improper configuration. Lastly, the claim rule in effect is visible in a SATP claim rule list (sincere apologies for the formatting – it’s bad I know):
esxcli storage nmp satp rule list
Name Device Vendor Model Driver Transport Options Rule Group Claim Options Default PSP PSP Options Description ——————- —— ——– —————- —— ——— —————————- ———- ———————————– ———– ———– ———————————————– VMW_SATP_ALUA COMPELNT disable_action_OnRetryErrors user VMW_PSP_RR
By the way… to remove the SATP claim rules above respectively:
The bottom line here is there may be a number of VMware customers with Active/Passive storage arrays, running vSphere 6.7. If and when planned or unplanned controller/storage processor failover occurs, APDs may unexpectedly occur, impacting virtual machines and their applications, whereas this was not the case with previous versions of vSphere.
In closing, I want to thank VMware Staff Technical Support Engineering for their work on this case and ultimately exposing “what changed in vSphere 6.7” because we had spent some time trying to reproduce this problem on vSphere 6.5 where we had an environment similar to what the customer had and we just weren’t seeing any problems.
Regulars: Thank you for stopping by but just as a heads up, this post is not VMware virtualization related.
After a bit of hardware trouble from the local store, my replacement flight sim rig is up and running Lockheed Martin Prepar3D 4.3. I’m trying to shake the rust off after not having flown a leg for quite some time but everything sim and add-on related is looking good and I was able to fly KMSP-KLAX with many more FPS that I’ve been used to the past many years on FSX.
Now, out of sheer coincidence late last week I received a promotion from MegaSceneryEarth. Normally I ignore these but since this was a 50% off deal and I’m essentially starting from ground zero with no scenery for Prepar3D, I took a look. After some chin scratching, I checked out with Minnesota, Arizona, Northern California, and Southern California. I felt like quite the opportunist until the email arrived with file download instructions. Each scenery is broken up into 2GB download chunks. Between the four sceneries, I was presented with 123 download links. With no FTP option that I’m aware of, I’m going to have to babysit this process. With each 2GB download taking anywhere from 5-10 minutes, this is going to feel a lot like installing Microsoft Office 2016 via floppy disk. Except longer. MegaSceneryEarth is available on shipped DVDs or USB sticks they cost a small fortune and of course the shipping and handling time. This is going to be painful.
But… there’s a cheaper, faster, and fully automated way. PowerShell scripting.
Now admittedly for my first scenery, I threw the v1.0 PowerShell script version together quickly using the Invoke-WebRequest cmdlet with my own static scenery-specific lines of code to serve my own needs. And it worked. I launched the script, walked away for a few hours, and when I came back I had a directory full of MegaSceneryEarth .zip files ready for installation. It worked beautifully and it didn’t consume bunches of my time.
I still had three sceneries left to download. While I could have made new static scripts for the remaining three sceneries, my mind was already going down the road that this script would be more powerful if one script worked on a variety of MegaSceneryEarth downloads. It becomes flexible to use for my future MegaSceneryEarth sceneries as well as extensible if shared with the community.
So on Sunday, version 2.0 is what I came up with. It takes three inputs in the form of modifying variables at the beginning of the script before running it:
The download URL for the first file of the scenery
The path on the local hard drive where all of the .zip files should be downloaded to
The starting point or first file to download. Usually this will be 1 but if for some reason a previous download was stopped or interrupted at say 6, we’d want to continue from there assuming we don’t want to re-download the first 5 files all over again.
The script does the rest of the heavy lifting. All three of the above are required for functionality but by far the first variable is the most important and where I spent almost all of my time making the script flexible so that it works across MegaSceneryEarth sceneries. When provided with the download URL of the first file of the scenery, the script does a bunch of parsing, splitting, and concatenation of stuff to automatically determine some things:
It figures out what the base path and file name URL is for the scenery. For any given scenery, these parts never change across all of the download links within a scenery but they will change across sceneries.
It figures out how many .zip files there are to download in total for the entire scenery.
Because MegaSceneryEarth likes to use leading zeroes as part of their naming convention, and leading zero strings aren’t the same thing as leading zero integers in terms of PowerShell constructs, it figures out how to deal with those for file names and looping iterations. Basically when you go from “009” files in a scenery download to “010”, without dealing with that, stuff breaks. I think most MegaSceneryEarth sceneries have more than 9 files, but some have less (Deleware has 1). The script deals with both kinds. That I know of, MegaSceneryEarth doesn’t have a scenery with more than 99 .zip files but version 2.1 of the script will accommodate that.
It figures out the correct file name to save on the local hard drive for each scenery file downloaded. This may sound stupid but that I know of, the Invoke-WebRequest cmdlet requires the output file name and doesn’t automatically assume the file name should be the same as the file name being downloaded via HTTP such as a copy command to a folder would.
Generally speaking, for automation to work properly, it relies on input consistency so that all assumptions it makes are 100% correct. Translated, this script relies on consistent file/path naming conventions used by MegaSceneryEarth. Not only within sceneries, but across sceneries as well.
And so here it is. Copy the PowerShell script below and execute in your favorite PowerShell environment. Most of the time I simply use Windows PowerShell ISE. The code isn’t signed so you may need to temporarily relax your PowerShell ExecutionPolicy to Bypass . It’s there to protect you by default.
######################################################################################################################
# MegaSceneryEarth.ps1 version 2.1 7/31/18
#
# This PowerShell script automates unattended HTTP download of up to 999 MegaSceneryEarth scenery files
# Relies on MegaSceneryEarth naming conventions current as of version date above
# Tested successfully with four MegaSceneryEarth downloads
# As with anything on the internet, use at your own risk, no warranty provided by the author
#
# Update the three variables below as necessary for your specific scenery and download parameters
#
# Jason Boche
# http://boche.net
# jason@boche.net
######################################################################################################################

# Provide the first file download link copied from the MegaSceneryEarth .htm link provided with license key email
# Internet Explorer: Right click the download link and choose "Copy shortcut"
# Google Chrome: Right click the download link and choose "Copy link address"
# Then paste the link between the quotation marks

$firstfile1 = "paste first file download link here.zip"

# Provide the path on your hard drive where the files will temporarily be saved.
# This will usually be where you have the MegaSceneryEarthInstallManager.exe file for subsequent installation
# Syntax requires a trailing backslash (\)

$dlpath = "D:\junk\"

# Provide the starting file count. Usually we start with 1 unless you're starting the download somewhere after 1

$startcount = 1

# Do not edit anything below this line

######################################################################################################################

# Get the HTTP path
$firstfile2 = split-path $firstfile1
$firstfile3 = $firstfile2.Replace("\","/")
$httppath = $firstfile3 + "/"

# Get the .zip file name
$firstfile4 = split-path $firstfile1 -leaf

# Get the static part of the .zip file name
$firstfile5 = $firstfile4 -split "001_of_"
$firstfile6 = $firstfile5[0]
$fileprefix = $firstfile6

# Get the total number of scenery files in string format with and without .zip extension
$firstfile7 = $firstfile5[1] -split ".zip"
$firstfile8 = $firstfile5[1]
# Convert total number of scenery files in string format to number format
$total = [decimal]::Parse($firstfile7)

if ($startcount -gt $total)
{
Write-Host Error: Starting file specified is greater than total number of files. Please check the `$startcount variable
pause
exit
}

# If there are 1-9 scenery files, download those
if ($total -ge 1)
{
$leadingzero = "00"
while ($startcount -le $total)
{
if ($startcount -gt 9){break}
Write-Host Downloading $httppath$fileprefix$leadingzero$startcount"_of_"$firstfile8 to $dlpath$fileprefix$leadingzero$startcount"_of_"$firstfile8

Invoke-WebRequest -Uri $httppath$fileprefix$leadingzero$startcount"_of_"$firstfile8 -OutFile $dlpath$fileprefix$leadingzero$startcount"_of_"$firstfile8

$startcount ++

}
}

# If there are 10-99 scenery files, download those also
if ($total -ge 10)
{
$leadingzero = "0"
while ($startcount -le $total)
{
if ($startcount -gt 99){break}
Write-Host Downloading $httppath$fileprefix$leadingzero$startcount"_of_"$firstfile8 to $dlpath$fileprefix$leadingzero$startcount"_of_"$firstfile8

Invoke-WebRequest -Uri $httppath$fileprefix$leadingzero$startcount"_of_"$firstfile8 -OutFile $dlpath$fileprefix$leadingzero$startcount"_of_"$firstfile8

$startcount ++

}
}

# If there are 100-999 scenery files, download those also
if ($total -ge 100)
{
$leadingzero = ""
while ($startcount -le $total)
{
if ($startcount -gt 999){break}
Write-Host Downloading $httppath$fileprefix$leadingzero$startcount"_of_"$firstfile8 to $dlpath$fileprefix$leadingzero$startcount"_of_"$firstfile8

Invoke-WebRequest -Uri $httppath$fileprefix$leadingzero$startcount"_of_"$firstfile8 -OutFile $dlpath$fileprefix$leadingzero$startcount"_of_"$firstfile8

$startcount ++

}
}
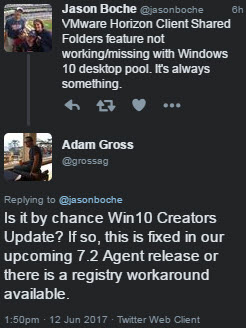
I spent some time the last few weekends making various updates and changes to the lab. Too numerous and not all that paramount to go into detail here, with the exception of one issue I did run into. I created a new VMware Horizon pool consisting of Windows 10 Enterprise, Version 1703 (Creators Update). The VM has 4GB RAM and VMware Horizon Agent 7.1.0.5170901 is installed. This is all key information contributing to my new problem which is the Shared Folders feature seems to have stopped functioning.
That is to say, when launching my virtual desktop from the Horizon Client, there are no shared folders or drives being passed through from where I launched the Horizon Client. Furthermore, the Share Folders menu item is completely missing from the blue Horizon Client pulldown menu.
I threw something out on Twitter and received a quick response from a very helpful VMware Developer by the name of Adam Gross (@grossag).
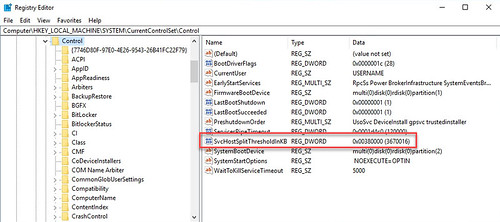
Adam went on to explain that the issue stems from a registry value defining an amount of memory which is less that the amount of RAM configured in the VM.
The registry key is HKLM\SYSTEM\CurrentControlSet\Control\ and the value configured for SvcHostSplitThresholdInKB is 3670016 (380000 Hex). The 3670016 is expressed in KB which comes out to be 3.5GB. The default Windows 10 VM configuration is deployed with 4GB of RAM which is what I did this past weekend. Since 3.5GB is less than 4GB, the bug rears its head.
Adam mentioned the upcoming 7.2 agent will configure this value at 32GB on Windows 10 virtual machines (that’s 33554432 or 2000000 in Hex) and perhaps even larger in the 7.2 version or some future release of the agent because the reality some day is that 32GB won’t be large enough. Adam went on to explain the maximum amount of RAM supported by Windows 10 x64 is 2TB which comes out to be 2147483648 expressed in KB or 80000000 in Hex. Therefore, it is guaranteed safe (at least to avoid this issue) to set the registry value to 80000001 (in Hex) or higher for any vRAM configuration.
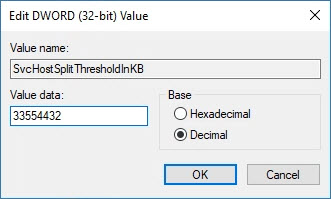
To move on, the value needs to be tweaked manually in the registry. I’ll set mine to 32GB as I’ll likely never have a VDI desktop deployed between now and when the 7.2 agent ships and is installed in my lab.
And the result for posterity.
I found a reboot of the Windows 10 VM was required before the registry change made the positive impact I was looking for. After all was said and done, my shared folders came back as did the menu item from the pulldown on the blue Horizon Client pulldown menu. Easy fix for a rather obscure issue. Once again my thanks to Adam Gross for providing the solution.
Last week I was made aware of an issue a customer in the field was having with a data protection strategy using array-based snapshots which were in turn leveraging VMware vSphere snapshots with VSS quiesce of Windows VMs. The problem began after installing VMware Tools version 10.0.0 build-3000743 (reported as version 10240 in the vSphere Web Client) which I believe is the version shipped in ESXI 6.0 Update 1b (reported as version 6.0.0, build 3380124 in the vSphere Web Client).
The issue is that creating a VMware virtual machine snapshot with VSS integration fails. The virtual machine disk configuration is simply two .vmdks on a VMFS-5 datastore but I doubt the symptoms are limited only to that configuration.
The failure message shown in the vSphere Web Client is “Cannot quiesce this virtual machine because VMware Tools is not currently available.” The vmware.log file for the virtual machine also shows the following:
2016-07-29T19:26:47.378Z| vmx| I120: SnapshotVMX_TakeSnapshot start: ‘jgb’, deviceState=0, lazy=0, logging=0, quiesced=1, forceNative=0, tryNative=1, saveAllocMaps=0 cb=1DE2F730, cbData=32603710
2016-07-29T19:26:47.407Z| vmx| I120: DISKLIB-LIB_CREATE : DiskLibCreateCreateParam: vmfsSparse grain size is set to 1 for ‘/vmfs/volumes/51af837d-784bc8bc-0f43-e0db550a0c26/rmvm02/rmvm02-000001.
2016-07-29T19:26:47.408Z| vmx| I120: DISKLIB-LIB_CREATE : DiskLibCreateCreateParam: vmfsSparse grain size is set to 1 for ‘/vmfs/volumes/51af837d-784bc8bc-0f43-e0db550a0c26/rmvm02/rmvm02_1-00000
2016-07-29T19:26:47.408Z| vmx| I120: SNAPSHOT: SnapshotPrepareTakeDoneCB: Prepare phase complete (The operation completed successfully).
2016-07-29T19:26:56.292Z| vmx| I120: GuestRpcSendTimedOut: message to toolbox timed out.
2016-07-29T19:27:07.790Z| vcpu-0| I120: Tools: Tools heartbeat timeout.
2016-07-29T19:27:11.294Z| vmx| I120: GuestRpcSendTimedOut: message to toolbox timed out.
2016-07-29T19:27:17.417Z| vmx| I120: GuestRpcSendTimedOut: message to toolbox timed out.
2016-07-29T19:27:17.417Z| vmx| I120: Msg_Post: Warning
2016-07-29T19:27:17.417Z| vmx| I120: [msg.snapshot.quiesce.rpc_timeout] A timeout occurred while communicating with VMware Tools in the virtual machine.
2016-07-29T19:27:17.417Z| vmx| I120: —————————————-
2016-07-29T19:27:17.420Z| vmx| I120: Vigor_MessageRevoke: message ‘msg.snapshot.quiesce.rpc_timeout’ (seq 10949920) is revoked
2016-07-29T19:27:17.420Z| vmx| I120: ToolsBackup: changing quiesce state: IDLE -> DONE
2016-07-29T19:27:17.420Z| vmx| I120: SnapshotVMXTakeSnapshotComplete: Done with snapshot ‘jgb’: 0
2016-07-29T19:27:17.420Z| vmx| I120: SnapshotVMXTakeSnapshotComplete: Snapshot 0 failed: Failed to quiesce the virtual machine (31).
2016-07-29T19:27:17.420Z| vmx| I120: VigorTransport_ServerSendResponse opID=ffd663ae-5b7b-49f5-9f1c-f2135ced62c0-95-ngc-ea-d6-adfa seq=12848: Completed Snapshot request.
2016-07-29T19:27:26.297Z| vmx| I120: GuestRpcSendTimedOut: message to toolbox timed out.
After performing some digging, I found VMware had released VMware Tools version 10.0.9 on June 6, 2016. The release notes identify the root cause has been identified and resolved.
Resolved Issues
Attempts to take a quiesced snapshot in a Windows Guest OS fails
Attempts to take a quiesced snapshot after booting a Windows Guest OS fails
After downloading and upgrading VMware Tools version 10.0.9 build-3917699 (reported as version 10249 in the vSphere Web Client), the customer’s problem was resolved. Since the faulty version of VMware Tools was embedded in the customer’s templates used to deploy virtual machines throughout the datacenter, there were a number of VMs needing their VMware Tools upgraded, as well as the templates themselves.
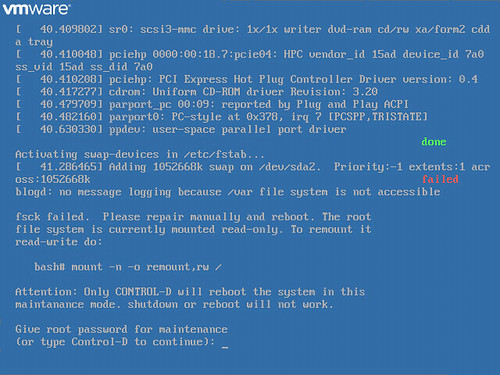
A vCenter Server Appliance (vSphere 6.0 Update 1b) belonging to me was bounced and for some reason was unbootable. The trouble during the boot process begins with /dev/sda3 contains a file system with errors, check forced. At approximately 27% of the way through, the process terminates with fsck failed. Please repair manually and reboot.
Unable to access a bash# prompt from the current state of the appliance, I followed VMware KB 2069041 VMware vCenter Server Appliance 5.5 and 6.0 root account locked out after password expiration, particularly the latter portion of it which provides the steps to modify a kernel option in the GRUB bootloader to obtain a root shell (and subsequently run the e2fsck -y /dev/sda3 repair command.
The steps are outlined in VMware KB 2069041 and are simple to follow.
Reboot the VCSA
Be quick about highlighting the VMware vCenter Server appliance menu option (the KB article recommends hitting the space bar to stop the default countdown)
p (to enter a root password and continue with additional commands the next step)
e (to edit the boot command)
Append init=/bin/bash (followed by Enter to return to the GRUB menu
b (to start the boot process)
This is where e2fsck -y /dev/sda3 is executed to repair file system errors on /dev/sda3 and allow the VCSA to boot successfully.
When the process above completes, reboot the VCSA and that should be all there is to it.
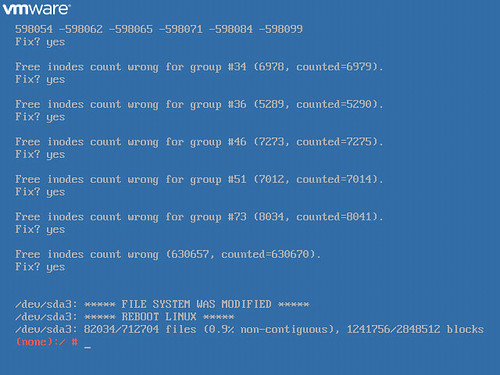
Update 10/9/17: I ran into a similar issue with VCSA 6.5 Update 1 where the appliance wouldn’t boot and I was left at an emergency mode prompt. In this situation, following the steps above isn’t so straight forward in part due to the Photon OS splash screen and no visibility to the GRUB bootloader (following VMware KB 2081464). In this situation, I executed fsck /dev/sda3 at the emergency mode prompt answering yes to all prompts. After reboot, I found this did not resolve all of the issues. I was able to log in by providing the root password twice. The journalctl command revealed a problem with /dev/mapper/log_vg-log. Next I ran fsck /dev/mapper/log_vg-log again answering yes to all prompts to repair. When that was finished, the appliance was rebooted and came up operational.
Disclaimer: The opinions expressed here are my personal opinions. Content published here does not necessarily reflect the views and opinions of my employer.