Error 1603: Java Update did not complete

February 9th, 2016 by jason No comments »

3 Billion Devices Run Java.

Unfortunately (or fortunately depending on how you look at it) my workstation isn’t one of them.

I’m no stranger to Java and I’m more than willing to share my bitter experiences with it but rarely does my dissatisfaction stem from the installation process itself (that is if you don’t count the update frequency). This blog post is for my future self as I’m bound to run into it again.

I encountered a never before seen by me problem installing the Windows Offline (64-bit) version of Java Version 8 Update 73 on Windows 7.

Java Update did not complete

Error Code: 1603

The usual tricks did not work. Uninstalling the old version first. Run as administrator. Directory and registry scrubbing. System reboot. Trying an older version. In fact all version 8 builds exhibited this behavior. It wasn’t until I rolled all the way back to a version 7 build that the installation was successful.

For posterity, this spiceworks thread covers a lot of ground; there seems to be a variety of fixes for an equal number of root causes which all yield the same Java installation failure. The Java knowledgebase covering this issue offers some basic workarounds under Option 1 such as a system reboot, offline installer, uninstalling old versions, all of which I had already tried without success.

The fix in my particular instance was Option 2: Disable Java content (in the web browser) through the Java Control Panel. You’ll find the Java applet in the Windows Control Panel when a 32-bit version of Java is installed.

On the Security tab, temporarily deselect the “Enable Java content in the browser” checkbox.

Complete the 64-bit version of Java installation (launch the installer using “Run as Administrator“) and don’t forget to “Enable Java content in the browser” when finished.

Update 5-12-16: If you’re receiving this error and “Enable Java content in the browser” is already deselected, check the box, Apply, OK, uncheck the box, Apply, OK.


vCloud Director vdnscope-1 could not be found

August 15th, 2015 by jason 4 comments »

For whatever reason, I’ve been spending a pretty fair amount of time lately with vCloud Director both at home as well as at the office. It’s a great product. It always has been, beginning with its Lab Manager roots. Like my last blog post, this writing will exhibit another vCloud Director database editing exercise which stemmed from a problem I encountered in the lab.

I was attempting to get away from my VLAN-backed Network Pool by configuring vCloud Director’s Provider vDC-VXLAN-NP Network Pool which is much more dynamic and powerful in nature. The Provider vDC-VXLAN-NP Network Pool is installed by default in vCloud Director but to configure and use it for Organization and vApp networks, one must follow a set of instructions which basically involves configuring upstream physical switch(es) with jumbo frames, a transport VLAN, and multicast settings, preparing the hosts by installing an agent on each of them using vShield Manager, adding VMkernel ports, Network Scopes, Virtual Wires, and so on (Mike Laverick and Rawlinson Rivera both have easy to follow tutorials. The VMware VXLAN Deployment Guide is also a great read). Once it’s all set up and working, VXLAN is pretty effing cool. Anyway, it sounds like a lot of steps and admittedly it requires some reading and attention to detail, but much of it is automated by vCloud Director, with some bumps along the way.

I did run into a few snags which ultimately lead me to going through the configuration process start to finish a few times. In the end I had to configure the Network Scope in vShield Manager manually when normally this step is performed automatically by vCloud Director via the Enable VXLAN Provider VDC right-click menu item.

Once I got beyond the installation hurdles, there was some residual impact left in the vCloud Director database and vShield Manager such that it all looked to be working properly, except that at the very end I could not power on a vApp with an isolated vApp network which relied on the use of the VXLAN-backed Network Pool. The error message was:

Cannot deploy organization VDC network  (uuid for that network)
com.vmware.vcloud.fabric.nsm.error.VsmException: VSM response error (202): The requested object : vdnscope-1 could not be found. Object identifiers are case sensitive.

[ bb505f5e-27f1-419e-9b05-da0d38a7788f ] Unable to deploy network “vApp net1(urn:uuid:7d813867-d3f1-420d-a0a8-a65263369327)”.

com.vmware.vcloud.fabric.nsm.error.VsmException: VSM response error (202): The requested object : vdnscope-1 could not be found. Object identifiers are case sensitive.

– com.vmware.vcloud.fabric.nsm.error.VsmException: VSM response error (202): The requested object : vdnscope-1 could

not be found. Object identifiers are case sensitive.

– VSM response error (202): The requested object : vdnscope-1 could not be found. Object identifiers are case sensitive.

An object named vdnscope-1 seems to be the obvious problem.

I was not able to make use of the Network Pool Repair function as it was unavailable:

Fortunately I was able to locate a related thread in the VMware Communities which more or less explained what might have happened and what I could try to fix the problem (credit to IamTHEvilONE). This is my interpretation.

Each time a Network Scope is created in the vShield Manager, an underlying object reference is tied to the Network Scope with a naming convention of vdnscope-x where x begins at 1 and is incremented at each create iteration. So the first Network Scope created in vShield Manager by vCloud Director is going to be called vdnscope-1. This object is stored in the vCloud Director database and is referenced each time an Org or vApp network is spun up which leans on the VXLAN-backed Network Pool. This is formally handled at vApp power on. The object is also stored somewhere in the vShield Manager although I was never able to locate it. What happened here is that Network Scope object known by both vCloud Director and vShield Manager were not sync and didn’t match. vCloud Direct dials up vShield Manager and says “I need that vdnscope-1 you have” and vShield Manager responds with “I have no idea what that object is”. Obvious problem.

The solution is fairly simple: Edit the vCloud Director database with the correct Network Scope object reference. But a small problem still remains: I was never able to locate the correct object name in vShield Manager. However, going back to the VMware Communities discussion, I’ll eventually be able to find the correct object name by incrementing the vdnscope-x object reference in the vCloud Director database by 1 until the two sides agree and the vApp powers on successfully.

I’ll borrow the same disclaimer from the previous blog post: An obligatory warning on vCloud database editing. Do as I say, not as I do. Editing the vCloud database should be performed only with the guidance of VMware support. Above all, create a point in time backup of the vCloud database with all vCloud Director cell servers stopped (service vmware-vcd stop). There are a variety of methods in which you can perform this database backup. Use the method that is most familiar to and works for you.

So after stopping the vCloud Director services and getting a vcloud database backup…

Step 1: Open Microsoft SQL Server Management Studio and navigate to the [vcloud].[dbo].[network_pool] table. Under the vdn_scope_id column, increment the vdnscope-1 value from 1 to 2.

Step 2: Start the vCloud Director service in all cell servers (service vmware-vcd start) and verify in vShield Manager the Virtual Wire has been created and the vApp can power on successfully. If it fails, stop vCloud services and repeat Step 1 above while incrementing the vdnscope value to 3, then 4, and so on. In my case, vdnscope-5 did the trick.

vCloud Director is awesome. VXLAN with 16 million networks capability kicks it up a notch.

Updated 8/22/15: I received a tip from Jon Hemming in the form of a blog comment. Jon states he has written a VMware KB article titled Creating an isolated network in VMware vCloud Director reports the error: vdnscope-x does not exist (2065485) which documents a process to get the correct VDN Scope ID via the REST API of vShield as well as update the vCloud Director database. Thank you Jon! I did find the syntax for the curl statement to be slightly off. The KB article calls for the following syntax:

curl -k -u admin:default -X GET https://vshield.boche.lab/api/2.0/vdn/scopes/

The result is HTTP Status 404 The requested resource is not available.

What did work was:

curl -k -u admin:default -X GET https://vshield.boche.lab/api/2.0/vdn/scopes

The only change was removing the trailing forward slash on the URL.

vCloud Director Error Cannot delete network pool

August 15th, 2015 by jason No comments »

I ran into a small problem this week in vCloud Director whereby I was unable to Delete a Network Pool. The error message stated Cannot delete network pool because It is still in use. It went on to list In use items along with a moref identifier. This was not right because I had verified there were no vApps tied to the Network Pool. Furthermore the item listed still in use was a dynamically created dvportgroup which also no longer existed on the vNetwork Distributed Switch in vCenter.

I suspect this situation came about due to running out of available storage space earlier in the week on the Microsoft SQL Server where the vCloud database is hosted. I was performing Network Pool work precisely when that incident occurred and I recall an error message at the time in vCloud Director regarding tempdb.

I tried removing state data from QRTZ tables which I blogged about here a few years ago and has worked for specific instances in the past but unfortunately that was no help here. Searching the VMware Communities turned up sparse conversations about roughly the same problem occurring with Org vDC Networks. In those situations, manually editing the vCloud Director database was required.

An obligatory warning on vCloud database editing. Do as I say, not as I do. Editing the vCloud database should be performed only with the guidance of VMware support. Above all, create a point in time backup of the vCloud database with all vCloud Director cell servers stopped (service vmware-vcd stop). There are a variety of methods in which you can perform this database backup. Use the method that is most familiar to and works for you.

Opening up Microsoft SQL Server Management Studio, there are rows in two different tables which I need to delete to fix this. This has to be done in the correct order or else a REFERENCE constraint conflict occurs in Microsoft SQL Server Management Studio and the statement will be terminated.

So after stopping the vCloud Director services and getting a vcloud database backup…

Step 1: Delete the row referencing the dvportgroup in the [vcloud].[dbo].[network_backing] table:

Step 2: Delete the row referencing the unwanted Network Pool in the [vcloud].[dbo].[network_pool] table:

That should take care of it. Start the vCloud Director service in all cell servers (service vmware-vcd start) and verify the Network Pool has been removed.

RHEL 7, open-vm-tools, and guest customization

August 9th, 2015 by jason 14 comments »

Update 5/26/18: For RHEL 7.2 and newer, be sure to read the 5/26/18 update below as some of the steps below are no longer necessary.

I spent some time this weekend working with vCloud Director 5.5.4 build 2831206 (on vSphere 6) and Red Hat Enterprise Linux vApp/guest customization. I’m not a *nix guru but I’m comfortable enough with legacy versions of RHEL 5 and 6 as I’ve worked with them quite a bit, particularly for vSphere applications and solutions such as vCloud Director to provide just one example. Quite honestly internet research or peer networking provides supplemental knowledge for whatever I can’t figure out. However I hadn’t spent much time with RHEL 7. There are some new twists and this blog post is an attempt to document what I’ve uncovered to answer questions and hopefully save myself some time in the future. If you’re in a hurry, skip to the “Tying It All Together” section at the end.

vSphere Templates and vCloud vApp Templates

When it comes to vSphere templates that I use myself, I’ll bake in commonly utilized software packages, patches, as well as tweaks and best practices. However, when it comes to shared vApp Templates in a vCloud Catalog, I employ more of a purist philosophy to minimize issues or questions raised regarding the DNA of the OS build I’m sharing with the organization which serves as their base starting point for their vApp. Aside from installing VMware Tools, my Windows 2012 R2 vApp is about as vanilla as it gets. The same can be said for my RHEL 5 and RHEL 6 vApps. When I applied that same approach to RHEL 7, that’s where some noticeable changes became apparent.

The RHEL 7 Minimal Install

The mere existence of this blog post stems from here. The default installation of RHEL 7 is a Minimal Install. While it’s not encumbered with extra software that may never be used depending on the server’s role, it’s also missing packages commonly installed in the past. Some of which are core dependencies in a virtualized datacenter. However, not knowing this, I gladly accepted the opportunity of a minimalist installation. And that’s exactly what I got.

VMware Tools

After completing a rather uneventful RHEL 7 installation, typically the first and last order of business is to install VMware Tools. Those who attempt it on RHEL 7 (as well as other newer versions of *nix such as CentOS 7) will be greeted with rather stern wording that VMware Tools should be avoided and rather the OS provided open-vm-tools should be used instead. VMware support of open-vm-tools (2073803) provides background information, detail, and outlines the benefits of open-vm-tools. It’s not that you can’t install VMware Tools on RHEL 7, you can, but VMware is not recommending it at this point. In the previously linked KB article:

VMware recommends using open-vm-tools redistributed by operating system vendors.

VMware fully supports…

VMware aids in the development of…

VMware does not recommend removing open-vm-tools redistributed by operating system vendors.

Those who choose to install VMware Tools anyway on a RHEL 7 Minimal Install will soon discover that they cannot do so without installing some additional support RHEL 7 packages. VMware Tools cannot be installed on RHEL 7 due to missing ifconfig (2075519) explains that net-tools is missing and must be installed as follows (you’ll need a yum repository; the next section covers that):

#sudo yum install net-tools

I’d also argue that you’re going to need to install supporting PERL packages to execute the /usr/bin/vmware-config-tools.pl script because it’s also missing in a RHEL 7 Minimal Install. More on that a little later but for now, the other packages that are needed can be installed as follows:

# yum install perl gcc make kernel-headers kernel-devel -y

Creating A Local DVD Repository For YUM (from Red Hat)

Without a Red Hat subscription (I fall into this category), or the networking means to reach your subscription on the internet, you’ll need to rely on your RHEL 7 DVD or .iso to install necessary packages such as net-tools mentioned above. In order to access these packages, you’ll need to mount the DVD and create a local DVD repository.

Mounting the DVD:

mount /dev/cdrom /mnt/

Creating the local DVD repository is slightly more involved but the steps are easy to follow. Create the file /etc/yum.repos.d/dvd.repo. The file should contain the following text:

[rhel7-dvd]
name=rhel7-dvd
baseurl=file:///mnt
enabled=1
gpgcheck=0

The local DVD repository is now available and its existence can now be queried (note that it only remains available for as long as the RHEL 7 DVD is mounted):

yum repolist all

An example of installing a yum package is shown above although it does not always require the use of sudo.

Open VM Tools (from Red Hat)

Red Hat Enterprise Linux 7 Guest Operating System Installation Guide documents the process of installing open-vm-tools. Remember that open-vm-tools is distributed by the OS vendor so everything you need from that respect is available from the RHEL 7 DVD and the local DVD repository created above. That said, installing open-vm-tools is straightforward:

# yum install open-vm-tools

Verify open-vm-tools has been installed in the guest:

# yum search open-vm-tools

With open-vm-tools installed, the guest now has the following vSphere feature functionality:

  • Synchronization of the guest OS clock with the virtualization platform
  • Enables the virtual infrastructure to perform graceful power operations (shut down) and file system quiescing of the virtual machine
  • Provides a heartbeat from guest to the virtualization infrastructure to support vSphere High Availability (HA)
  • Publishes information about the guest OS to the virtualization platform, including resource utilization and networking information
  • Provides a secure and authenticated mechanism to perform various operations within the guest OS from the virtualization infrastructure
  • Accepts additional plug-ins that can extend or customize open-vm-tools functionality

Guest customization and the deployPkg Tools Plug-in (from VMware)

Looking at the bulleted list above, a number of features are provided by open-vm-tools. Unfortunately guest customization isn’t one of them (guest customization is typically used in deploying templates in vSphere as well as deploying available vApps from a vCloud Director catalog). At this point if you attempt to clone a RHEL 7 guest with open-vm-tools, you’ll get the exact same VM over and over again with no unique guest customization. The last bullet speaks to a plug-in architecture for which a guest customization plug-in is available from VMware called the deployPkg Tools Plug-in.

Red Hat Enterprise Linux 7 Guest Operating System Installation Guide talks about the plug-in and while it appears to provide the installation instructions, it’s missing a few required steps for installing the VMware Packaging Public Keys so refer to Installing the deployPkg plug-in in a Linux virtual machine (2075048) for the correct process. In this process, yum will be used to install a package available via the internet from VMware instead of from the local DVD repository described previously.

Download the two VMware Packaging Public Keys from VMware at http://packages.vmware.com/tools/keys

Copy them to /tmp/ on the RHEL 7 guest

Import each of the two keys (that’s a double dash in front of import):

# rpm –import /tmp/VMWARE-PACKAGING-GPG-DSA-KEY.pub

# rpm –import /tmp/VMWARE-PACKAGING-GPG-RSA-KEY.pub

Create the yum repository by creating a file called /etc/yum.repos.d/vmware-tools.repo containing the following text:

[vmware-tools]
name = VMware Tools
baseurl = http://packages.vmware.com/packages/rhel7/x86_64/
enabled = 1
gpgcheck = 1

Execute the command

sudo yum install open-vm-tools-deploypkg

Followed by

sudo systemctl restart vmtoolsd

At this point, both open-vm-tools from Red Hat as well as open-vm-tools-deploypkg from VMware have been installed and guest customization should work and you’d be done, except…

RHEL 7 Guest Customization Fails Because The Minimal Install Is Missing PERL

Under the RHEL 7 Minimal Install, guest customization still does not produce unique VMs during a cloning process. Taking a look at the clone in /var/log/vmware-imc/toolsDeployPkg.log, I noticed the following:

Launching deployment /usr/bin/perl -I/tmp/.vmware/linux/deploy/scripts /tmp/.vmware/linux/deploy/scripts/Customize.pl /tmp/.vmware/linux/deploy/cust.cfg.

Command to exec : /usr/bin/perl

Customization command output:

Deploy error: Deployment failed. The forked off process returned error code.

Package deploy failed in DeployPkg_DeployPackageFromFile

The folder /usr/bin/perl/ does not exist.

So then where is PERL? I already know the answer before I’m told.. it doesn’t exist under a RHEL 7 Minimal Install

[root@localhost ~]# whereis perl
perl:[root@localhost ~]#

Install PERL from the RHEL 7 local DVD repository. This installation should be performed on the template or vApp before it’s placed into the catalog so that the resulting guest customization works (obviously it has little effect on a guest customization which has already failed):

# yum install perl gcc make kernel-headers kernel-devel -y

PERL is now installed and can be called upon for guest customization:

[root@localhost ~]# whereis perl
perl: /usr/bin/perl /usr/share/man/man1/perl.1.gz
[root@localhost ~]#

RHEL 7 Guest Agents

The RHEL 7 Minimal Install turned out to be a bit of learning process. A more streamlined approach, if available, would be to utilize the Infrastructure Server base environment during the RHEL 7 installation instead of the Minimal Install. Infrastructure Server is going to automatically include PERL and net-tools. It’s also going to expose the ability to install the Guest Agents Add-On. It’s talked about in full in the Red Hat Enterprise Linux 7 Guest Operating System Installation Guide. Installing the Guest Agents includes open-vm-tools from the RHEL 7 DVD without the extra steps of manually creating the RHEL 7 local DVD repository.

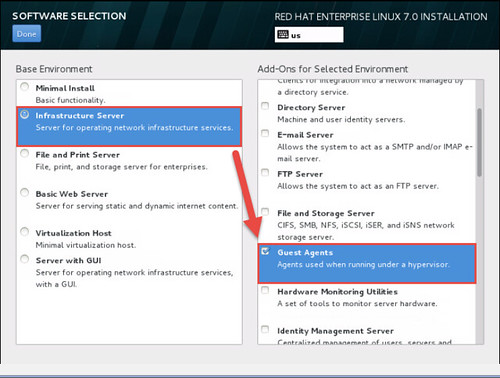
While this is certainly more efficient, the one remaining caveat is that Guest Agents does not include the deployPkg Tools Plug-in from VMware. The plug-in will still need to be manually installed from the VMware repository if customization of the VM or vApp is required. For templates, this is almost always a necessity.

RHEL 7 Networking

One last note is that networking in RHEL 7 has seen some changes. For openers, legacy device names such as eth0, eth1, etc. are replaced by a profile name such as eno16780032 (the corresponding files reflect these name changes in /etc/sysconfig/network-scripts/). Menu driven network configuration (previously accessed from setup) has been replaced by a Network Manager which is accessible via nmtui (Network Manager Text User Interface), nmcli (Network Manager Command Line Interface), or Network Scripts. Also recall from the top of the article that the old standby ifconfig will not be present under a Minimal Install – it requires the net-tools package. Last but not least, detected Ethernet adapters in a Minimal Installation are not automatically enabled for use. Discovered Ethernet devices can be enabled during the initial RHEL 7 setup (I believe it’s under Hostname and Network), or it can be enabled after installation by running nmtui and check the Automatically Connect box for the appropriate Edit a connection menu. A detected Ethernet adapter listing can be obtained at any time with nmcli d.

Although this article was specific RHEL 7, open-vm-tools is available with the following operating systems as documented by VMware support of open-vm-tools (2073803)

  • Fedora 19 and later releases
  • Debian 7.x and later releases
  • openSUSE 11.x and later releases
  • Recent Ubuntu releases (12.04 LTS, 13.10 and later)
  • Red Hat Enterprise Linux 7.0 and later releases
  • CentOS 7 and later releases
  • Oracle Linux 7 and later releases
  • SUSE Linux Enterprise 12 and later releases

RHEL 7 Templates – Tying It All Together

In the end, there are a few different Base Environment types available with varying steps for building a RHEL 7 image which supports guest customization in vSphere or vCloud Director.

Minimal Install (default)

  1. Choose Minimal Install Base Environment
  2. Enable Ethernet card to automatically connect (at install or later using nmtui)
  3. Add RHEL 7 local DVD repository
  4. Install net-tools
  5. Install PERL
  6. Install open-vm-tools
  7. Add yum repository for VMware (for RHEL 7.2 and newer, be sure to read the 5/26/18 update below as this step is no longer necessary)
  8. Install the deployPkg Tools Plug-in (for RHEL 7.2 and newer, be sure to read the 5/26/18 update below as this step is no longer necessary)

Infrastructure Server

  1. Choose Infrastructure Server Base Environment and Guest Agents Add-On (open-vm-tools will automatically be installed)(for RHEL 8.0 and newer, open-vm-tools is automatically installed with the default Base Environment of Server with GUI)
  2. Enable Ethernet card to automatically connect (at install or later using nmtui)
  3. Add yum repository for VMware (for RHEL 7.2 and newer, be sure to read the 5/26/18 update below as this step is no longer necessary)
  4. Install the deployPkg Tools Plug-in (for RHEL 7.2 and newer, be sure to read the 5/26/18 update below as this step is no longer necessary)

Clearly the Minimal Install route has more steps while the Infrastructure Server route has less steps and is quicker. Regardless of Base Environment type, VMware does not recommend the installation of VMware Tools.

I’ve linked several resources throughout this article. Just about all of the information was available, it was merely a matter of finding and reading the relevant documentation which isn’t always in one place. The only dots I had to connect on my own which I didn’t see mentioned anywhere was the lack of PERL for the deployPkg Tools Plug-in from VMware as well as for the installation of VMware Tools on RHEL 7 which isn’t recommended by VMware.

Update 8/22/15: vCloud Director guest customization is also problematic with CentOS 7 but with one additional hang up. I’ve found several references on the internet with the workaround including one I’ll link here from my good friend Bob Plankers/etc/redhat-release must read Red Hat Enterprise Linux Server release 7.0 (Maipo)

Update 9/11/15: Brian Graf authored a nice piece yesterday titled Open-VM-Tools (OVT): The Future of VMware Tools for Linux which anyone who wound up here should find interesting.

Update 5/26/18: As noted by daVikes in the comment section below (thank you daVikes!), relevant updates have been made as of RHEL 7.2 which streamlines templates and guest customization even further. In short, deployPkg is included with open-vm-tools. Whether you choose to start with a minimal installation and install open-vm-tools afterwards, or you choose the Infrastructure Server and install Guest Agents (this installs open-vm-tools), deployPkg will be included with open-vm-tools. Do note that if choosing the Infrastructure Server method, downloading the two VMware Packaging Public Keys and creating the /etc/yum.repos.d/vmware-tools.repo yum repository is no longer necessary. I still make it a habit to follow the steps for Creating A Local DVD Repository For YUM.

Update 6/28/19: RHEL 8.0: open-vm-tools is automatically installed with the default Base Environment of Server with GUI

VMware vCenter Cookbook

July 27th, 2015 by jason No comments »

Back in June, I was extended an offer from PACKT Publishing to review a new VMware book. I’ve got a lot on my plate at the moment but it sounded like an easier read and I appreciated the offer as well as the accommodation of my request for paperback in lieu of electronic copy so I accepted. I finished reading it this past weekend.

The book’s title is VMware vCenter Cookbook and it is PACKT’s latest addition to an already extensive Cookbook series (Interested in Docker, DevOps, or Data Science? There’s Cookbooks for that). Although it was first published in May 2015, the content isn’t quite so new as its coverage includes vSphere 5, and vSphere 5 only with specific focus on vSphere management via vCenter Server as the title of the book indicates. The author is Konstantin Kuminsky and as I mentioned earlier the book is made available in both Kindle and paperback formats.

Admittedly I’m not familiar with PACKT’s other Cookbooks but the formula for this one is much the same as the others I imagine: “Over 65 hands-on recipes to help you efficiently manage your vSphere environment with VMware vCenter”. Each of the recipes ties to a management task that an Administrator of a vSphere environment might need to carry out day to day, weekly, monthly, or perhaps annually. Some of the recipes can also be associated with and aid in design, architecture, and planning although I would not say these are not the main areas of focus. The majority of the text is operational in nature.

The recipes are organized by chapter and while going from one to the next, there may be a correlation, but often there is not. It should be clear at this point it reads like a cookbook, and not a mystery novel (although for review purposes I did read it cover to cover). Find the vCenter how-to recipe you need via the Table of Contents or the index and follow it. Expect no more and no less.

Speaking of the Table of Contents…

  • Chapter 1: vCenter Basic Tasks and Features
  • Chapter 2: Increasing Environment Availability
  • Chapter 3: Increasing Environment Scalability
  • Chapter 4: Improving Environment Efficiency
  • Chapter 5: Optimizing Resource Usage
  • Chapter 6: Basic Administrative Tasks
  • Chapter 7: Improving Environment Manageability

It’s a desktop reference (or handheld I suppose depending on your preferred consumption model) which walks you through vSphere packaging and licensing on one page, and NUMA architecture on the next. The focus is vCenter Server and perhaps more accurately vSphere management. Fortunately that means there is quite a bit of ESXi coverage as well with management inroads from vCenter, PowerShell, and esxcli. Both Windows and appliance vCenter Server editions are included as well as equally fair coverage of both vSphere legacy client and vSphere web client.

Bottom line: It’s a good book but it would have been better had it been released at least a year or two earlier. Without vSphere 6 coverage, there’s not a lot of mileage left on the odometer. In fairness I will state that many of the recipes will translate identically or closely to vSphere 6, but not all of them. To provide a few examples, VM templates and their best operational practices haven’t changed that much. On the other hand, there are significant differences between FT capabilities and limitations between vSphere 5 and vSphere 6. From a technical perspective, I found it pretty spot on which means the author and/or the reviewers did a fine job.

Thank you PACKT Publishing for the book and the opportunity.

vCloud Director 5.6.4 Remote consoleproxy issues

June 12th, 2015 by jason No comments »

vCloud Director is a wonderful IaaS addition to any lab, development, or production environment. When it’s working properly, it is a very satisfying experience wielding the power of agility, consistency, and efficiency vCD provides. However, like many things tech with upstream and human dependencies, it can and does break. Particularly in lab or lesser maintained environments that don’t get all the care and feeding production environments benefit from. When it breaks, it’s not nearly as much fun.

This week I ran into what seemed like a convergence of issues with vCD 5.6.4 relating to the Remote Console functionality in conjunction with SSL certificates, various browser types, networking, and 32-bit Java. As is the case often, what I’m documenting here is really more for my future benefit as there were a number of sparse areas I covered which I won’t necessarily retain in memory long but as it goes with blogs and information sharing, sharing is caring.

The starting point was a functional vCD 5.6.4-2496071 environment on vSphere 5.5. Everything historically and to date working normally with the exception of the vCD console which had stopped working recently in Firefox and Google Chrome browsers. Opening the console in either browser from seemingly any client workstation yielded the pop out console window with toolbar buttons along the top, but there was no guest OS console painted in the main window area. It was blank. The status of the console would almost immediately change to Disconnected. I’ve dealt with permutations of this in the past and I verified all of the usual suspects: NTP, DNS, LDAP, storage capacity, 32-bit Java version, blocked browser plug-ins, etc. No dice here.

In Firefox, the vCD console status shows Disconnected while the Inspect Element console shows repeated failed attempts to connect to the consoleproxy address.

10:11:30.195 "10:11:30 AM [TRACE] mks-connection: Connecting to wss://172.16.21.151/902;cst-t3A6SwOSPRuUqIz18QAM1Wrz6jDGlWrrTlaxH8k6aYuBKilv/1mc7ap50x3sPiHiSJYoVhyjlaVuf6vKfvDPAlq2yukO7qzHdfUTsWvgiZISK56Q4r/4ZkD7xWBltn15s5AvTSSHKsVbByMshNd9ABjBBzJMcqrVa8M02psr2muBmfro4ZySvRqn/kKRgBZhhQEjg6uAHaqwvz7VSX3MhnR6MCWbfO4KhxhImpQVFYVkGJ7panbjxSlXrAjEUif7roGPRfhESBGLpiiGe8cjfjb7TzqtMGCcKPO7NBxhgqU=-R5RVy5hiyYhV3Y4j4GZWSL+AiRyf/GoW7TkaQg==--tp-B5:85:69:FF:C3:0A:39:36:77:F0:4F:7C:CA:5F:FE:B1:67:21:61:53--"1 debug.js:18:12

10:11:30.263 Firefox can't establish a connection to the server at wss://172.16.21.151/902;cst-t3A6SwOSPRuUqIz18QAM1Wrz6jDGlWrrTlaxH8k6aYuBKilv/1mc7ap50x3sPiHiSJYoVhyjlaVuf6vKfvDPAlq2yukO7qzHdfUTsWvgiZISK56Q4r/4ZkD7xWBltn15s5AvTSSHKsVbByMshNd9ABjBBzJMcqrVa8M02psr2muBmfro4ZySvRqn/kKRgBZhhQEjg6uAHaqwvz7VSX3MhnR6MCWbfO4KhxhImpQVFYVkGJ7panbjxSlXrAjEUif7roGPRfhESBGLpiiGe8cjfjb7TzqtMGCcKPO7NBxhgqU=-R5RVy5hiyYhV3Y4j4GZWSL+AiRyf/GoW7TkaQg==--tp-B5:85:69:FF:C3:0A:39:36:77:F0:4F:7C:CA:5F:FE:B1:67:21:61:53--.1 wmks.js:321:0

tail -f /opt/vmware/vcloud-director/logs/vcloud-container-debug.log |grep consoleproxy revealed:
2015-06-12 10:50:54,808 | DEBUG    | consoleproxy              | SimpleProxyConnectionHandler   | Initiated handling for channel 0x22c9c990 [java.nio.channels.SocketChannel[connected local=/172.16.21.151:443 remote=/172.31.101.6:61719]] |
2015-06-12 10:50:54,854 | DEBUG    | consoleproxy              | ReadOperation                  | IOException while reading data: java.io.IOException: Broken pipe |
2015-06-12 10:50:54,855 | DEBUG    | consoleproxy              | ChannelContext                 | Closing channel java.nio.channels.SocketChannel[connected local=/172.16.21.151:443 remote=/172.31.101.6:61719] |
2015-06-12 10:50:55,595 | DEBUG    | consoleproxy              | SimpleProxyConnectionHandler   | Initiated handling for channel 0xd191a58 [java.nio.channels.SocketChannel[connected local=/172.16.21.151:443 remote=/172.31.101.6:61720]] |
2015-06-12 10:50:55,648 | DEBUG    | pool-consoleproxy-4-thread-289 | SSLHandshakeTask               | Exception during handshake: java.io.IOException: Broken pipe |
2015-06-12 10:50:56,949 | DEBUG    | consoleproxy              | SimpleProxyConnectionHandler   | Initiated handling for channel 0x3f0c025b [java.nio.channels.SocketChannel[connected local=/172.16.21.151:443 remote=/172.31.101.6:61721]] |
2015-06-12 10:50:57,003 | DEBUG    | pool-consoleproxy-4-thread-301 | SSLHandshakeTask               | Exception during handshake: java.io.IOException: Broken pipe |
2015-06-12 10:50:59,902 | DEBUG    | consoleproxy              | SimpleProxyConnectionHandler   | Initiated handling for channel 0x1bda3590 [java.nio.channels.SocketChannel[connected local=/172.16.21.151:443 remote=/172.31.101.6:61723]] |
2015-06-12 10:50:59,959 | DEBUG    | pool-consoleproxy-4-thread-295 | SSLHandshakeTask               | Exception during handshake: java.io.IOException: Broken pipe |

In Google Chrome, the vCD console status shows Disconnected while the Inspect element console (F12) shows repeated failed attempts to connect to the consoleproxy address.

10:26:43 AM [TRACE] init: attempting ticket acquisition for vm vcdclient
10:26:44 AM [TRACE] plugin: Connecting vm
10:26:44 AM [TRACE] mks-connection: Connecting to wss://172.16.21.151/902;cst-f2eeAr8lNU6BTmeVelt9L8VKoe92kJJMxZCC2watauBV6/x…fmI8Xg==--tp-B5:85:69:FF:C3:0A:39:36:77:F0:4F:7C:CA:5F:FE:B1:67:21:61:53--
WebSocket connection to 'wss://172.16.21.151/902;cst-f2eeAr8lNU6BTmeVelt9L8VKoe92kJJMxZCC2watauBV6/x…fmI8Xg==--tp-B5:85:69:FF:C3:0A:39:36:77:F0:4F:7C:CA:5F:FE:B1:67:21:61:53--' failed: WebSocket opening handshake was canceled
10:26:46 AM [ERROR] mks-console: Error occurred: [object Event]
10:26:46 AM [TRACE] mks-connection: Disconnected [object Object]

tail -f /opt/vmware/vcloud-director/logs/vcloud-container-debug.log |grep consoleproxy revealed:
2015-06-12 10:48:35,760 | DEBUG    | consoleproxy              | SimpleProxyConnectionHandler   | Initiated handling for channel 0x55efffb3 [java.nio.channels.SocketChannel[connected local=/172.16.21.151:443 remote=/172.31.101.6:61675]] |
2015-06-12 10:48:39,754 | DEBUG    | consoleproxy              | SimpleProxyConnectionHandler   | Initiated handling for channel 0x3f123a13 [java.nio.channels.SocketChannel[connected local=/172.16.21.151:443 remote=/172.31.101.6:61677]] |
2015-06-12 10:48:42,658 | DEBUG    | consoleproxy              | SimpleProxyConnectionHandler   | Initiated handling for channel 0x7793f0a [java.nio.channels.SocketChannel[connected local=/172.16.21.151:443 remote=/172.31.101.6:61679]] |

If you have acute attention to detail, you’ll notice the time stamps from the cell logs don’t correlate closely with the time stamps from the browser Inspect element console. Normally this would indicate time skew or an NTP issue which does cause major headaches with functionality but that’s by design here for my various screen captures and log examples aren’t from the exact same point in time. So it’s safe to move on.

Looking at the most recent vCloud Director For Service Providers installation documentation, I noticed a few things.

  1. Although I did upgrade vCD a few months ago to the most current build at the time, there’s a newer build available: 5.6.4-2619597
  2. Through repetition, I’ve gotten quite comfortable with the use of Java keytool and its parameters. However, additional parameters have been added to the recommended use of the tool. Noted going forward.
  3. VMware self signed certificates expire within three (3) months. Self signed certificates were in use in this environment. I haven’t noticed this behavior in the past nor has it presented itself as an issue but after a quick review, the self signed certificates generated a few months ago with the vCD upgrade had indeed expired recently.

At this point I was quite sure the expired certificates was the problem although it seemed strange the vCD portal was still usable while only the consoleproxy was giving me fits.  So I went through the two minute process of regenerating and installing new self signed certificates for both http and the consoleproxy.  The vCD installation guide more or less outlines this process as it is the same for a new cell installation as it is for replacing certificates. VMware also has a few KB articles which address it as well (1026309, 2014237). For those going through this process, you should really note the keytool parameter changes/additions in the vCD installation guide.

While I was at it, I also built a new replacement cell on a newer version of RHEL 6.5, performed the database upgrades, extended the self signed certificate default expiration from three months to three years, and I retired the older RHEL 6.4 cell. Fresh new cell. New certs. Ready to rock and roll.

Not so much. I still had the same problem with the console showing Disconnected. However, the Inspection element console for each browser are now indicating some new error message which I don’t have handy at the moment but basically it can’t talk to the consoleproxy adddress at all. I tried to ping the address and it was dead from a remote station point of view although it was quite alive at a RHEL 6.5 command prompt. Peters Virtual Notes had this one covered thankfully. According to https://access.redhat.com/site/solutions/53031, a small change is needed for the file /etc/sysctl.conf.

net.ipv4.conf.default.rp_filter = 1

must be changed to

net.ipv4.conf.default.rp_filter = 2

Success. Surely consoleproxy will work now. Unfortunately it still does not want to work. Back to the java.io.IOException: Broken pipe SSL handshake issues although the new certificate for vCD’s http address is registered and working fine (remembering again each vCD cell has two IP addresses, one for http access and one for consoleproxy functionality – each requires a trusted SSL certificate or an exception).

The last piece of the puzzle was something I have never had to do in the past and that is to manually add an exception (Firefox) for the consoleproxy self signed certificate and install it (Google Chrome). For each browser, this is a slightly different process.

For Firefox, browse to the https:// address of the consoleproxy, don’t worry, nothing visible should be displayed when it does not receive a properly formatted request. The key here is to add an exception for the certificate associated specifically to the consoleproxy address.

Once this certificate exception is added, the consoleproxy certificate is essentially trusted and so is the IP address for the host and the console service it is supposed to provide.

To resolve the consoleproxy issue for Google Chrome, the process is slightly different. Ironically I found it easiest to use Internet Explorer for this. Open Internet Explorer and when you do so, be sure to right click on the IE shortcut and Run as administrator (this is key in a moment). Browse to the https:// address of the consoleproxy, don’t worry, nothing visible should be displayed when it does not receive a properly formatted request. Continue to this website and then use the Certificate Error status message in the address bar to view the certificate being presented. The self signed consoleproxy certificate needs to be installed. Start this task using the Install Certificate button. This button is typically missing when launching IE normally but it is revealed when launching IE with Run as administrator rights.

Browse for the location to install the self signed certificate. Tick the box Show physical stores. Drill down under Third-Party Root Certification Authorities. Install the certificate in the Local Computer folder. This folder is typically missing when launching IE normally but it is revealed when launching IE with Run as administrator rights.

Once this certificate is installed, the consoleproxy certificate is essentially trusted in Google Chrome. Just as with the Firefox remedy, the Java SSL handshake with the consoleproxy succeeds and the vCD remote console is rendered.

Note that for Google Chrome, there is another quick method to temporarily gain functional console access without installing the consoleproxy certificate via Internet Explorer.

  1. Open a Google Chrome browser and browse to the https:// address of the consoleproxy.
  2. When prompted with Your connection is not private, click the Advanced link.
  3. Click the Proceed to <console proxy IP address> (unsafe) link.
  4. Nothing will visibly happen except Google Chrome will now temporarily trust the consoleproxy certificate and the vCD remote console will function for as long as a Google Chrome tab remains open.
  5. Without closing Google Chrome, now continue into the vCD organization portal and resume business as usual with functional remote consoles.

On the topic of Google Chrome, internet searches will quickly reveal vCloud Director console issues with Google Chrome and NPAPI. VMware discusses this in the vCloud Director 5.5.2.1 Release Notes:

Attempts to open a virtual machine console on Google Chrome fail
When you attempt to open a virtual machine console on a Google Chrome browser, the operation fails. The occurs due to the deprication of NPAPI in Google Chrome. vCloud Director 5.5.2.1 uses WebMKS instead of the VMware Remote Console to open virtual machine consoles in Google Chrome, which resolves this issue.

I was working with vCD 5.6.x which leverages WebKMS in lieu of NPAPI so the NPAPI issue was not relevant in this case but if you are running into an NPAPI issue, Google offers How to temporarily enable NPAPI plugins here.

Update 8/8/15: Josiah points out a useful VMware forum thread which may help resolve this issue further when FQDNs are defined in DNS for remote console proxies or where multiple vCloud cells are installed in a cluster behind a front end load balancer, NAT/reverse proxy, or firewall.

Update 7/17/20: The VMware Cloud Director virtual appliance with embedded PostgreSQL database by default uses eth0 for the console proxy address along with port 8443. ie. https://100.88.144.13:8443. This is the URL that must be trusted in order to open a VMware Cloud Director remote console without the dreaded Disconnected message. Find this address and port combination to trust in a Disconnected console browser window by pressing SHIFT + CTRL + J or F12 which opens the Elements window. This information was previously published in VMware KB 2058496 Cannot connect to vCloud Director WebMKS console with Mozilla Firefox or Google Chrome which has been taken down but the cached version of the page still remains.

Veeam Backup & Replication 8.0 Update 2 Has Arrived

April 29th, 2015 by jason No comments »

Veeam Backup & Replication 8.0 Update 2 has arrived and with it comes compatibility with VMware vSphere 6.  The announcement (here’s another) from Veeam came yesterday following the vSphere 6 launch by about six weeks.  I was personally notified in a DM via Twitter as promised.  Talk about red carpet treatment from an organization which values community – it’s hard to find a better example than Veeam.

Not only is Update 2 vSphere 6 hypervisor aware, but it also supports many of the features baked into vSphere 6 such as VVOLs, VSAN, Cross-vCenter vMotion, tags, FT virtual machines, and Storage Policy-Based Management (SPBM) backup and restore.  This is just the short list.  Improvements were made other areas such as Microsoft Hyper-V, SQL Server, file level recovery, and Veeam Cloud Connect.  For a long and detailed list of enhancements, take a look at the Release Notes for Veeam Backup & Replication 8.0 Update 2 found in Veeam KB 2024.

As with past upgrades, I found the process quick, painless, and no-nonsense.  Granted, my lab installation is pretty straightforward.  However, be sure to read the release notes if you’re utilizing vSphere tags.

Veeam customers can download Update 2 by visiting Veeam KB 2024.