Plaxo: Did we really need another online network?

October 29th, 2008 by jason No comments »

I’ve been a member of the LinkedIn online networking site for, I think, over ten years.  The goal of building the biggest baddest list of online networking contacts ever orbits my interest cluster about once every three or four years (I’m on my active cycle right now by the way).  Nonetheless, during those periods of minimal activity, LinkedIn has graciously maintained my account without so much as even a friendly periodic inactivity email reminder.

Then I start receiving email requests from friends and colleagues that have joined the new Plaxo online networking site.  Some of these people I already have links to on LinkedIn.  Maintaining contacts and my updated information in both LinkedIn and Plaxo is about as much fun and time well spent as keeping all of my bookmarks in sync between different PCs and browsers.  You’ll have to excuse me as I come from the Netscape days… Favorites might be the term you recognize.

Relatives, friends, and colleagues, I refuse to participate in Plaxo and as such I accept no contact requests in that system.  LinkedIn was and still is the standard.  As far as I’m concerned, Plaxo had no business re-inventing a solution that had already existed for a decade and in the process mucking up a perfectly functioning eco system.

Lack of chargeback solution stunts virtualization growth

October 29th, 2008 by jason No comments »

By some of today’s standards, we’ve got a modest sized virtual infrastructure. Seven non-production ESX hosts and four production ESX hosts, plus various isolated lab and small remote office deployments. We purchased the infrastructure a few years ago when we stood up our first ESX environment.

From day one, our infrastructure has been plenty over capacity because part of our initial deployment didn’t involve a massive P2V exercise to immediately fill up the infrastructure. The goal was to gradually migrate new and existing virtualization candidates to the virtual environment. With around 90 VMs today, we don’t quite have the consolidation ratio that I’d like to be seeing, but I understand it’s a gradual ramp up and for the most part I’ve been patient.

Like others, we began experimenting with VDI (virtual desktop infrastructure) on VMware ESX. A VDI image was developed and deployed to 12 pilot users. For the past year, the pilot testing has been largely successful. In fact, the tales of success in the hallways produced a few additional requests from developers and power users for VDIs. Today we’ve got 20 VDIs with a batch request in the queue for 90 more.

I was excited when I heard 90 VDIs had been requested. In a single transaction I could double my consolidation ratio from 8:1 (virtual machines:physical machines) to 16:1. VM to socket ratio would be 4:1. VM to core ratio would be 2:1.

Disappointment soon set in. Management has put an indefinite hold on VDI deployments because we don’t have a chargeback model that can be applied effectively or fairly to VDIs. The primitive chargeback model we’re required to abide by comes from the Finance department. It states that in order for us to charge a business line, we need a vendor invoice. Basically, we can’t charge entities for use of existing infrastructure. We would need an invoice for infrastructure expansion such as additional processors, disk shelves, memory, fiber switches, etc. What it boils down to is we’d end up charging a business line thousands of dollars, sometimes even $20,000 or more, for a VM or a few VMs. The business line immediately walks away from the table and decides to purchase a few comodity PCs for $500 or less each. In addition, the business line learns that all of this virtualization money saving that they have been hearing about is totally false. They get a bad taste in their mouths about virtualization and spread their experience to other co-workers and departments.

The technology department is not a profit generating department. We’re completely expense. We don’t have the money in our own budgets to fund additional virtual infrastructure without a project. Budget requests have been submitted to fund VDI infrastructure, however, the red pens see that as way too much expense when commodity PCs can be purchased for less. Particularly in today’s business climate (and we’re a bank). A lot of the tangible benefits that virtualization brings to the datacenter (cooling, energy, real estate, etc.) aren’t directly realized out on the floor where the desktops are. A manager purchasing five PCs for his/her department doesn’t have cooling, electrical, or space issues so a $1,000+ per VDI cost makes no economical sense to the departmental budget they manage, even though it could be proven beneficial at a higher level for the company.

Organizations must upgrade their chargeback models and cut out the politics to allow virtualization to grow. I think it’s safe to say that virtualization isn’t going away anytime soon. The trend is here to stay. Adapt now or adapt later. The choice on how soon we’d like to save money and the environment is a decision that all must be in agreement with to move forward.

N_Port ID Virtualization (NPIV) and VMware Virtual Infrastructure

October 28th, 2008 by jason 5 comments »

A few weeks ago, an associate got me curious about N_Port ID Virtualization (NPIV for short) and what could be done with it in VMware’s current Virtual Infrastructure offerings (VC 2.5u3, ESX 3.5u2).  Most of my SAN equipment is a little on the older side so I haven’t had much chance to play with NPIV or investigate its benefits.  I decided to head into the lab and kick the tires.

To the best of my knowledge, I thought NPIV was somewhat of a newer technolgoy so the first thing was to inventory my hardware for NPIV capability.

  • VMware Virtual Infrastructure 3.5 – check!
  • Compaq StorageWorks 4/8 SAN switch – bzzz!
  • Preferably 4Gb SFPs but 2Gb should work also – check!
  • QLogic 2Gb HBAs – bzzz!

Right off the bat, I’ve got some obstacles to overcome.  My SAN switch doesn’t support NPIV in the current firmware version but the fact that it’s a 4GB switch leads me to believe there may be hope in a newer firmware version.  The SAN switch needs to support NPIV in any NPIV implementation, VMware or otherwise.  The good news is that there’s newer firmware available for the SAN switch.  I upgraded the SAN switch firmware and see that I now have NPIV configuration options on my SAN switch.  One issue resolved.

To validate whether or not a Brocade switch port supports NPIV, check the Port Admin in the GUI console or run the following command from the switch CLI via telnet:

portcfgshow 1  (where 1 is the switch port number)

If NPIV is disabled, it can easily be enabled via the Port Admin GUI or by using the following command from the switch CLI via telnet:

portCfgNPIVPort 5 1  (where 5 is the port number and 1 is the mode 1=enable, 0=disable)

I don’t have a compatible HBA.  That’s a tough one.  VMware’s documentation explains “Currently, the following vendors and types of HBA provide [NPIV] support”

  • QLogic – any 4GB HBA
  • Emulex – 4GB HBAs that have NPIV-compatible firmware

A quick look online at Ebay reveals that 4Gb HBAs are outside of my lab’s budget range (most of the lab budget this year was reallocated for a new deck and sprinkler system for the house – funny how things at home tend to mimic the politics in the office).  Fortunately, there’s more than one way to skin a cat.  A few emails later and I have a 60 day demo HBA coming from Hewlett Packard (HP’s OEM part number: FC1243 4GB PCI-X 2.0 DC, QLogic’s part number QLA2462). 

To validate whether or not your current HBA supports NPIV, open up the ESX console and run the following command:

cat /proc/scsi/qla2300/1 |grep NPIV  (where qla2300 is the HBA type and 1 is the HBA number)

For Emulex, it’s going to be something like cat /proc/scsi/lpfc/1 |grep NPIV

Obviously, browse your /proc/scsi/ directory to see what HBAs are in use by ESX.

npiv4

In addition to the hardware issues, VMware sparsely distributes key NPIV information across several different documents in their library.   This is a pet peeve of mine.  Nonetheless, these are the VMware documents you need to pay attention to (but like me, you can choose to save the reading until AFTER you run into issues):

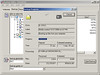
After a few days, the demo HBA from HP arrives.  I notice the firmware is from 2005 so I upgrade the firmware to current.  I then begin my testing.  I connected the fibre beteen the HBA and the SAN switch and powered on the ESX host.  Before allowing the ESX host to boot up, I entered the <CTRL + Q> BIOS configuration of the HBA to see if any new NPIV options had been added with the firmware upgrade.  None.  No mention of NPIV anywhere in the BIOS.  I proceeded to allow ESX to boot up.  Now that the fibre port is hot, I opened the management interface of the Brocade SAN switch and configured the port for the correct speed and NPIV support (this is configured on a port by port basis).  Unfortunately, I’m not seeing that NPIV is in use from the SAN switch point of view.  I decide to create a VM and see if I need to enable NPIV inside the VM first.  Another roadblock as shown below – the NPIV configuration is essentially all gray’d out and I see a hint at the bottom saying I need RDM storage.  I’m not sure why I need RDM.  Seems like an odd requirement, but I’ll find out why a little later.

npiv1

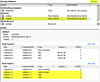
In the lab I have swiSCSI shared storage suitable enough for testing with RDMs.  A few mouse clicks later and I have myself a VM with an RDM.  I head back to the VM configuration and I’m greeted with the success of being able to add WWNs.  Although I could create the WWNs myself by editing the .vmx file by hand, it’s much easier to let ESX assign them for me.  ESX generates exactly five WWNs:  1x Node WWN and 4x Port WWNs (the Port WWNs are what you should zone to).  It goes without saying that once these WWNs are generated, they should remain static in zoned fabrics (you do zone your fabric don’t you?!).

npiv2     npiv3

The entries in the .vmx file look like this (really, that’s it):

wwn.node = “25bb000c29000ba5”
wwn.port = “25bb000c29000da5,25bb000c29000ca5,25bb000c29000ea5,25bb000c29000fa5”
wwn.type = “vc”
 
Two steps forward, one step back.  I power cycled the VM a few times and I’m still not seeing any sign of NPIV kicking in on the SAN switch.  I should be seeing the virtual WWNs coming online so that I can zone them to something.  Referring to the sparse VMware documentation on NPIV, I discovered how VMware’s implementation of NPIV (version 1.0) works and I also learned I was missing a critical hardware component:  a SAN.  This ties back to my previous questioning of why an RDM is required for NPIV.  So quickly, here’s how NPIV works on VMware Virtual Infrastructure when NPIV is enabled (I obtained access to a SAN to work all of this out):
  1. When the VM is powered on, before the virtual hardware POSTs, it scans the physical HBAs of the ESX host for the RDM mapping to SAN storage.  SAN storage connected to HBAs is a hard requirement.  If an HBA doesn’t support NPIV, it is skipped in the detection process.  If ESX cannot see the zoned RDM LUN through an NPIV aware HBA, the HBA is skipped in the detection process.
  2. If and when an RDM SAN LUN is discovered through the detection process via an NPIV aware HBA through an NPIV capable SAN switch, fireworks go off and magic happens.  One of the four virtual Port WWN s (in the order as they appear in the .vmx file) are assigned to the phsyical HBA and the NPIV virtual Port WWN is activated on the SAN switch.
  3. ESX will assign a maximum of four NPIV Port WWNs during the detection process.  What this means is that if you have four NPIV HBAs connected to four NPIV aware SAN switch ports which are in turn zoned to four SAN LUNs, all four will be NPIV activated.  If you have only one NPIV HBA, you’ll only use one of the virtual Port WWNs.  If you have six NPIV HBAs, only the first four will be activated with NPIV Port WWNs in the discovery process.
  4. Zoning and storage presentation.  Here’s the catch 22 in this contraption and it’s a big one.
    1. I can’t get the ESX generated NPIV Port WWNs to activate on the switch until the VM can see RDM SAN LUN storage targets!
    2. I can’t easily zone RDM SAN storage processors to NPIV Port WWNs until the SAN switch can see the NPIV Port WWNs come online (I use soft zoning by WWN, not hard zoning by physical switch port)!!
    3. I can’t configure selective storage presentation (easily) on the SAN until the SAN can see the NPIV Port WWNs!!!
    4. The detection process at VM POST literally takes less than five seconds total to be successful or to fail and one second or less per HBA scan so to coordinate the correct GUI screens in the SAN switch management console, the selective storage presentation SAN console, and the VM console to toggle power state, takes incredible hand/eye coordination and timing.  It’s literally lining up all the screens, powering on the VM and hitting the refresh button in each of the SAN management consoles to capture the NPIV Port WWN that briefly comes online during the detection process, then goes away after failing to find an RDM SAN LUN.
    5. The only way to make this all work easily in my favor is to disable zoning on the SAN switch and disable selective storage presentation on the SAN.
  5. At any time during the initial detection process or while the VM is already online in operation, should an NPIV hardware or zoning requirement fail to be met for the RDM raw storage on SAN, the VM will fall back to using the Port WWN of the physical HBA it was traversing through it’s NPIV Port WWN assignment.

Once I met all of the requirements above and got NPIV working, the result was rather anticlimactic for the amount of effort that was involved.  Here’s what NPIV looks like from Port Admin on a Brocade switch (blue is the physical HBA, green in is the NPIV Port WWN that VMware generated): 

 npiv5  
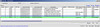
(Zoom in using the Flickr toolbar)

 I asked myself the questions “Why would anyone even do this?  What are the benefits?”.  There aren’t many, at least not right now with this implementation.  By far, I think the largest benefit is going to be for the SAN administrator.  Maybe a SAN switch port or storage controller is running hot.  Without NPIV, we have many VMs communicating with back end SAN storage over a shared HBA which to the SAN administrator appears as a single Port WWN in his/her SAN admin tools.  However, with NPIV, the SAN admin tools can now monitor the individual virtualized streams of I/O traffic that tie back to individual VMs.  I liken it much to the unique channels in the Citrix ICA protocol that is carried over TCP/IP.  Each of those channels can be monitored and in some cases be throttled or given priority.  The same concept applies to virtualized channels of VM disk I/O traffic through a physical HBA.  Another analogy would be VLANs for disk I/O traffic, but in a very primatave stage.

Another thought for this is to provide a layer of security if we could zone a SAN storage controller solely to an NPIV Port WWN, however, right now this is impossible because as was explained in #5 above, any time the physical HBA is removed from the NPIV visibility chain, NPIV shuts down and falls back to the physical HBA for traffic, and at that point you’ve zoned out your phyiscal HBA and disk I/O traffic would quickly queue and then halt, sending your VM into obvious distress.

A few tips that I’ve personally come up with in this exploration process:

  1. Don’t remove and then readd NPIV WWNs in the VM once it has all initially been zoned because ESX will assign a completely new set of WWNs.
  2. If you’ve done the above, you can modify the WWNs by hand in the .vmx file.  Remove the VM from inventory first, then modify the .vmx, then readd the VM back to inventory because VirtualCenter (or the VIC) likes to hold on to the generated WWNs if you don’t.
  3. Adding or removing phsyical HBAs on the host or RDMs on the VM causes the discovery process to mismatch different NPIV Port WWNs with physical HBAs thus throwing off the zoning and causing the whole thing to bomb to the point all NPIV discovery fails.
  4. If the above happens, you can change the order of the NPIV Port WWN assignment discovery in the .vmx file.
  5. You can VMotion with NPIV, however, make sure the RDM file is located on the same datastore where the VM configuration file resides.  Storage VMotion or VMotion between datastores isn’t allowed with NPIV enabled.
  6. The location of the RDM metadata (pointer) file can be on SAN or local VMFS storage
  7. On an HP MSA SAN, the hosts and corresponding Port WWNs can manually be created in the CLI (or temporarily disable SSP to ease the zoning process)
  8. Removing/adding RDMs can throw off the NPIV Port WWN assignments which in turn throws off zoning
  9. Discovery order of NPIV Port WWNs is tied to physical HBAs.  Adding or removing HBAs throws off the NPIV Port WWN assignments which in turn throws off zoning

Conclusion:  This is version 1.0 of VMware NPIV and it functions as such.  We need much more flexibility in future versions from all facets:  discovery process, better interface for management, editing of the WWNs in the VIC, pinning of WWNs to physcial HBAs, monitoring of NPIV Port WWN disk I/O traffic in VIC performance graphs, guaranteed isolation for security, etc.

ESX/ESXi 3.5 Update 3 coming soon to an Akamai site near you?

October 28th, 2008 by jason No comments »

I doubt an upcoming release of ESX 3.5 Update 3 would surprise many people but has the company that rarely ever talks about futures let the cat out of the bag?  This page would seem to suggest so:

http://www.vmware.com/support/pubs/vi_pages/vi_pubs_35u2.html

esx3.5u3

Connect a fibre attached tape device to a VM on ESX

October 27th, 2008 by jason No comments »

Have you ever considered virtualizing your tape backup server? Maybe you’ve thought about it in the past but reasoning produced drawbacks that were too compelling to go forth and virtualize. For instance, pinning a VM to a clustered ESX host which is connected with a SCSI cable attached tape device hanging off of it. Pinning a VM to a clustered host means you lose the benefit of a VM portability, you lose the flexibility of host maintenance during production cycles, and you lose the use of valuable dollars spent on VMotion, DRS, HA, shared storage, and FT (future).

What if you had the hardware to make it possible? Would you do it? If I had to purchase hardware to specifically make this happen, cost effectiveness would need to be researched. Everything else being equal, if I had the hardware infrastructure in place already, yes I would. I had access to the hardware, so I headed into my lab to give it a shot.

What’s required?

  • Hardware
    • One or more ESX hosts
    • At least one fibre HBA in each ESX host that supportes fibre tape devices (enabled in the HBA BIOS typically at POST)
    • A fibre attached tape device (the fibre HBA in a tape device is called an NSR or Network Storage Router)
    • At least one fibre SAN switch
      • If using more than one in a single fabric, be sure they are ISL’d together
      • If multipathing in separate fabrics, at least two HBAs per host will be required and at least two NSRs in the tape device (although this is really going overboard and would be quite expensive)
    • Fibre cable between ESX host and SAN switch
    • Fibre cable between NSR and SAN switch
    • Optional components: shared storage
  • Software
    • VMware ESX or ESXi
    • Virtual Infrastructure Client
    • Latest firmware on HBA(s), NSR(s), and SAN switch(es)
    • Appropriate zoning created and enabled on SAN switch for all ESX host HBAs and NSR
    • Optional components: VirtualCenter, VMotion, DRS, HA

The steps to setting this up aren’t incredibly difficult.

  1. Attach fibre cables between HBAs and SAN switch
  2. Attach fibre cable between NSR and SAN switch
  3. On the fibre SAN switch, zone the NSR to all HBAs in all ESX hosts that will participate. Be sure to enable the active zone configuration. On Brocade SAN switches this is a two step process.
  4. Perform a scan on the fibre HBA cards (on all ESX hosts) to discover the fibre tape device. In this case, I’ve got an HP MSL5026 autoloader containing a robotic library and two tape drives:
    fctape1
  5. Once each ESX host can “see” the tape device, add the tape device to the VM as a SCSI passthru device. In the drop down selection box, the two tape drives are seen as “tape” and the robotic library is seen as “media”. Take a look at the .vmx file and see how the SCSI passthru device maps back to VMHBA1:1:2 and ultimately the tape drive as a symbolic link:
    fctape2 fctape3 fctape9 fctape10 fctape11
  6. The VM can now see the tape device. Notice it is SCSI and not fibre. At this time, VMs only see SCSI devices. Fibre is not virtualized within the VMware virtual machines to the extent that a VM can see virtual fibre or a virtual HBA. The current implementation of NPIV support in VMware is something different and will be explored in an upcoming blog:
    fctape4

Good news! The fibre attached tape drive works perfectly using Windows ntbackup.exe. Effective throughput rate of many smaller files to tape is 389MB/minute or 6.5MB/second. As expected, running a second backup job with less files but larger sizes, I saw an increased throughput rate of 590MB/minute or nearly 10MB/second. These speeds are not bad:
fctape5 fctape6 fctape8

Now for the bad news. When trying to migrate the VM while it was powered on (VMotion) or powered off (cold migration), I ran into a snag. VMware sees the fibre tape device as a raw disk with an LSI Logic SCSI controller which is not supported for migration (I tried changing the LSI Logic bus to use Physical bus sharing, but that did not work):
fctape7 fctape9

The VM migration component of my test was a failure, but the fibre connectivity was a success. Perhaps we’ll have SCSI passthru migration ability in a future version of VMware Virtual Infrastructure. Maybe v-SCSI passthru is the answer (v-* seems to be the next generation answer to many datacenter needs). What this experiment all boils down to is that I can’t do much more with a fibre attached tape device than I can with a SCSI attached tape device. In addition, a VM with an attached SCSI passthru device remains pinned to an ESX host and therefore doesn’t belong on a clustered host.  However, I can think of a few potential advantages of a fibre attached tape device which may still be of interest:

  1. Fibre cabling offers better throughput speed and more bandwidth than SCSI.
  2. Fibre cabling offers much longer cable run distances in the datacenter.
  3. A failed SCSI card on the host often means a motherboard replacement. A failed HBA on the host means replacing an HBA.
  4. Fibre cabling allows multipathing while SCSI cabling along with the required bus termination does not.
  5. Fibre cabling leverages a SAN fabric infrastructure which can be used to gather detailed reports using native and robust SAN fabric tools such as SAN switch performance monitor, SANsurfer, HBAnywhere, etc.
  6. VMs with fibre attached tape can still be migrated to other zoned hosts by simply removing the tape device in virtual hardware, performing the migration, then re-adding the tape device, all without leaving my chair. A SCSI attached tape device would actually need to be re-cabled behind the rack.

Microsoft Windows Add or Remove Programs terminology clarified

October 26th, 2008 by jason No comments »

A look at “Add or Remove Programs” on a Microsoft Windows machine reveals a list of installed software and Microsoft Windows Updates.  To the right of each program are details on installation size, use frequency, and date last used.  I rarely use the information on the right hand side because I’ve found it to be unreliable.  Take a peek at the example below.  Adobe Acrobat, a program I use often for reading and creating .PDF files is listed as being used “frequently”, yet I apparently haven’t used Adobe Acrobat since 12/23/2005, which was around the time this machine was built.

arprog1

Well what exactly does the term “frequently” mean then?  Below are the defintions from Microsoft. 

arprog2

Things are so much clearer to me now.  Well, not really.  Arbitrary definitions from one Microsoft developer are just that, arbitrary and potentially meaningless to the next person.  The reality of it is this is a broken feature that I’ll venture guess has behaved this way since Windows 2000 (I recall the screens being similar or identical).  Added shame is this misinformation comes from a Windows Server.  One would think this type of information would be easily gathered and reliably reported on a server class operating system.

Blog infrastructure updates

October 26th, 2008 by jason No comments »

I finally got around to removing the default logo on the banners used in the Xplosive Reloaded 1.0 theme I’m using. Anyone using Xplosive Reloaded can feel free to “borrow” my updated version of the banners. I’m not a graphics art guru but I was able to use SnagIt (a screen capturing tool I regularly use) to get the job done. All four of the banner images (.PNG format) are identical in pixel dimensions. The only difference between the four banners are the colors used. Once saved, the aqua (blue) and prairie (green) banners are 4KB, the default (red) banner is 8KB, and the autumn (orange) banner is 12KB. Can someone can please explain that to me? First person with the correct answer wins a new MacBook w/o firewire (just kidding).

Added a few plugins:
Akismet (spam filter for comments)
Flickr Manager (using my own bandwidth for hosting images wasn’t going to be feasible)
Feedburner (again, a bandwidth saving measure, but also a feed statistics tool as well)
Related Posts (appends other potentially related posts to new posts)
TinyMCE Advanced (more wysiwyg editor goodness for writing)
Twitter Tools (displays Twitter updates in a sidebar widget)