Patio Door Lock Replacement Tips

August 25th, 2012 by jason No comments »

1.  Make sure you purchase the correct replacement lock at your home improvement store.  This one looks like a match.

Snagit Capture


2.  Before removing the old lock or installing the new lock, insert the long door handle screw in the door.  Now it is safe to remove the two mounting screws located on the face of the lock.

Snagit Capture


3.  Failure to perform step #2 above allows gravity to cause the lock to fall down inside to the bottom of the door.  Not such a big deal if it’s the old lock being replaced, such as in my case, but you don’t want to drop your new replacement lock down there.  As far as I know, there is no easy way to retrieve it without removing the door.  Notice my new lock stays in place while I go grab the two mounting screws.

Snagit Capture


Well that’s it.  I hope I was able to save you that 2nd trip to the home improvement store.

Microsoft Windows Server 2012 Tips

August 16th, 2012 by jason No comments »

One of the benefits of working for Dell Compellent is having the privilege to collaborate with some very smart people who are subject matter experts in areas of technology I don’t get as much time to spend time on as I’d like to.  I get to share information with team members about vSphere, as well as Exchange, SQL, *nix, Oracle, and you might have guessed it… Microsoft Windows (including Hyper-V).  One of my colleagues has been working with Windows Server 2012 lately and he drew up a quick guide on some of the findings he had made.  Not only was he gracious enough to share it with his teammates, he was more than happy to share with the community when asked.  When I say community, of course I’m referring to readers of this blog.  So without further to do, here are some Windows Server 2012 (and perhaps even Windows 8) tips to get you started.

Navigating the New Server 2012 GUI

The look and feel of the Server 2012 GUI is quite different than Server 2008. While most of the familiar options and features are still available, the process of getting to them is quite different, and in some cases, more difficult.

Snagit Capture


1)      The “Start” button no longer exists in Server 2012.  To expose Start, jiggle your mouse in the lower left corner of the desktop and the Start option will appear as shown above.  This is a bit cumbersome in RDP sessions and takes some getting used to.

Snagit Capture

2)      The Start Menu presents applications and other options as tiles.

3)      To access Lock and Sign out, click on the User in the upper right for a drop-down menu.

Snagit Capture


4)      To access All Applications, right-click on any tile under Start, and then an options bar will appear at the bottom of the screen.  On this options bar, click on All Apps in the lower right.

Snagit Capture


5)      Under All Apps, you can find all the rest of the familiar (but now more difficult to find) options such as Command Prompt and Run.  To make these more easily accessible, pin them to the taskbar.

Snagit Capture


6)      Another hidden menu exits off the right side of the desktop.  To access it, move your mouse to the far right or lower-right corner of the screen and hold it there for a couple seconds.   Again, this is cumbersome in RDP sessions and takes some getting used to.

7)      As you can see above, the Restart and Shut down options are now buried a few layers deep so accessing them is a bit tedious.   Some customization suggestions below will help alleviate this.

Snagit Capture


8)      To stop the Server Manager window from automatically starting every time you log on, edit the Server Manager Properties and check the box Do not start Server Manager automatically at logon.


Customizations to Facilitate Better User Experience with Server 2012

You may find yourself a little frustrated with the changes introduced with the Server 2012 GUI because many apps/options/tools have been relocated and are therefore more difficult (and more time consuming) to find.

Below are some quick and simple customization changes to “restore” some of the of the Server 2008 look/feel/agility to the 2012 GUI.


1)      The first step is to install the Desktop Experience as found under Features.  Once installed, then the (My) Computer icon can be added back to the desktop.

Snagit Capture

a)      Launch Server Manager from the taskbar.

Snagit Capture

b)      Click on Add roles and features to launch the Add Roles and Features Wizard.  Under Features, check the box for Desktop Experience and then complete the wizard (requires a reboot).

Snagit Capture

c)       After rebooting, from the Desktop, right click and choose Personalize, Change Desktop Icons, and add the desired icons such as Computer and Control Panel.

d)      Right click on the Desktop again, and under View, set icon size to Small, and set Auto Arrange and Sort By options according to your preference.

Snagit Capture


2)      Customize the taskbar by pinning shortcuts for I.E., Run, Command Prompt, and other frequently used apps (as found under Start and All Apps) that you want to be quickly accessible.  For directions on how to access the Start and All Apps menus, see Page 2.

3)      Right click on the taskbar, select Properties, and select Use Small taskbar buttons, and under the Toolbars tab, add the Desktop toolbar.

4)      If you desire to add the Background Info (BGI) utility to your Windows 2012 server desktop, then complete the following steps:

Snagit Capture

  • From your network share or software repository containing BGInfo, copy the folder BGInfo to C:\BGInfo.  Edit the BGInfo.bgi config file to customize (if desired) the BGInfo settings.  (this is the latest 64-bit version of BGInfo)

Snagit Capture

  • To automatically refresh BGInfo each time you log on to the server, add a reg key (string value) called BGInfo with value of C:\BGInfo\LaunchBGI.batto:HKLM\Software\Microsoft\Windows\CurrentVersion\Run

Snagit Capture


  • If using mRemote, change the Display Wallpaper setting to Yes under the configuration settings for your server (the default setting is No).  Otherwise the BGInfo screen will not be passed to your display.


5)      To work around the cumbersome process of having to navigate to log-off, shutdown, or reboot commands under the hidden menus, place shortcuts to these operations on the Server 2012 desktop.  To make this process quick and easy, pre-defined shortcuts can be saved on a network share and copied down to each server installation.

 Snagit Capture


  • From the network share, copy the desktop shortcuts to Libraries\Documents\Public Documents on your 2012 server.

Snagit Capture

  • Once copied, open the Desktop_Icons folder, and copy and paste the icons found there to the public desktop (a hidden folder) which can be accessed at C:\Users\public\desktop (manually type this path in Windows Explorer as shown above to get to it).
  • Add or create other shortcuts as desired here so they will show on the public desktop.
  • By placing them on the public desktop, they will be there for all users, and will be preserved even when the server is sysprepped.

Snagit Capture

6)      When finished, your desktop will look similar to the above screen capture:

  • (My) Computer and Control Panel icons added to the desktop
  • Shutdown, Logoff, and Restart icons (which are shortcuts to the shutdown command) added to the desktop.  This is much quicker than having to access these options from the hidden menus on the left or right sides of the desktop, and it skips having to provide a reason for shutting down.
  • Shortcut to launch Disk Manager added to the desktop (add other shortcuts as desired)
  • Shortcuts to I.E., Run, and Command Prompt added to the taskbar
  • Desktop toolbar added to the taskbar
  • Background Info (BGInfo) provides for a blue background with the server name and other essential server specs on the desktop.  This will automatically refresh at each logon due to adding LaunchBGI.bat to Run in the system registry, and it can be refreshed manually at any time by clicking on the LaunchBGI icon on the public desktop.


Sysprep Suggestions


1)      When building a new gold image of a Windows 2012 server, include the above customizations before running Sysprep to allow cloned copies to boot with these modifications in place.  Most of the changes will be preserved in the sysprep image saving configuration time.

2)      Other suggested modifications you may want to consider making to a Windows 2012 image before sysprepping it to use as a gold image it include:

  1. Enable RDP
  2. Install Adobe Reader
  3. Using Roles and Features, install .Net 3.5 (set the path to <driveletter or UNC path>\sources\sxs when prompted); Failover Clustering, MPIO, and Hyper-V
  4. Disable the firewall
  5. Disable I.E. security
  6. Disable User Account Control security (set to never notify)
  7. Fully patch the server
  8. If a physical server, run the applicable driver and firmware management/update utility to apply the latest drivers and firmware.
  9. Set the time zone to Central
  10. Install JRE (version of your choice, both the 32bit and 64bit versions)
  11. Other apps and features as desired


StarWind and Cirrus Tech Partner to Deliver Cutting Edge Technologies to the Cloud Computing Market

August 12th, 2012 by jason No comments »

Press Release

StarWind Solutions Become Available Through a Leading Canadian Web Hosting Company

Burlington, MA – 6 August 2012StarWind Software Inc., an innovative provider of storage virtualization software and VM backup technology, announced today a new partnership agreement with Cirrus Tech Ltd., a Canadian web hosting company specializing in VPS, VM and cloud hosting services. Companies collaborate to deliver best-in-breed Cloud services that help customers accelerate their businesses.

According to the agreement, Cirrus Tech extends its portfolio with StarWind storage virtualization software and will offer it to their customers as a dedicated storage platform that delivers a highly available and high performance scalable storage infrastructure that is capable of supporting heterogeneous server environments; as Cloud storage for private clouds as well as a robust solution for building Disaster Recovery (DR) plans.

StarWind SAN solutions deliver a wide variety of enterprise-class features, such as High Availability (HA), Synchronous Data Mirroring, Remote Asynchronous Replication, CDP/Snapshots, Thin Provisioning, Global Deduplication, etc., that make the stored data highly available, simplify storage management, and ensure business continuity and disaster recovery.

“Companies are increasingly turning to cloud services to gain efficiencies and respond faster to today’s changing business requirements.” said Artem Berman, Chief Executive Officer of StarWind Software, Inc. “We are pleased to combine our forces with Cirrus Tech in order to deliver our customers a wide range of innovative cloud services that will help their transition to a flexible and efficient shared IT infrastructure.”

“Every business needs to consider what would happen in the event of a disaster,” shares Cirrus CEO Ehsan Mirdamadi. “By bringing StarWind’s SAN solution to our customers, we are helping them to ease the burden of disaster recovery planning by offering powerful and affordable storage options. You never want to think of the worst, but when it comes to your sensitive data and business critical web operations, it’s always better to be safe than sorry. Being safe just got that much easier for Cirrus customers.”

To find out more about Cirrus’ web hosting services visit http://www.cirrushosting.com or call 1.877.624.7787.
For more information about StarWind, visit www.starwindsoftware.com

About Cirrus Hosting
Cirrus Tech Ltd. has been a leader in providing affordable, dependable VHS and VPS hosting services in Canada since 1999. They have hosted and supported hundreds of thousands of websites and applications for Canadian businesses and clients around the world. As a BBB member with an A+ rating, Cirrus Tech is a top-notch Canadian web hosting company with professional support, rigorous reliability and easily upgradable VPS solutions that grow right alongside your business. Their Canadian data center is at 151 Front Street in Toronto.

About StarWind Software Inc.
StarWind Software is a global leader in storage management and SAN software for small and midsize companies. StarWind’s flagship product is SAN software that turns any industry-standard Windows Server into a fault-tolerant, fail-safe iSCSI SAN. StarWind iSCSI SAN is qualified for use with VMware, Hyper-V, XenServer and Linux and Unix environments. StarWind Software focuses on providing small and midsize companies with affordable, highly availability storage technology which previously was only available in high-end storage hardware. Advanced enterprise-class features in StarWind include Automated HA Storage Node Failover and Failback (High Availability), Replication across a WAN, CDP and Snapshots, Thin Provisioning and Virtual Tape management.

Since 2003, StarWind has pioneered the iSCSI SAN software industry and is the solution of choice for over 30,000 customers worldwide in more than 100 countries and from small and midsize companies to governments and Fortune 1000 companies.

For more information on StarWind Software Inc., visit: www.starwindsoftware.com

View 5.1 Upgrade Experience. Composer, Permissions, and SSL – Oh My!

August 8th, 2012 by jason No comments »

The other night I upgraded the VMware View 5.0.1 environment in the lab to 5.1 which was released on May 16th.  Normally when I upgrade the View environment, I don’t actually perform an inline upgrade of the Connection Server or database.  The environment is small enough that I can flatten it and rebuild fresh from scratch (including brand new VMs for the infrastructure components such as the Connection Server) for each new version VMware releases.  Due to VMware’s aggressive release schedule, I also embed the production version in the infrastructure server name which helps me keep track of where things are at in the lab.  Thus, with each new release, I’m building new infrastructure VMs with updated names, rather than recycling the previous infrastructure VMs, renaming them, remove/re-add to the domain, and even then I’m left with a VM name which doesn’t match the name on the datastore folder.  Pushing the reset button and starting fresh obliterates any bad DNA or cooties the previous environment might have had and it gives me a little extra peace of mind when I sleep at night.

I was running a little short on time so for this round I decided to perform an inline upgrade to 5.1 rather than going through the normal rebuild routine.  After all, most production environments don’t have the luxury of starting over so now was as good a time as ever to test the upgrade process of View in the lab.  Again – a fairly simple setup: a Connection Server, View Composer 2.7 installed on the vCenter Server which for the first time in many releases will be upgraded to 3.0, back end databases on an external SQL server, and 3 small pools.

The View Connection Server upgrade went as planned. No issues to speak of there (yet).  However, I did struggle with the View Composer upgrade.  The first run through uninstalled View Composer and failed with an error which I wasn’t quick enough to capture.  I re-ran through the Composer installation and it failed again with the same error:

The wizard was interrupted before VMware View Composer could be completely installed.

While I was perfrming some troubleshooting, a couple of gracious folks on Twitter by the name of Diego Quintana and Tim Washburn (@daquintana and @mittim12 respectively) pointed out VMware KB article 2017773 Installing or upgrading View Composer fails with error: The wizard was interrupted before VMware View Composer could be completely installed which resolved my issue.  The previous View Composer installation had placed one or more keys in the directory C:\ProgramData\Microsoft\Crypto\RSA\MachineKeys\ which my user account no longer had NTFS permissions to.  The resolution was to simply relax the NTFS permissions both on the MachineKeys folder as well as the files inside of the folder for good measure.

I thought I was out of the woods, but not quite yet.  SSL certificate issues followed.

Snagit Capture

VMware made some new changes with regards to SSL in View 5.1 which are documented at <View installation drive letter>:\Program Files\VMware\VMware View\Server\README.rtf

Copied and pasted verbatim, the release notes are:

Read These Notes!  Your View 5.1 Setup Will Be Easier!

You can read these notes in your language:
Français    Deutsch     简体中文     日本語     한국어

We made changes in View 5.1 that require you to configure View components a little differently than in the past.  These notes will help you to avoid potential pitfalls when you install or upgrade to View 5.1.

1)  You cannot downgrade View 5.1 Connection Server to previous versions.

In View 5.1, the View LDAP configuration is encrypted and cannot be used by earlier versions of View.

  • After you upgrade a View Connection Server instance to View 5.1, you cannot downgrade that instance to an earlier version.
  • After you upgrade all View Connection Server instances in a replicated group, you cannot add another instance that runs an earlier version of View.

Note: Downgrading was never supported, but in past releases it worked.  Now it won’t work.

2)  vCenter Server and View Composer hosts need valid SSL certificates.

  • Best choice: Ensure your vCenter Server and View Composer have Certificate Authority (CA)-provided certificates:

o  Install an SSL certificate, signed by a CA, on the Windows Server on which vCenter Server is installed.

o  Do the same for View Composer. If you install View Composer and vCenter Server on the same host, they can use the same certificate, but you must configure the certificate separately for each component.

* If you install the certificate before you install View Composer, you can select your certificate during the View Composer installation.

* If you replace the default certificate later, run the SviConfig ReplaceCertificate command to bind the new certificate to the port used by View Composer.

o  Make sure the CA for the new certificates, and any parent CAs, are trusted by each Windows server on which a View Connection Server instance is installed.

  • Alternative: After you add vCenter Server and View Composer to View, accept the thumbprint of the default certificate for View Composer by clicking Verify in View Administrator.  Do the same for vCenter Server.

More information: See “Configuring SSL Certificates for View Servers” in the View Installation guide.

3)  Security server and View Connection Server hosts need valid SSL certificates.

  • Best choice: After you install a View Connection Server instance or security server on a Windows Server host, open the Windows Server certificate store and take these steps:

o  Import an SSL certificate that is signed by a CA and that your clients can validate.

o  Make sure that the entire certificate chain, including intermediate certificates and root certificate, are installed.

o  Make sure the certificate has a private key, and mark the key as exportable.

o  Configure the certificate Friendly Name as vdm.

  • Alternative: Let the View server installer create a default certificate in the Windows Server certificate store. The certificate is self-signed and will be shown as invalid in View Administrator.
  • Upgrading to View 5.1: If your original View servers already have SSL certificates signed by a CA, you don’t have to do anything.  During the upgrade, View imports your certificates into the Windows Server certificate store.

If your original View servers have default certificates, upgrade your View servers and follow the Best choice steps shown above.

More information: See “Configuring SSL Certificates for View Servers” in the View Installation guide.

4)  Certificates for vCenter Server, View Composer, and View servers must include certificate revocation lists (CRLs).

View will not validate a certificate without a CRL.

  • Best Choice: lf needed, take these steps:

o  Add a CRL to your certificate.

o  Import the updated certificate into the Windows certificate store on the vCenter Server, View Composer, and View server host.

  • Alternative: Change the registry settings that control CRL checking.

More information: “Configuring Certificate Revocation Checking on Server Certificates” in the View Installation guide.

5)  Windows Firewall with Advanced Security must be enabled on Security Server and View Connection Server hosts. 

By default, IPsec rules govern connections between the View security server and View Connection Server and require Windows Firewall with Advanced Security to be enabled.

  • Best choice: Set Windows Firewall with Advanced Security to on before you install the View servers. Make sure it’s on for any active profiles; better still, set it to on for all profiles.
  • Alternative: Before you install security servers, open View Administrator and disable the Global Setting, Use IPsec for Security Server Connections, by setting it to no. (This is not recommended.)

6)  Back-end firewalls must be set up to support IPsec.

If you have a back-end firewall between security servers and View Connection Server instances, you must configure firewall rules to allow the connections to work.

More information: See “Configuring a Back-End Firewall to Support IPsec ” in the View Installation guide.

7)  View Clients must use HTTPS to connect to View.

View Connection Server instances and security servers use SSL for client connections.

  • If View clients connect via an SSL off-loading intermediate device, you must install the intermediate device’s SSL certificate on View Connection Server or security server.
  • The connection must be HTTPS whether or not a View client connects via an intermediate device such as a load balancer. If you use an intermediate device, and you want the connection between the intermediate device and View server to be over HTTP (SSL off-loading), configure the locked.properties file on the View server.
  • Older View clients that can choose not to use HTTPS will get an error if users select HTTP. Previously they were silently redirected to HTTPS. Clients that cannot make SSL connections will be unable to connect to View.

More information: See “Off-loading SSL Connections to Intermediate Servers” in the View Administration guide.

8)  Encrypted and cleansed View backups require new restore steps.

By default, View 5.1 backups are encrypted. You can also cleanse View backups (exclude passwords and other sensitive information from the backup data) or back up in plain text (not recommended).

  • To restore an encrypted backup, you must decrypt the data first. You must use the data recovery password that you provided when you installed View Connection Server.
  • Do not restore cleansed backups. Data such as passwords will be missing from your View LDAP configuration. View components will not function properly without this data. To restore normal functionality, you will have to use View Administrator to manually reset all passwords and other missing data items.

More information: See “Backing Up and Restoring View Configuration Data” in the View Administration guide.

9)  Before you can upgrade or reinstall a View 5.1 security server, you must remove the relevant IPsec rules from the paired View Connection Server instance so that fresh rules can be established.

  • In View Administrator, select the security server and click More Commands > Prepare for Upgrade or Reinstallation.

Note: You don’t need to remove a security server from View before you upgrade or reinstall the server.

More information: See “Prepare to Upgrade or Reinstall a Security Server” in the View Installation guide.

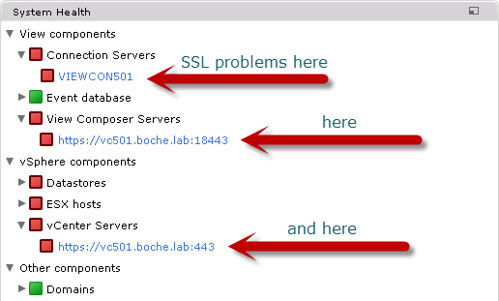
Ok, so basically VMware is pushing for the use of SSL certificates from a trusted CA whether that be externally (VeriSign, etc.) or internally (Microsoft Certificate Services) generated.  For the time being, I have ditched my internal Microsoft CA and wish to continue using the self signed certificates shipped and installed by View.  To do so, as explained in the README above, one must visit the System Health in the View Administrator Dashboard and verify the certificates for the vCenter Server as well as the View Composer Server (each will be seen in a red status in the dashboard).  The Connection Server certificate cannot be verified and will remain in a red status however from this point forward both the View Connection Server and View Composer will function normally.

Upgrading the View Agents and recomposing the pools was a non-issue and the upgrade was completed successfully.  After all is said and done, the environment is working and the upgrade was successful.  View 5.0.1 Clients have no problem connecting to the new 5.1 environment; I’ll get the clients upgraded in the near future and I’ll consider resurrecting the lab CA to generate trusted SSL certificates.

VCDXs To Recieve New Storage Book

July 25th, 2012 by jason No comments »

Snagit Capture

Last fall at the VMworld book store in Las Vegas, I picked up sample chapter 6 ALUA from Mostafa Khalil‘s (@MostafaVMW) upcoming book “Storage Design and Implementation in vSphere 5.0“.  The level of detail looked fantastic and I could hardly wait for the rest of the book to be released.

Fast forward to a month ago, nearing completion I joked with Mostafa that perhaps VCDXs could receive a copy of his new book. Mostafa gracefully accepted the challenge and delivered the good news tonight that he has arranged with VMware Press for all current VCDXs to receive a free copy of his book via e-copy or print.

What Mostafa has done is extremely generous and I’m really looking forward to receiving a copy of his new storage book once it is released (which should be very soon) so that I can read the rest.

The Newest Mayor of VCAP5-DCD & VCDX5

July 19th, 2012 by jason No comments »

Last February at VMware Partner Exchange (PEX), I sat the VCAP5-DCD BETA exam.  I detailed that experience here.  The exam consisted of 130 questions to be answered in 225 minutes.  I squandered a lot of time in deep thought on some questions and also spent time providing feedback on many of the questions.  I was fairly comfortable with the content but based on the time I spent on each question, I came up 30 or 40 questions short of being answered.  Pass/Fail results came in late April with a detailed exam report in July.  I didn’t pass the BETA exam but I was surprised how close I came to passing despite the large number of questions I didn’t get to.  Oh well, the beta exam cost was marked down 50% and worth a shot.

This afternoon I exercised the free retake voucher (thank you VMware certification department, and I do sincerely mean that despite the sharp criticism I’ve had no moral issues in sharing.)  I’ll be honest, not passing the beta exam initially only bothered me in that I’d have to wait for it to GA and sit through it again.  But as the weeks and months passed, coupled with the VCA4-DT failure by a close margin last winter, I was starting to question my abilities in a market I’ve dedicated my career to.

For me, the key to passing the VCAP5-DCD exam was simply better time management.  I recognize over the past few years I’ve slipped into the habit of being more methodical and spending too much time on each exam question.  While being careful and meticulous in the real world can be considered a positive attribute, there’s just no room for it on the VMware VCAP exams. The publicly available VCAP5-DCD exam consists of 100 questions and 225 minutes.  That averages out to be 2m 15s allowed to answer each question.  But that’s not the reality.  At the beginning of the exam, a general exam tip is given that a number of the questions in the exam are the design tool type and that 1h 15m should be allotted to answer these questions.

My new exam approach:

I need to create time in the exam room.  There are a few ways I’m going to accomplish this:

  1. For answers that I’m quite confident in, mark the correct answers and move on immediately, especially on the valuable short reading questions which can be knocked out in 30 seconds.  There is absolutely no sense in wasting valuable time debating what I already know to be the best answer.
  2. For obscure questions which frankly I have no real clue what the correct answer is (and there definitely were a few of these types), quickly choose what looks to be the best answer and move on immediately.  There is absolutely no sense in wasting valuable time debating an answer which will never come to me in this exam’s lifetime.  There were some bizarre questions on today’s exam which were not worth fighting over.  Cut your losses and move on in the interest of time.
  3. When a design tool question pops, immediately flag it for review and move on to the next question.  I want to get through the lion’s share of the questions and save the “time sync” questions for the end, whether I have enough time left get through them all or not.  This approach actually works well – I think using the design tool in end-to-end consecutive questions yields more design tool use efficiency rather than dealing with the design tool in sparse frequency.  Once I got through the first design question with the tool, I found myself able to use it very swiftly for the remaining questions.
  4. Find the buried questions faster.  There’s really not enough time to read each question from beginning to end.  There is so much to digest with a lot of the questions, only to find that the question could have been appropriately answered by reading the last few sentences of the question first or by reading the question in reverse order from bottom to top hunting for the facts, while already having a preview of the possible answers and what details the question is really focusing on.  There’s plenty of fluff in many of the questions.  Basically don’t waste time reading, memorizing, or getting wound around the fluff axle.

These are not new techniques.  I’ve been sitting certification exams since the mid ’90’s (mostly Microsoft) and I quickly learned the above tactics in test taking but over the years I’ve had a gradual departure, employing quality and thought provoking debate in each exam question I encountered.  That’s a big mistake because these exams just don’t provide the time for it.

What a difference it made:

Looking back the last few years, a common exam room theme had clearly developed for me: Either I ran out of time on the exam leaving questions unanswered or I came very very close to running out of time.  Today I reached the end of the exam with well beyond the recommended 1h 15m required to go back and address the design tool questions.  I completed the design tool questions at a pace faster than what VMware recommends by applying the basic methodology of not getting wound around the axle.  That’s not to say my designs were perfectly accurate but I felt pretty comfortable with half of them.

After getting through the design tool questions, I still had plenty of exam time left to three times go through a handful of other questions I had marked to review.

Final thoughts before pressing “End Exam”:

Although I rocked the time component, there were some new elements this time which I let get the best of me to some degree.

It was a late afternoon exam. I only sit morning exams. I never sit exams in the afternoon, especially 4 hour exams staring at a computer after lunch.  To avoid any post-lunch sleepies that might show up, I opted to take a quick nap in lieu of lunch.  This helped immensely, no drowsiness whatsoever during the exam.

Prior to sitting down, I was not looking forward to the 4 hour exam.  The experience at PEX was dreadful.  I wasn’t 100% invested into it and there were a lot of distractions which just made the exam feel like it took forever.  I was caught in a stressful catch-22 where I just wanted the hell out of that cold and noisy room yet the reality was I had burned through so much time I would have needed an additional 2 hours to complete the exam with all questions answered.  After sitting the beta, I was under the hopeful impression the GA version would be trimmed to something like 50 questions and 2 hours.  When I found the GA version was still 100 questions in under 4 hours, I was anticipating the likelihood of a repeat experience if I wasn’t able to step up my time management game.  And the other thing – 4 hour exams are too long and not what I’ve been used to prior to VCAP exams being invented.  In reflection, today’s exam duration wasn’t too bad, in fact, time flew.  Maybe because I was managing my time better. Maybe because of the power nap.  I don’t know but today was ok.  Ask me again tomorrow and I’ll tell you 4 hour exams are way too damned long.  There should be a better way to measure design skill.  Halve the number of questions and the time commitment.

While I was quite comfortable with the beta exam content to the point that I’m sure I could have passed the exam based on content mastery alone, today’s experience was actually quite a bit different.  I was expecting to see the same familiar content.  The truth is there were up to 40 questions I hadn’t even seen during the beta.  While some of the content was familiar, there were quite a few new questions I wasn’t so confident in plus there were many familiar questions I was counting on being on today’s exam that were absent (low hanging fruit if you will).

While you might think there’s nothing more frustrating than facing a question for which you are completely unprepared for, even worse are questions with ambiguous dialogue either in the question itself and/or the answer(s).  I came across several exam questions which I felt were left to the author’s interpretation.  It’s really frustrating to know the right answers but a question is worded in such a way that it can be interpreted in different ways and there’s a correct answer below for each of the interpretations.

CONGRATULATIONS!

There was nothing left to do now but push that “End Exam” button.  I gave this thing my best 3 hours and 45 minutes.  Fortunately for me, the joyful message above was displayed on the screen.  For sure it’s what I had hoped would be there, but I wasn’t 100% confident like I was with the beta exam.

Key takeaways:

Good time management clearly made a difference.  The content alone on these exams is difficult enough, there’s no sense in creating additional obstacles to contend with.  Having the time available on questions where I really needed it was king.  And of course, completing the exam with no questions left unanswered also helps.

Someone tweeted me tonight asking me to divulge what to study.  As I’ve said in the past, I find there’s not a whole lot to study for when it comes to the design exams.  I mostly draw on my experience and brush up on a few things I’m weak on (such as PVLANs which I crashed yesterday and it paid off big time). Note the blueprint: Microsoft clustering also rears its head.  While I was at one time a MSCS master from a Microsoft perspective, I struggle to keep all of the details straight with regards to vSphere.  Frankly it has been a mess to track from day 1 and I wish MSCS would either be supported end to end or I wish it would just go away.

Back to that tweet, there’s a nightmare of a reality here:  if you lack the experience or know-how to tackle at least, I’d say, 75% of the blueprint, there’s too much ground to cover in terms of “what do I need to study – point me to the white papers”.  VCAP-DCD covers a very broad range of design topics but it also gets into the weeds on technical content you might expect to know for the VCAP-DCA exam.  I don’t say this to intimidate anyone or to flex my ego.  Today was a reality check and reminder for myself that the content on these exams shouldn’t be taken for granted even for someone like myself who spends his life immersed in the technology as much as possible.  That said, I’m going to have to up my game for the upcoming VCAP5-DCA exam as I consider that one more difficult than the DCD.  I’m not sure how much exam fuel I have left in me.  A part of me wants to retire from the certification treadmill (the VMware cert treadmill is by far the most aggressive) but I definitely don’t want to let the VCDX lapse.  I used to be able to knock out exams without too much trouble.  Don’t get me wrong, I put forth all of the due diligence required by reading thick books and spending a lot of time with hands on in the lab.  In the past, that formula always lead to a passing grade in the exam room.  But it’s getting harder.  At least it feels like it.  Maybe it’s my old age catching up.

If you plan on sitting the VCAP5-DCD exam soon, I wish you the best of luck.  Let me know how your experience was.

XCOPY VAAI Primitive Not Working with Storage vMotion

July 6th, 2012 by jason No comments »

Quick VAAI tip as we head into the weekend.  This showed up unexpectedly in lab testing – If you’ve built a new ESXi 5.0 host or cluster of hosts and the VAAI copy offload (XCOPY) primitive isn’t working as expected with Storage vMotion, among other things, verify the Hostname in the DNS Configuration via the DCUI that you’ve named the hosts properly as opposed to leaving the field at the default of localhost.

Snagit Capture