Adding an IP Alias to the vCloud Director Cell Server

July 5th, 2012 by jason No comments »

Hola! Yo Soy Dora!  I hope you are having a great week and for those in the US, I hope your 4th of July holiday was fun and relaxing.

Here’s another “how to” for those not real familiar with Linux when standing up a vCloud Director infrastructure.  If you’re following the documentation, you’ll notice on page 13 of the vCloud Director Installation and Configuration Guide that two NICs or an IP alias are required to support two separate SSL connections on each vCloud Director cell server.  One IP is used for the vCloud Director HTTP service and the other is used for the console proxy service.  I’ve deployed both methods, multiple NICs and IP aliasing, for the VCD cell server.  Neither method has a distinct advantage over the other in terms of performance or other important metrics.  Where both the http and console proxy addresses are on the same subnet, I prefer to use the IP Alias method to keep things a little cleaner but using two NICs is better at full disclosure in terms of how the VCD Cell Server is built and configured from a network standpoint.

To wrap some visualization around the two options, if you’re not familiar with Linux IP Aliasing, you’d probably deploy each VCD cell server in a multihomed configured with a minimum of two NICs and two IP addresses required for VCD, one IP established for each of the required SSL connections.

Snagit Capture

The IP Alias method involves just a single NIC with two IP addresses on the same subnet sharing a common mask and default gateway for the two required SSL connections.  Don’t forget that with either method, without routed NFS on the network, each VCD cell server would likely have one additional NIC dedicated to an NFS network for vCloud Director Transfer Storage assuming the clustered cell configuration recommended for production and highly available cloud infrastructures.

Snagit Capture

I think everyone knows how to install and configure a multihomed server, so this writing will focus on adding an IP alias to a NIC in RHEL 5 Update 7, or at least it will focus on how I learned to do it via the command line.  I’ll also show a second method to accomplish adding an IP alias through the GUI (X is enabled by default in RHEL 5.7).

Assuming RHEL 5 Update 7 is already installed with a NIC having an IP address 192.168.0.10, adding an additional IP address via an alias takes just a few steps via CLI.

  1. Use nano -w /etc/sysconfig/network-scripts/ifcfg-eth0 to edit the network configuration for eth0.  If it exists, remove the line GATEWAY=192.168.0.1 or comment it out by placing a hash (#) character at the beginning of the line like so: # GATEWAY=192.168.0.1  Save and exit nano with CTRL+X.
  2. Make a copy of ifcfg-eth0 to use for the IP alias.  Do this with the command cp /etc/sysconfig/network-scripts/ifcfg-eth0/etc/sysconfig/network-scripts/ifcfg-eth0:0
  3. Use nano -w /etc/sysconfig/network-scripts/ifcfg-eth0:0 to edit the network configuration for eth0:0.  Change DEVICE=eth0 to read DEVICE=eth0:0.  Change IPADDR=192.168.0.10 to read IPADDR=192.168.0.11  Change ONBOOT=yes to read ONPARENT=yes  Save and exit nano with CTRL+X.
  4. Use nano -w /etc/sysconfig/network to add a commonly shared default gateway for eth0 and eth0:0.  Add the line GATEWAY=192.168.0.1  Save and exit nano with CTRL+X.
  5. Restart networking with service network restart

At this point, the Linux platform has a single NIC with two IP addresses and the installation of vCloud Director on this cell can begin.

A second method to accomplish the above would be through the GUI by running the Networking application in RHEL 5 Update 7.

Seen here, eth0 is already configured.  Click the New button to add an IP alias:

Snagit Capture

Select Ethernet connection, choose the existing NIC for eth0, assign the IP address, Subnet Mask, and Default Gateway for the alias, and then lastly click on the Activate button with eth0:1 highlighted.

Snagit Capture

Once again, at this point, the Linux platform has a single NIC with two IP addresses and the installation of vCloud Director on this cell can begin.  Highlighted in yellow below is the IP alias or second IP address bound to eth0:

Snagit Capture

I’ve found that the GUI approach obsoletes steps 1 and 4 from the CLI approach above.  Basically it strips out the steps where the Default Gateway configuration is moved from the individual ifcfg-eth0 network startup scripts to the centralized /etc/sysconfig/network location.  It further affirms the GATEWAY= entry may remain in each of the individual ifcfg-eth0 network startup scripts.  In the end, both methods work for a vCloud Director cell server however I imagine adding an additional NIC hard wired to an access port not on the 192.168.0.0 subnet will have issues with a GATEWAY=192.168.0.1 in /etc/sysconfig/network.

Creating vCloud Director Transfer Server Storage on NFS

July 3rd, 2012 by jason No comments »

Six months ago I wrote an article about Expanding vCloud Director Transfer Storage on a local block storage device.  Today I take a step back and document the process of instantiating vCloud Director Transfer Storage on an NFS export which is where all scalable VCD implementations in production should reside.  The process is not extremely difficult but it can be difficult to remember the fine details if Linux is not your native OS.  Basically run through the following steps on each VCD cell server in the server group before installing vCloud Director.  I’ll be performing these steps on a RHEL 5 Update 7 distribution.

First create the directory structure which the NFS export will be mounted to (the -p argument creates the entire path of directories as necessary):

mkdir -p /opt/vmware/vcloud-director/data/transfer

Update 5/27/18: I happened to notice with RHEL 7.5 (could impact earlier builds as well) that mounting NFS exports now requires nfs-utils. Install this from the local DVD repository for YUM using the command yum install nfs-utils.

As a verification that NFS and networking is configured properly, use the showmount -e command to list mounts from the NFS server:

[root@vcdcell1 transfer]# showmount -e tsfiles.techsol.local
Export list for tsfiles.techsol.local:
/isos (everyone)
/oracle (everyone)
/unix (everyone)
/vcdtransfer (everyone)
/vcdtransfer2 (everyone)
[root@vcdcell1 transfer]#

Next, mount the NFS export manually:

mount nfshost.fqdn.orip:/nfs_export_name /opt/vmware/vcloud-director/data/transfer

Finally, let’s make sure the NFS export auto mounts each time the cell is rebooted.  This is done by editing /etc/fstab

nano -w /etc/fstab

Add the following line to /etc/fstab:

nfshost.fqdn.orip:/nfs_export_name      /opt/vmware/vcloud-director/data/transfer       nfs     rw      0 0

Exit nano using CTRL + X. Save /etc/fstab when prompted.

Proceed with the vCloud Director cell installation.  If using the mount path in the example above, it is safe and convenient to press Enter through the default prompt relating to the Transfer Server Storage installation path.

I’ll close by pointing out that although the Transfer Server Storage is used as a temporary holding tank for vApp and catalog media imports and exports, critical cell data is also stored in this repository.  If the Transfer Server Storage area is unavailable (ie. issues with NFS or the network), the VCD cell will not function properly, yielding a range of symptoms such as not being able to authenticate at the provider or organization portals.

Storage: Starting Thin and Staying Thin with VAAI UNMAP

June 28th, 2012 by jason No comments »

For me, it’s hard to believe nearly a year has elapsed since vSphere 5 was announced on July 12th.  Among the many new features that shipped was an added 4th VAAI primitive for block storage.  The primitive itself revolved around thin provisioning and was the sum of two components: UNMAP and STUN.  At this time I’m going to go through the UNMAP/Block Space Reclamation process in a lab environment and I’ll leave STUN for a later discussion.

Before I jump into the lab, I want frame out a bit of a chronological timeline around the new primitive.  Although this 4th primitive was formally launched with vSphere 5 and built into the corresponding platform code that shipped, a few months down the road VMware issued a recall on the UNMAP portion of the primitive due to a discovery made either in the field or in their lab environment.  With the UNMAP component recalled, the Thin Provisioning primitive as a whole (including the STUN component) was not supported by VMware.  Furthermore, storage vendors could not be certified for the Thin Provisioning VAAI primitive although the features may have been functional if their respective arrays supported it.  A short while later, VMware released a patch which, once installed on the ESXi hosts, disabled the UNMAP functionality globally.  In March of this year, VMware released vSphere 5.0 Update 1.  With this release, VMware implemented the necessary code to resolve the performance issues related to UNMAP.  However, VMware did not re-enable the automatic UNMAP mechanism.  Instead and in the interim, VMware implemented a manual process for block space reclamation on a per datastore basis regardless of the global UNMAP setting on the host.  I believe it is VMware’s intent to bring back “automatic” UNMAP long term but that is purely speculation.  This article will walk through the manual process of returning unused blocks to a storage array which supports both thin provisioning and the UNMAP feature.

I also want to point out some good information that already exists on UNMAP which introduces the feature and provides a good level of detail.

  • Duncan Epping wrote this piece about a year ago when the feature was launched.
  • Cormac Hogan wrote this article in March when vSphere 5.0 Update 1 was launched and the manual UNMAP process was re-introduced.
  • VMware KB 2014849 Using vmkfstools to reclaim VMFS deleted blocks on thin-provisioned LUNs

By this point, if you are unaware of the value of UNMAP, it is simply keeping thin provisioned LUNs thin.  By doing so, raw storage is consumed and utilized in the most efficient manner yielding cost savings and better ROI for the business. Arrays which support thin provisioning have been shipping for years.  What hasn’t matured is just as important as thin provisioning itself: the ability to stay thin where possible.  I’m going to highlight this below in a working example but basically once pages are allocated from a storage pool, they remain pinned to the volume they were originally allocated for, even after the data written to those pages has been deleted or moved.  Once the data is gone, the free space remains available to that particular LUN and the storage host which owns it and will continue to manage it – whether or not that free space will ever be needed again in the future for that storage host.  Without UNMAP, the pages are never released back to the global storage pool where they may be allocated to some other LUN or storage host whether it be virtual or physical.  Ideal use cases for UNMAP:  Transient data, Storage vMotion, SDRS, data migration. UNMAP functionality requires the collaboration of both operating system and storage vendors.  As an example, Dell Compellent Storage Center has supported the T10 UNMAP command going back to early versions of the 5.x Storage Center code, however there has been very little adoption on the OS platform side which is responsible for issuing the UNMAP command to the storage array when data is deleted from a volume.  RHEL 6 supports it, vSphere 5.0 Update 1 now supports it, and Windows Server 2012 is slated to be the first Windows platform to support UNMAP.

UNMAP in the Lab

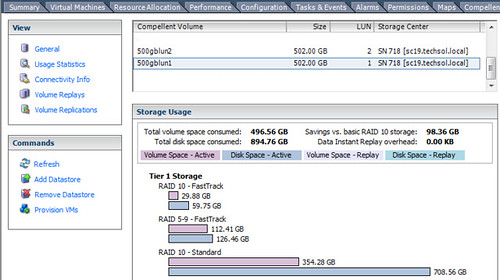
So in the lab I have a vSphere ESXi 5.0 Update 1 host attached to a Dell Compellent Storage Center SAN.  To demonstrate UNMAP, I’ll Storage vMotion a 500GB virtual machine from one 500GB LUN to another 500GB LUN.  As you can see below from the Datastore view in the vSphere Client, the 500GB VM is already occupying lun1 and an alarm is thrown due to lack of available capacity on the datastore:

Snagit Capture

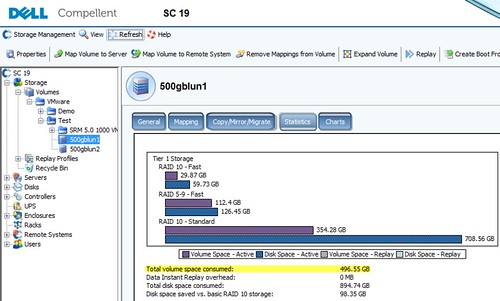
Looking at the volume in Dell Compellent Storage Center, I can see that approximately 500GB of storage is being consumed from the storage page pool. To keep the numbers simple, I’ll ignore actual capacity consumed due to RAID overhead.

Snagit Capture

After the Storage vMotion

I’ve now performed a Storage vMotion of the 500GB VM from lun1 to lun2.  Again looking at the datastores from a vSphere client perspective, I can see that lun2 is now completely consumed with data while lun1 is no longer occupied – it now has 500GB  capacity available.  This is where operating systems and storage arrays which do not support UNMAP fall short of keeping a volume thin provisioned.

Snagit Capture

Using the Dell Compellent vSphere Client plug-in, I can see that the 500GB of raw storage originally allocated for lun1 remains pinned with lun1 even though the LUN is empty!  I’m also occupying 500GB of additional storage for the virtual machine now residing on lun2.  The net here is that as a result of my Storage vMotion, I’m occupying nearly 1TB of storage capacity for a virtual machine that’s half the size.  If I continue to Storage vMotion this virtual machine to other LUNs, the problem is compounded and the available capacity in the storage pool continues to drain, effectively raising the high watermark of consumed storage.  To add insult to injury, this will more than likely be stranded Tier 1 storage – backed by the most expensive spindles in the array.

Snagit Capture

Performing the Manual UNMAP

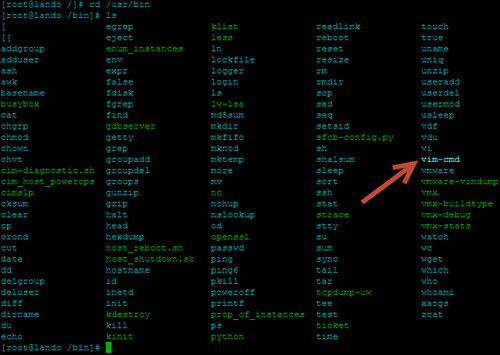
Using a PuTTY connection to the ESXi host, I’ll start with identifying the naa ID of my datastore using esxcli storage core device list |more

Snagit Capture

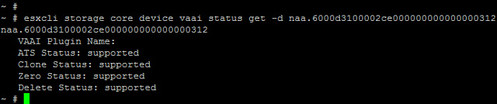
Following the KB article above, I’ll make sure my datastore supports the UNMAP primitive using esxcli storage core device vaai status get -d <naa ID>.  The output shows UNMAP is supported by Dell Compellent Storage Center, in addition to the other three core VAAI primitives (Atomic Test and Set, Copy Offload, and Block Zeroing).

Snagit Capture

I’ll now change to the directory of the datastore and perform the UNMAP using vmkfstools -y 100.  It’s worth pointing out here that using a value of 100, although apparently supported, ultimately fails.  I reran the command using a value of 99% which successfully unmapped 500GB in about 3 minutes.

Snagit Capture

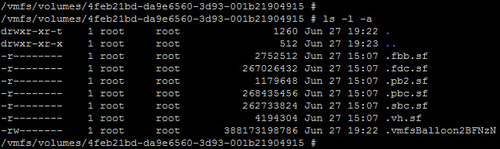
Also important to note is VMware recommends the reclaim be run after hours or during a maintenance window with maximum recommended reclaim percentage of 60%.  This value is pointed out by Duncan in the article I linked above and it’s also noted when providing a reclaim value outside of the acceptable parameters of 0-100.  Here’s the reasoning behind the value:  When the manual UNMAP process is run, it balloons up a temporary hidden file at the root of the datastore which the UNMAP is being run against.  You won’t see this balloon file with the vSphere Client’s Datastore Browser as it is hidden.  You can catch it quickly while UNMAP is running by issuing the ls -l -a command against the datastore directory.  The file will be named .vmfsBalloon along with a generated suffix.  This file will quickly grow to the size of data being unmapped (this is actually noted when the UNMAP command is run and evident in the screenshot above).  Once the UNMAP is completed, the .vmfsBalloon file is removed.  For a more detailed explanation behind the .vmfsBalloon file, check out this blog article.

Snagit Capture

The bottom line is that the datastore needs as much free capacity as what is being unmapped.  VMware’s recommended value of 60% reclaim is actually a broad assumption that the datastore will have at least 60% capacity available at the time UNMAP is being run.  For obvious reasons, we don’t want to run the datastore out of capacity with the .vmfsBalloon file, especially if there are still VMs running on it.  My recommendation if you are unsure or simply bad at math: start with a smaller percentage of block reclaim initially and perform multiple iterations of UNMAP safely until all unused blocks are returned to the storage pool.

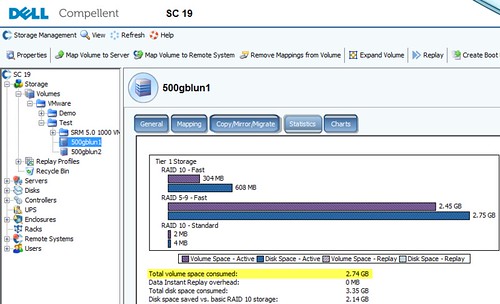
To wrap up this procedure, after the UNMAP step has been run with a value of 99%, I can now see from Storage Center that nearly all pages have been returned to the page pool and 500gbvol1 is only consuming a small amount of raw storage comparatively – basically the 1% I wasn’t able to UNMAP using the value of 99% earlier.  If I so chose, I could run the UNMAP process again with a value of 99% and that should return just about all of the 2.74GB still being consumed, minus the space consumed for VMFS-5 formatting.

Snagit Capture

The last thing I want to emphasize is that today, UNMAP works at the VMFS datastore layer and isn’t designed to work inside the encapsulated virtual machine.  In other words, if I delete a file inside a guest operating system running on top of the vSphere hypervisor with attached block storage, that space can’t be liberated with UNMAP.  As a vSphere and storage enthusiast, for me that would be next on the wish list and might be considered by others as the next logical step in storage virtualization.  And although UNMAP doesn’t show up in Windows platforms until 2012, Dell Compellent has developed an agent which accomplishes the free space recovery on earlier versions of Windows in combination with a physical raw device mapping (RDM).

Update 7/2/12: VMware Labs released its latest fling – Guest Reclaim.

From labs.vmware.com:

Guest Reclaim reclaims dead space from NTFS volumes hosted on a thin provisioned SCSI disk. The tool can also reclaim space from full disks and partitions, thereby wiping off the file systems on it. As the tool deals with active data, please take all precautionary measures understanding the SCSI UNMAP framework and backing up important data.

Features

  • Reclaim space from Simple FAT/NTFS volumes
  • Works on WindowsXP to Windows7
  • Can reclaim space from flat partitions and flat disks
  • Can work in virtual as well as physical machines

Whats a Thin provisioned (TP) SCSI disks? In a thin provisioned LUN/Disk, physical storage space is allocated on demand. That is, the storage system allocates space as and when a client (example a file system/database) writes data to the storage medium. One primary goal of thin provisioning is to allow for storage overcommit. A thin provisioned disk can be a virtual disk, or a physical LUN/disk exposed from a storage array that supports TP. Virtual disks created as thin disks are exposed as TP disks, starting with virtual Hardware Version 9. For more information on this please refer http://en.wikipedia.org/wiki/Thin_provisioning. What is Dead Space Reclamation?Deleting files frees up space on the file system volume. This freed space sticks with the LUN/Disk, until it is released and reclaimed by the underlying storage layer. Free space reclamation allows the lower level storage layer (for example a storage array, or any hypervisor) to repurpose the freed space from one client for some other storage allocation request. For example:

  • A storage array that supports thin provisioning can repurpose the reclaimed space to satisfy allocation requests for some other thin provisioned LUN within the same array.
  • A hypervisor file system can repurpose the reclaimed space from one virtual disk for satisfying allocation needs of some other virtual disk within the same data store.

GuestReclaim allows transparent reclamation of dead space from NTFS volumes. For more information and detailed instructions, view the Guest Reclaim ReadMe (pdf)

Update 5/14/13: Excerpt from Cormac Hogan’s vSphere storage blog: “We’ve recently been made aware of a limitation on our UNMAP mechanism in ESXi 5.0 & 5.1. It would appear that if you attempt to reclaim more than 2TB of dead space in a single operation, the UNMAP primitive is not handling this very well.” Read more about it here: Heads Up! UNMAP considerations when reclaiming more than 2TB s

Update 9/13/13: vSphere 5.5 UNMAP Deep Dive

Using vim-cmd To Power On Virtual Machines

June 21st, 2012 by jason No comments »

I’ve been pretty lucky in that since retiring the UPS equipment in the lab, the flow of electricity to the lab has been both clean and consistent.  We get some nasty weather and high winds in this area but I’ll bet there hasn’t been an electrical outage in close to 2+ years.  Well, early Tuesday morning we had a terrible storm with hail and winds blowing harder than ever.  I ended up losing some soffits, window screens, and a two stall garage door.  A lot of mature trees were also lost in the surrounding area.  I was pretty sure we’d be losing electricity and the lab would go down hard – and it did.

If you’re familiar with my lab, you might know that it’s 100% virtualized.  Every infrastructure service, including DHCP, DNS, and Active Directory, resides in a virtual machine.  This is great when the environment is stable, but recovering this type of environment from a complete outage can be a little hairy.  After bringing the network, storage, and ESXi hosts online, I still have no DHCP on the network from which I’d leverage to open the vSphere Client and connect to an ESXi host.  What this means is that I typically will bring up a few infrastructure VMs from the ESXi host TSM (Tech Support Mode) console.  No problem, I’ve done this many times in the past using vmware-cmd.

Snagit Capture

Well, on ESXi 5.0 Update 1, vmware-cmd no longer brings joy.  The command has apparently been deprecated and replaced by /usr/bin/vim-cmd.

Snagit Capture

Before I can start my infrastructure VMs using vim-cmd, I need to find their corresponding Vmid using vim-cmd vmsvc/getallvms (add |more at the end to pause at each page of a long list of registered virtual machines):

Snagit Capture

Now that I have the Vmid for the infrastructure VM I want to power on, I can power it on using vim-cmd vmsvc/power.on 77.  At this point I’ll have DHCP and I can use the vSphere Client on my workstation to power up the remaining virtual machines in order.  Or, I can continue using vim-cmd to power on virtual machines.

Snagit Capture

As you can see from the output below, there is much more that vim-cmd can accomplish within the virtual machine vmsvc context:

Snagit Capture

Take a quick look at this in your lab. Command line management is popular on the VCAP-DCA exams. Knowing this could prove useful in the exam room or the datacenter the next time you experience an outage.

Spousetivities Is Packing For Boston

June 5th, 2012 by jason No comments »

Snagit Capture

Dell Storage Forum kicks off in Boston next week and Spousetivities will be there to ensure a good time is had by all.  If you’ve never been to Boston or if you haven’t had a chance to look around, you’re in for a treat.  Crystal has an array of activities queued up (see what I did there?) including  whale watching, a tour of MIT and/or Harvard via trolley or walking, a trolley tour of historic Boston (I highly recommend this one, lots of history in Boston), a wine tour, as well as a welcome breakfast to get things started and a private lunch cruise.

If you’d like to learn more or if you’d like to sign up for one or more of these events, follow this link – Spousetivities even has deals to save you money on your itinerary.

We hope to see you there!

Snagit Capture

Update VMware Tools via Windows System Tray

May 31st, 2012 by jason No comments »

A Windows platform owner may inquire why he or she is unable to update an Out-of-date VMware tools installation using the VMware Tools applet in the system tray.  Clicking on the Update Tools button either produces an error similar to Update Tools failed or nothing at all happens.

Snagit Capture

Although the option to update VMware Tools is generally available via the system tray, the functionality is disabled by default in the VM shell.  The solution to the issue can be found in VMware KB 2007298 Updating VMware Tools fails with the error: Update Tools failed. Edit the virtual machine’s vmx file.

Shut down the virtual machine and add the following line to the virtual machine’s .vmx configuration file via Edit Settings | Options | General | Configuration Parameters:

isolation.tools.guestInitiatedUpgrade.disable = “FALSE”

Power on the virtual machine.  From this point forward, a VMware Tools update can be successfully performed from within the guest VM.

Invitation to Dell/Sanity Virtualization Seminar

May 22nd, 2012 by jason No comments »

I know this is pretty short notice but I wanted to make local readers aware of a lunch event taking place tomorrow between 11:00am and 1:30pm.  Dell and Sanity Solutions will be discussing storage technologies for your vSphere virtualized datacenter, private, public, or  hybrid cloud.  I’ll be on hand as well talking about some of the key integration points between the vSphere and Storage Center.  You can find full details in the brochure below.  Click on it or this text to get yourself registered and we’ll hope to see you tomorrow.

Snagit Capture