StarWind Software Inc. Announces Opening of German Office

October 4th, 2011 by jason No comments »

Press Release:

StarWind Software Inc. Announces Opening of German Office

StarWind Software Inc. Opens a New Office in Germany to Drive Local Channel Growth

Snagit CaptureBurlington, MA – October 1, 2011StarWind Software Inc., a global leader and pioneer in SAN software for building iSCSI storage servers, announced today that it has opened a new office in Sankt Augustin, Germany to service the growing demand for StarWind’s iSCSI SAN solutions. The German office expands StarWind’s ability to offer local sales and support services to its fast growing base of customers and prospects in the region.

“We have seen substantial growth in our customer base and level of interest in our solutions in Europe,” said Artem Berman, Chief Executive Officer of StarWind Software. “Since the market potential for our products is significant, we have opened a new office in Germany to strengthen our presence there. We shall use our best efforts to complete the localization of resources.”

“Our local presence in Germany will help us to work closely with our partners and customers, to better meet their needs as well as sweepingly develop their distribution networks,” said Roman Shovkun, Chief Sales Officer of StarWind Software. “The new office permits us to deliver superior sales, support to our customers, and to the growing prospect base in the region.”

The new office is located at:
Monikastr. 13
53757 Sankt Augustin
Germany
Primary contact: Veronica Schmidberger
+49-171-5109103

About StarWind Software Inc.
StarWind Software is a global leader in storage management and SAN software for small and midsize companies. StarWind’s flagship product is SAN software that turns any industry-standard Windows Server into a fault-tolerant, fail-safe iSCSI SAN. StarWind iSCSI SAN is qualified for use with VMware, Hyper-V, XenServer and Linux and Unix environments. StarWind Software focuses on providing small and midsize companies with affordable, highly availability storage technology which previously was only available in high-end storage hardware. Advanced enterprise-class features in StarWind include Automated Storage Node Failover and Failback, Replication across a WAN, CDP and Snapshots, Thin Provisioning and Virtual Tape management.

StarWind is a pioneer, since 2003, in the iSCSI SAN software industry and is the solution of choice for over 30,000 customers worldwide in more than 100 countries and from small and midsize companies to governments and Fortune 1000 companies.

VMworld Europe Is Ready And Waiting For You

October 3rd, 2011 by jason No comments »

Are you kicking around the idea of attending VMworld Europe?  You’re in luck – there’s still plenty of time to get signed up as an attendee!  VMworld is by far the best technology conference I’ve ever attended in my 15 year career.  To prove that point, this year’s European gathering in Copenhagen, Denmark will mark mark my 8th trip. My 2nd in Europe and also my 2nd which I’ve funded myself. I feel that strongly about it. It’s an absolutely fantastic opportunity for learning about new architecture, technologies, and trends in the VMware virtualization ecosystem.  It’s also a good opportunity to meet community members, friends, and some of the most knowledgeable virtualization, storage, and networking experts on the planet.

The Copenhagen schedule looks like this:

General Sessions – Hear from key VMware executives:

  • – Tuesday, October 18: Steve Herrod, CTO and SVP of R&D
  • – Wednesday, October 19: Raghu Raghuram, Senior VP and General Manager of Cloud Platforms
  • – Thursday, October 20: Paul Maritz, CEO


Super Sessions – Learn about key VMware products and solutions on Tuesday, October 18:

  • – Managing Virtual and Cloud IT Environments – A Roadmap to Well-Managed ITaaS
  • – Transitioning to ESXi
  • – Securing your Cloud
  • – The End-User Computing Revolution Starts Now with VMware View

Also:

Breakout Sessions – More Freedom. Less Formality.

This year for both conferences, there is pre-registration for Sessions, giving you the peace of mind that you will have a spot in the sessions you and your business care most about. Plan your daily agenda with Schedule Builder to view a complete listing of available Sessions, and then select the ones that matter most to you. Plus, we’ll be repeating most Sessions at least once, so you’ll have ample opportunity to pre-register for your top choices.  Check out the session abstracts in the content catalog.


Knowledge Experts

Connect directly with subject-matter authorities through our Knowledge Experts Program. These members of the VMware community – made up of industry-leading customers, bloggers and VMware employees – will conduct and participate in Breakout Sessions and Group Discussions. They’ll also be available for One-on-One meetings and more casual discussions as they circulate throughout the conference.


One-on-One Meetings

Schedule One-on-One meetings with up to three Knowledge Experts during the conference. Use these 15-minute sessions to delve into topics that relate specifically to your organization. Registration will open shortly.


Group Discussions

In addition to traditional Breakout Sessions, we’re introducing Group Discussions led by Knowledge Experts. These informative and interactive discussion groups are a great opportunity for you to gain insight from like-minded colleagues in similar industries. Attendance is on a first-come, first-served basis. Just Register for VMworld, and then you can use Schedule Builder (launching in mid-August) to schedule your preferred Group Discussions.


Hands-on Labs

Powered by the VMware cloud and presented via a self-service Lab Cloud portal, you will easily explore how virtualization can make a powerful impact on your organization. Unlike traditional instructor-led Labs, you are empowered not only to schedule which topics you want to take, but also when you want to take them, enabling you to choose the content that is right for your own business objectives on a schedule that allows you to maximize your conference experience.

VMworld will stage more than 18,000 lab seats and conduct up to 480 simultaneous Lab sessions during the four-day event. To build out this environment, we have committed 75,000+ man-hours in Lab creation and development to produce 30 Lab topics – all powered by vSphere Hypervisor, formerly vSphere ESXi. The Labs will cover everything from virtualized desktop infrastructure, through the vSphere-powered data center and into the VMware-powered cloud. With easy access to more than 100 VMware Subject Matter Experts on hand to answer questions and explore options, you’ll get one-on-one attention when you need it, and still have the flexibility to move at your own pace. Forget pre-registration. With over 40 hours of available Lab time throughout the conference, you’re free to experience the latest in VMware offerings on your own schedule.

Finally, if you’re planning on being there, look for the VMware Community TV booth where live interviews and podcasts can be conducted with industry experts, bloggers, vEXPERTs, etc.  The VMware Community TV booth will be available Monday through Thursday, 10:30 – 16:00pm, with shows starting every hour, at 30 minutes past the hour. Reserve a slot by following this link.

I hope to see you there!

SRM 5.0 Replication Bits and Bytes

October 3rd, 2011 by jason No comments »

VMware has pushed out several releases and features in the past several weeks.  It can be a lot to digest, particularly if you’ve been involved in the beta programs for these new products because there were some changes made when the bits made their GA debut. One of those new products is SRM 5.0.  I’ve been working a lot with this product lately and I thought it would be helpful to share some of the information I’ve collected along the way.

One of the new features in SRM 5.0 is vSphere Replication.  I’ve heard some people refer to it as Host Based Replication or HBR for short.  In terms of how it works, this is an accurate description and it was the feature name during the beta phase.  However, by the time SRM 5.0 went to GA, each of the replication components went through a name change as you’ll see below. If you know me, you’re aware that I’m somewhat of a stickler on branding.  As such, I try to get it right as much as possible myself, and I’ll sometimes point out corrections to others in an effort to lessen or perpetuate confusion.

Another product feature launched around the same time is the vSphere Storage Appliance or VSA for short.  In my brief experience with both products I’ve mentioned so far, I find it’s not uncommon for people to associate or confuse SRM replication with a dependency on the VSA.  This is not the case – they are quite independent.  In fact, one of the biggest selling points of SRM based replication is that it works with any VMware vSphere certified storage and protocol.  If you think about it for a minute, this now becomes a pretty powerful for getting a DR site set up with what you have today storage wise.  It also allows you to get SRM in the door based on the same principles, with the ability to grow into scalable array based replication in an upcoming budget cycle.

With that out of the way, here’s a glimpse at the SRM 5.0 native replication components and terminology (both beta and GA).

Beta Name GA Name GA Acronym
HBR vSphere Replication VR
HMS vSphere Replication Management Server vRMS
HBR server vSphere Replication Server vRS
ESXi HBR agent vSphere Replication Agent vR agent


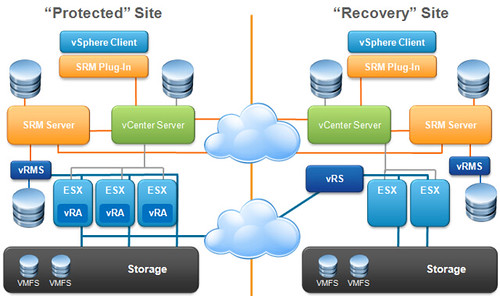
Here is a look at how the SRM based replication pieces fit in the SRM 5.0 architecture.  Note the storage objects shown are VMFS but they could be both VMFS datastores as well as NFS datastores on either side:

Snagit Capture

Diagram courtesy VMware, Inc.

To review, the benefits of vSphere Replication are:

  1. No requirement for enterprise array based replication at both sites.
  2. Replication between heterogeneous storage, whatever that storage vendor or protocol might be at each site (so long as it’s supported on the HCL).
  3. Per VM replication. I didn’t mention this earlier but it’s another distinct advantage of VR over per datastore replication.
  4. It’s included in the cost of SRM licensing. No extra VMware or array based replication licenses are needed.

Do note that access to the VR feature is by way of a separate installable component of SRM 5.0.  If you haven’t already installed the component during the initial SRM installation, you can do so afterwards by running the SRM 5.0 setup routine again at each site.

I’ve talked about the advantages of VR.  Again, I think they are a big enabler for small to medium sized businesses and I applaud VMware for offering this component which is critical to the best possible RPO and RTO.  But what about the disadvantages compared to array based replication?  In no particular order:

  1. Cannot replicate templates.  The ‘why’ comes next.
  2. Cannot replicate powered off virtual machines.  The ‘why’ for this follows.
  3. Cannot replicate files which don’t change (powered off VMs, ISOs, etc.)  This is because replications are handled by the vRA component – a shim in vSphere’s storage stack deployed on each ESX(i) host.  By the way, Changed Block Tracking (CBT) and VMware snapshots are not used by the vRA.  The mechanism uses a bandwidth efficient technology similar to CBT but it’s worth pointing out it is not CBT.  Another item to note here is that VMs which are shut down won’t replicate writes during the shutdown process.  This is fundamentally because only VMs which are powered on and stay powered on are replicated by VR.  Current state of the VM would, however, be replicated once the VM is powered back on.
  4. Cannot replicate FT VMs. Note that array based replication can be used to protect FT VMs but once recovered they are not longer FT enabled.
  5. Cannot replicate linked clone trees (Lab Manager, vCD, View, etc.)
  6. Array based replication will replicate a VMware based snapshot hierarchy to the destination site while leaving them in tact. VR can replicate VMs with snapshots but they will be consolidated at the destination site.  This is again based on the principle that only changes are replicated to the destination site.
  7. Cannot replicate vApp consistency groups.
  8. VR does not work with virtual disks opened in “multi-writer mode” which is how MSCS VMs are configured.
  9. VR can only be used with SRM.  It can’t be used as a data replication for your vSphere environment outside of SRM.
  10. Losing a vSphere host means that the vRA and the current replication state of a VM or VMs is also lost.  In the event of HA failover, a full-sync must be performed for these VMs once they are powered on at the new host (and vRA).
  11. The number of VMs which can be replicated with VR will likely be less than array based replication depending on the storage array you’re comparing to.  In the beta, VR supported 100 VMs.  At GA, SRM 5.0 supports up to 500 VMs with vSphere Replication. (Thanks Greg)
  12. In band VR requires additional open TCP ports:
    1. 31031 for initial replication
    2. 44046 for ongoing replication
  13. VR requires vSphere 5 hosts at both the protected and recovery sites while array based replication follows only general SRM 5.0 minimum requirements of vCenter 5.0 and hosts which can be 3.5, 4.x, and/or 5.0.

The list of disadvantages appears long but don’t let that stop you from taking a serious look at SRM 5.0 and vSphere Replication.  I don’t think there are many, if any, showstoppers in that list for small to medium businesses.

I hope you find this useful.  I gathered the information from various sources, much of it from an SRM Beta FAQ which to the best of my knowledge are still fact today in the GA release.  If you find any errors or would like to offer corrections or additions, as always please feel free to use the Comments section below.

VMware issues recall on new vSphere 5.0 UNMAP feature

September 30th, 2011 by jason No comments »

One of the new features in vSphere 5.0 is Thin Provisioning Block Space Reclamation (UNMAP).  This was released as one part of a new VAAI primitive (the other component of the new primitive being thin provision stun).

Today, VMware released KB 2007427 Disabling VAAI Thin Provisioning Block Space Reclamation (UNMAP) in ESXi 5.0.

Due to varied response times from the storage devices, UNMAP command can result in poor performance of the system and should be disabled on the ESXi 5.0 host.  This variation of response times in critical regions could potentially interfere with operations such as Storage vMotion and Virtual Machine Snapshot consolidation.

VMware intends to disable UNMAP in an upcoming patch release till full support for Space Reclamation is available.

As described in the article, the workaround to avoid the use of UNMAP commands on Thin Provisioned LUNs is as follows:

  1. Log into your host using Tech Support mode. For more information on using Tech Support mode see Tech Support Mode in ESXi 4.1 and 5.0 (1017910).
  2. From your ESXi 5.0 host, issue this esxcli command:  esxcli system settings advanced set –int-value 0 –option /VMFS3/EnableBlockDelete

Note: In the command above, double hyphens are used before “int-value” and “option”; the font used may render them as a single long hypen. This is a per-host setting and must be issued on each ESXi 5.0 host in your cluster.

Update 12/16/11: VMware released five (5) non-critical patches last night.  One of those patches is ESXi500-201112401-SG which is the anticipated update that disables the UNMAP functionality in the new vSphere 5 Thin Provisioning VAAI primitive.  Full patch details below:

Summaries and Symptoms

This patch updates the esx-base VIB to resolve the following issues:

  • Updates the glibc third party library to resolve multiple security issues.
    The Common Vulnerabilities and Exposures project (cve.mitre.org) has assigned the names CVE-2010-0296, CVE-2011-0536, CVE-2011-1071, CVE-2011-1095, CVE-2011-1658 and CVE-2011-1659 to these issues.
  • When a hot spare disk that is added to a RAID group is accessed before the disk instance finishes initialization or if the disk is removed while an instance of it is being accessed, a race condition might occur causing the vSphere Client to not display information about the RAID controllers and the vSphere Client user interface might also not respond for a very long time.
  • vMotion fails with the A general system error occurred: Failed to flush checkpoint data!error message when:
    • The resolution of the virtual machines is higher than 1280×1024, or smaller if you are using a second screen
    • The guest operating system is using the WDDM driver (Windows 7, Windows 2008 R2, Windows 2008, Windows Vista)
    • The virtual machine is using Virtual Machine Hardware version 8.
  • Creating host profiles of ESX i 5.0 hosts might fail when the host profile creation process is unable to resolve the hostname and IP address of the host by relying on the DNS for hostname and IP address lookup. An error message similar to the following is displayed:
    Call"HostProfileManager.CreateProfile" for object "HostProfileManager" on vCenter Server"<Server_Name> failed.
    Error extracting indication configuation: [Errno- 2] Name or service not known.
  • In vSphere 5.0, Thin Provisioning is enabled by default on devices that adhere to T10 standards. On such thin provisioned LUNs, vSphere issues SCSI UNMAP commands to help the storage arrays reclaim unused space. Sending UNMAP commands might cause performance issues with operations such as snapshot consolidation or storage vMotion.
    This patch resolves the issue by disabling the space reclamation feature, by default.
  • If a user subscribes for an ESXi Server’s CIM indications from more that one client (for example, c1 and c2) and deletes the subscription from the first client (c1), the other clients (C2) might fail to receive any indication notification from the host.

This patch also provides you with the option of configuring the iSCSI initiator login timeout value for software iSCSI and dependent iSCSI adapters.
For example, to set the login timeout value to 10 seconds you can use commands similar to the following:

  • ~ # vmkiscsi-tool -W -a "login_timeout=10" vmhba37
  • ~ # esxcli iscsi adapter param set -A vmhba37 -k LoginTimeout -v 10

The default login timeout value is 5 seconds and the maximum value that you can set is 60 seconds.
We recommend that you change the login timeout value only if suggested by the storage vendor.

Changing the default vSphere 5.0 PSP to Round Robin

September 28th, 2011 by jason No comments »

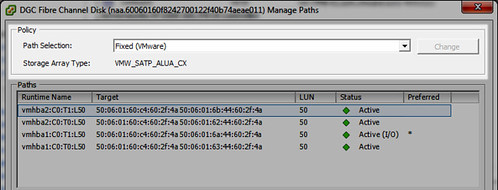
If you have a vSphere 5.0 environment backed by a storage array (SAN) which supports multipathing over two or more active front end ports (or if you have an array with ALUA support), you may be interested in using VMware’s Round Robin PSP (Path Selection Policy) to distribute storage I/O evenly across multiple fabrics and/or fabric paths.  One of the benefits with the Round Robin PSP is that it performs the I/O balancing automatically as opposed to manually tuning fabric and path utilization which is associated with the Fixed PSP – typically the default for active/active arrays.  If you’re familiar with Round Robin, you’re probably already aware that you can manually change the PSP using the vSphere Client.  However, this can become a tedious affair yielding inconsistent configurations since each LUN on each host in the cluster needs to be configured.
SnagIt Capture

A better solution would be to modify the default PSP for your SATP (Storage Array Type Plugin) so that each new LUN presented to the hosts is automatically configured for Round Robin.

Taking a look at the default PSP for each SATP, I see there is a mix of two different PSPs: VMW_PSP_FIXED (generally for active/active arrays) and VMW_PSP_MRU (generally for active/passive arrays).  Notice the Round Robin policy VMW_PSP_RR is not the default for any SATP:

[root@lando /]# esxcli storage nmp satp list
Name                 Default PSP    Description
——————-  ————-  ——————————————————-
VMW_SATP_ALUA_CX     VMW_PSP_FIXED  Supports EMC CX that use the ALUA protocol
VMW_SATP_ALUA        VMW_PSP_MRU    Supports non-specific arrays that use the ALUA protocol
VMW_SATP_MSA         VMW_PSP_MRU    Placeholder (plugin not loaded)
VMW_SATP_DEFAULT_AP  VMW_PSP_MRU    Placeholder (plugin not loaded)
VMW_SATP_SVC         VMW_PSP_FIXED  Placeholder (plugin not loaded)
VMW_SATP_EQL         VMW_PSP_FIXED  Placeholder (plugin not loaded)
VMW_SATP_INV         VMW_PSP_FIXED  Placeholder (plugin not loaded)
VMW_SATP_EVA         VMW_PSP_FIXED  Placeholder (plugin not loaded)
VMW_SATP_SYMM        VMW_PSP_FIXED  Placeholder (plugin not loaded)
VMW_SATP_CX          VMW_PSP_MRU    Placeholder (plugin not loaded)
VMW_SATP_LSI         VMW_PSP_MRU    Placeholder (plugin not loaded)
VMW_SATP_DEFAULT_AA  VMW_PSP_FIXED  Supports non-specific active/active arrays
VMW_SATP_LOCAL       VMW_PSP_FIXED  Supports direct attached devices

Modifying the PSP is achieved with a single command on each ESXi host (no reboot required):

[root@lando /]# esxcli storage nmp satp set -s VMW_SATP_ALUA_CX -P VMW_PSP_RR
Default PSP for VMW_SATP_ALUA_CX is now VMW_PSP_RR

Similarly and specifically for Dell Compellent Storage Center arrays, modifying the PSP is achieved with a single command on each ESXi host (no reboot required):

Storage Center 6.5 and older esxcli method:

[root@lando /]# esxcli storage nmp satp set -s VMW_SATP_DEFAULT_AA -P VMW_PSP_RR
Default PSP for VMW_SATP_DEFAULT_AA is now VMW_PSP_RR

Storage Center 6.6 and newer esxcli method:

[root@lando /]# esxcli storage nmp satp set -s VMW_SATP_ALUA -P VMW_PSP_RR
Default PSP for VMW_SATP_ALUA is now VMW_PSP_RR

Storage Center 6.5 and older PowerShell method:

$Datacenter = Get-Datacenter -Name “Datacenter”

ForEach ( $VMHost in ( Get-VMHost -Location $Datacenter | Sort-Object Name ) )

{

Write-Host “Working on host `”$($VMHost.Name)`”” -ForegroundColor Green

$EsxCli = Get-EsxCli -VMHost $VMHost

$EsxCli.storage.nmp.satp.list() | Where-Object { $_.Name -eq “VMW_SATP_DEFAULT_AA” }

$EsxCli.storage.nmp.satp.set( $null, “VMW_PSP_RR”, “VMW_SATP_DEFAULT_AA” )

$EsxCli.storage.nmp.satp.list() | Where-Object { $_.Name -eq “VMW_SATP_DEFAULT_AA” }

}

Storage Center 6.6 and newer PowerShell method:

$Datacenter = Get-Datacenter -Name “Datacenter”

ForEach ( $VMHost in ( Get-VMHost -Location $Datacenter | Sort-Object Name ) )

{

Write-Host “Working on host `”$($VMHost.Name)`”” -ForegroundColor Green

$EsxCli = Get-EsxCli -VMHost $VMHost

$EsxCli.storage.nmp.satp.list() | Where-Object { $_.Name -eq “VMW_SATP_ALUA” }

$EsxCli.storage.nmp.satp.set( $null, “VMW_PSP_RR”, “VMW_SATP_ALUA” )

$EsxCli.storage.nmp.satp.list() | Where-Object { $_.Name -eq “VMW_SATP_ALUA” }

}

If I take a look at the the default PSP for each SATP, I can see the top one has changed from VMW_PSP_FIXED to VMW_PSP_RR:

[root@lando /]# esxcli storage nmp satp list
Name                 Default PSP    Description
——————-  ————-  ——————————————————-
VMW_SATP_ALUA_CX     VMW_PSP_RR     Supports EMC CX that use the ALUA protocol
VMW_SATP_ALUA        VMW_PSP_RR    Supports non-specific arrays that use the ALUA protocol
VMW_SATP_CX          VMW_PSP_MRU    Supports EMC CX that do not use the ALUA protocol
VMW_SATP_MSA         VMW_PSP_MRU    Placeholder (plugin not loaded)
VMW_SATP_DEFAULT_AP  VMW_PSP_MRU    Placeholder (plugin not loaded)
VMW_SATP_SVC         VMW_PSP_FIXED  Placeholder (plugin not loaded)
VMW_SATP_EQL         VMW_PSP_FIXED  Placeholder (plugin not loaded)
VMW_SATP_INV         VMW_PSP_FIXED  Placeholder (plugin not loaded)
VMW_SATP_EVA         VMW_PSP_FIXED  Placeholder (plugin not loaded)
VMW_SATP_SYMM        VMW_PSP_FIXED  Placeholder (plugin not loaded)
VMW_SATP_LSI         VMW_PSP_MRU    Placeholder (plugin not loaded)
VMW_SATP_DEFAULT_AA  VMW_PSP_RR  Supports non-specific active/active arrays
VMW_SATP_LOCAL       VMW_PSP_FIXED  Supports direct attached devices

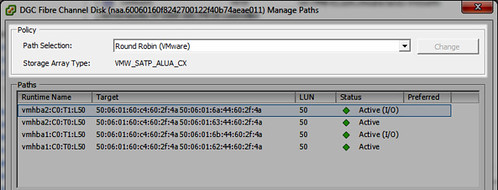
Now when I present a new LUN to the host which uses the VMW_SATP_ALUA_CX SATP, instead of using the old PSP default of VMW_PSP_FIXED, it applies the new default PSP which is VMW_PSP_RR (Round Robin):
SnagIt Capture

To clarify just a little further, what I’ve done is change the default PSP for just one SATP.  If I had other active/active or ALUA arrays which used a different SATP, I’d need to modify the default PSP for those corresponding SATPs as well.

This is good VCAP-DCA fodder.  For more on this, take a look at the vSphere Storage Guide.

If you’ve already presented and formatted your LUNs to your vSphere cluster, it’s too late to use the above method to automagically configure each of the block devices with the Round Robin PSP.  If that is the case you find yourself in with a lot of datastores you’d like to reconfigure for Round Robin, PowerShell can be leveraged with the example below changing the PSP to Round Robin explicitly for Dell Compellent Storage Center volumes (this script comes by way of the Dell Compellent Best Practices Guide for VMware vSphere):

Storage Center 6.5 and older PowerShell method:

Get-Cluster InsertClusterNameHere | Get-VMHost | Get-ScsiLun | where {$_.Vendor -eq “COMPELNT” –and $_.Multipathpolicy -eq “Fixed”} | Set-ScsiLun -Multipathpolicy RoundRobin

Storage Center 6.6 and newer PowerShell method:

Get-Cluster InsertClusterNameHere | Get-VMHost | Get-ScsiLun | where {$_.Vendor -eq “COMPELNT” –and $_.Multipathpolicy -eq “MostRecentlyUsed”} | Set-ScsiLun -Multipathpolicy RoundRobin

The PSP for devices which are already presented and in use by vSphere can also be modified individually per host, per device using esxcli. First, retrieve a list of all devices and their associated SATP and PSP configuration via esxcli on the host:

[root@lando:~] esxcli storage nmp device list
naa.6000d31000ed1f010000000000000015
Device Display Name: COMPELNT Fibre Channel Disk (naa.6000d31000ed1f010000000000000015)
Storage Array Type: VMW_SATP_ALUA
Storage Array Type Device Config: {implicit_support=on;explicit_support=off; explicit_allow=on;alua_followover=on; action_OnRetryErrors=off; {TPG_id=61485,TPG_state=AO}{TPG_id=61486,TPG_state=AO}{TPG_id=61483,TPG_state=AO}{TPG_id=61484,TPG_state=AO}}
Path Selection Policy: VMW_PSP_MRU
Path Selection Policy Device Config: Current Path=vmhba1:C0:T10:L256
Path Selection Policy Device Custom Config:
Working Paths: vmhba1:C0:T10:L256
Is USB: false

Now change the PSP for the individual device:

[root@lando:~] esxcli storage nmp device set -d naa.6000d31000ed1f010000000000000015 -P VMW_PSP_RR

Perform this action for each device on each host in the cluster as needed.

Round Robin specific tuning can be made per device per host using the esxcli storage nmp psp roundrobin deviceconfig set command. Type may be default, iops, or bytes. The Round Robin default is 1000 IOPS. Default bytes is 10485760 or 10MB. Following is an example changing the Round Robin policy for the device to IOPS and 3 IOPS per path:

[root@lando:~] esxcli storage nmp psp roundrobin deviceconfig set -d naa.6000d31000ed1f010000000000000015 -t=iops -I=3


Enabling vCenter Server 5.0 Database Monitoring

September 27th, 2011 by jason No comments »

I stumbled across this while rummaging through the vSphere 5.0 Installation and Setup document.  Page 183 contains a small section (new in vSphere 5.0) which describes a process to enable database monitoring for Microsoft SQL Server (surrounding pages discuss enabling the same for other supported database platforms).  The SQL script provided in the documentation contains an error on the first line but I was able to adjust that and run it on the SQL 2008 R2 server in the lab.  Following is the script I ran:

use master
go
grant VIEW SERVER STATE to vcenter
go

Once access has been granted, vCenter will collect certain SQL Server health statistics and store them in the rotating vCenter profile log located by default at C:\ProgramData\VMware\VMware VirtualCenter\Logs\vpxd-profiler-xx.log.  These metrics were taken from my vCenter Server log file and serve as an example of what is being collected from the SQL Server by the vCenter Server:

–> <dbMonitoring>
–> DbMonitoring/Counter/Storage: Manually extensible data files/Unit/count/Range Type/range/RangeMin/0/RangeMax/0/Timestamp/2011-09-27T18:00:01.79Z/Value/0
–> DbMonitoring/Counter/Memory:Database pages/Unit/timesIncrease/Range Type/range/RangeMin/0/RangeMax/3/Timestamp/1970-01-01T00:00:00Z/Value/N/A
–> DbMonitoring/Counter/Storage: Peak data file storage utilization/Unit/percent/Range Type/range/RangeMin/60559224/RangeMax/90/Timestamp/2011-09-27T18:00:01.802999Z/Value/0
–> DbMonitoring/Counter/Memory:Availaable/Unit/kiloBytes/Range Type/range/RangeMin/5120/RangeMax/60559416/Timestamp/1970-01-01T00:00:00Z/Value/N/A
–> DbMonitoring/Counter/Memory:Page Life Expectancy/Unit/seconds/Range Type/range/RangeMin/300/RangeMax/60559416/Timestamp/1970-01-01T00:00:00Z/Value/N/A
–> DbMonitoring/Counter/IO:Log growths/Unit/timesIncrease/Range Type/range/RangeMin/0/RangeMax/3/Timestamp/1970-01-01T00:00:00Z/Value/N/A
–> DbMonitoring/Counter/CPU:Usage/Unit/percent/Range Type/range/RangeMin/0/RangeMax/80/Timestamp/2011-09-27T18:00:01.75Z/Value/44
–> DbMonitoring/Counter/Memory:Buffer cache hit ratio/Unit/percent/Range Type/range/RangeMin/90/RangeMax/100/Timestamp/1970-01-01T00:00:00Z/Value/N/A
–> DbMonitoring/Counter/General:User Connections/Unit/count/Range Type/range/RangeMin/255/RangeMax/60559416/Timestamp/1970-01-01T00:00:00Z/Value/N/A
–> </dbMonitoring>

Per VMware’s documentation:

vCenter Server Database Monitoring captures metrics that enable the administrator to assess the status and health of the database server. Enabling Database Monitoring helps the administrator prevent vCenter downtime because of a lack of resources for the database server. Database Monitoring for vCenter Server enables administrators to monitor the database server CPU, memory, I/O, data storage, and other environment factors for stress conditions. Statistics are stored in the vCenter Server Profile Logs. You can enable Database Monitoring for a user before or after you install vCenter Server. You can also perform this procedure while vCenter Server is running.

One thing that I noticed is that these metrics were being collected in the vCenter log files prior to running the enabling script.  I’m not sure if this is because vCenter already had the required permissions to the master database (I use SQL authentication and I didn’t explicitly grant this), or perhaps this is enabled by default in the vCenter installation routine when the database prepare script runs.

The instructions provide plenty of context but are are fairly brief and don’t identify next steps or how to harvest the collected metrics.  Perhaps the vCenter Service Health agent monitors the profile log and will alarm through vCenter.  If not, then I view this as a monitoring framework VMware provides which can tailored for specific environments.  Thresholds could be defined which trigger alerts proactively before dangers or an outage occurs.  Admittedly I’m not a DBA.  With what’s provided, I’m not sure if this provides much value above and beyond native monitoring and alerting provided by SQL Server and Perfmon.

VMware View 5.0 VDI vHardware 8 vMotion Error

September 20th, 2011 by jason No comments »

General awareness/heads up blog post here on something I stumbled on with VMware View 5.0.  A few weeks ago while working with View 5.0 BETA in the lab, I ran into an issue where a Windows 7 virtual machine would not vMotion from one ESXi 5.0 host to another.  The resulting error in the vSphere Client was:

A general system error occurred: Failed to flush checkpoint data

I did a little searching and found similar symptoms in VMware KB 1011971 which speaks to an issue that can arise  when Video RAM (VRAM) is greater than 30MB for a virtual machine. In my case it was greater than 30MB but I could not adjust it due to the fact that it was being managed by the View Connection Server.  At the same time, a VMware source on Twitter volunteered his assistance and quickly came up with some inside information on the issue.  He had me try adding the following line to /etc/vmware/config on the ESXi 5.0 hosts (no reboot required):

migrate.baseCptCacheSize = “16777216”

The fix worked and I was able to vMotion the Windows 7 VM back and forth between hosts.  The information was taken back to Engineering for a KB to be released.  That KB is now available: VMware KB 2005741 vMotion of a virtual machine fails with the error: A general system error occurred: Failed to flush checkpoint data! The new KB article lists the following background information and several workarounds:

Cause

Due to new features with Hardware Version 8 for the WDDM driver, the vMotion display graphics memory requirement has increased. The default pre-allocated buffer may be too small for certain virtual machines with higher resolutions. The buffer size is not automatically increased to account for the requirements of those new features if mks.enable3d is set to FALSE (the default).

Resolution

To work around this issue, perform one of these options:

  • Change the resolution to a single screen of 1280×1024 or smaller before the vMotion.
  • Do not upgrade to Virtual Machine Hardware version 8.
  • Increase the base checkpoint cache size. Doubling it from its default 8MB to 16MB (16777216 byte) should be enough for every single display resolution. If you are using two displays at 1600×1200 each, increase the setting to 20MB (20971520 byte).To increase thebase checkpoint cache size:

    1. Power off the virtual machine.
    2. Click the virtual machine in the Inventory.
    3. On the Summary tab for that virtual machine, click Edit Settings.
    4. In the virtual machine Properties dialog box, click the Options tab.
    5. Under Advanced, select General and click Configuration Parameters.
    6. Click Add Row.
    7. In the new row, add migrate. baseCptCacheSize to the name column and add 16777216 to the value column.
    8. Click OK to save the change.

    Note: If you don’t want to power off your virtual machine to change the resolution, you can also add the parameter to the /etc/vmware/config file on the target host. This adds the option to every VMX process that is spawning on this host, which happens when vMotion is starting a virtual machine on the server.

  • Set mks.enable3d = TRUE for the virtual machine:
    1. Power off the virtual machine.
    2. Click the virtual machine in the Inventory.
    3. On the Summary tab for that virtual machine, click Edit Settings.
    4. In the virtual machine Properties dialog box, click the Options tab.
    5. Under Advanced, select General and click Configuration Parameters.
    6. Click Add Row.
    7. In the new row, add mks.enable3d to the name column and add True to the value column.
    8. Click OK to save the change.
Caution: This workaround increases the overhead memory reservation by 256MB. As such, it may have a negative impact on HA Clusters with strict Admission Control. However, this memory is only used if the 3d application is active. If, for example, Aero Basic and not Aero Glass is used as a window theme, most of the reservation is not used and the memory could be kept available for the ESX host. The reservation still affects HA Admission Control if large multi-monitor setups are used for the virtual machine and if the CPU is older than a Nehalem processor and does not have the SSE 4.1 instruction set. In this case, using 3d is not recommended. The maximum recommended resolution for using 3d, regardless of CPU type and SSE 4.1 support, is 1920×1200 with dual screens.

The permanent fix for this issue did not make it into the recent View 5.0 GA release but I expect it will be included in a future release or patch.

Update 12/23/11: VMware released five (5) non-critical patches last week.  One of those patches is ESXi500-201112401-SG which permanently resolves the issues described above.  Full patch details below:

Summaries and Symptoms

This patch updates the esx-base VIB to resolve the following issues:

  • Updates the glibc third party library to resolve multiple security issues.
    The Common Vulnerabilities and Exposures project (cve.mitre.org) has assigned the names CVE-2010-0296, CVE-2011-0536, CVE-2011-1071, CVE-2011-1095, CVE-2011-1658 and CVE-2011-1659 to these issues.
  • When a hot spare disk that is added to a RAID group is accessed before the disk instance finishes initialization or if the disk is removed while an instance of it is being accessed, a race condition might occur causing the vSphere Client to not display information about the RAID controllers and the vSphere Client user interface might also not respond for a very long time.
  • vMotion fails with the A general system error occurred: Failed to flush checkpoint data!error message when:
    • The resolution of the virtual machines is higher than 1280×1024, or smaller if you are using a second screen
    • The guest operating system is using the WDDM driver (Windows 7, Windows 2008 R2, Windows 2008, Windows Vista)
    • The virtual machine is using Virtual Machine Hardware version 8.
  • Creating host profiles of ESX i 5.0 hosts might fail when the host profile creation process is unable to resolve the hostname and IP address of the host by relying on the DNS for hostname and IP address lookup. An error message similar to the following is displayed:
    Call"HostProfileManager.CreateProfile" for object "HostProfileManager" on vCenter Server"<Server_Name> failed.
    Error extracting indication configuation: [Errno- 2] Name or service not known.
  • In vSphere 5.0, Thin Provisioning is enabled by default on devices that adhere to T10 standards. On such thin provisioned LUNs, vSphere issues SCSI UNMAP commands to help the storage arrays reclaim unused space. Sending UNMAP commands might cause performance issues with operations such as snapshot consolidation or storage vMotion.
    This patch resolves the issue by disabling the space reclamation feature, by default.
  • If a user subscribes for an ESXi Server’s CIM indications from more that one client (for example, c1 and c2) and deletes the subscription from the first client (c1), the other clients (C2) might fail to receive any indication notification from the host.

This patch also provides you with the option of configuring the iSCSI initiator login timeout value for software iSCSI and dependent iSCSI adapters.
For example, to set the login timeout value to 10 seconds you can use commands similar to the following:

  • ~ # vmkiscsi-tool -W -a "login_timeout=10" vmhba37
  • ~ # esxcli iscsi adapter param set -A vmhba37 -k LoginTimeout -v 10

The default login timeout value is 5 seconds and the maximum value that you can set is 60 seconds.
We recommend that you change the login timeout value only if suggested by the storage vendor.