Tame Electrical and Heating Costs with CPU Power Management

November 11th, 2009 by jason No comments »

A casual Twitter tweet about my power savings through the use of VMware Distributed Power Management (DPM) found its way to VMware Senior Product Manager for DPM, Ulana Legedza, and Andrei Dorofeev. Ulana was interested in learning more about my situation. I explained how VMware DPM had evaluated workloads between two clustered vSphere hosts in my home lab, and proceeded to shut down one of the hosts for most of the month of October, saving me more than $50 on my energy bill.

Ulana and Andrei took the conversation to the next level and asked me if I was using vSphere’s Advanced CPU Power Management feature (See vSphere Resource Management Guide page 22). I was not, in fact I was unaware of its existence. Power Management is a new feature in ESX(i)4 available to processors supporting Enhanced Intel SpeedStep or Enhanced AMD PowerNow! power management technologies. To quote the .PDF article:

“To improve CPU power efficiency, you can configure your ESX/ESXi hosts to dynamically switch CPU frequencies based on workload demands. This type of power management is called Dynamic Voltage and Frequency Scaling (DVFS). It uses processor performance states (P-states) made available to the VMkernel through an ACPI interface.”

A quick look at the Quad Core AMD Opteron 2356 processors in my HP DL385 G2 showed they support Enhanced AMD PowerNow! Power Management Technology:

There are two steps to enabling this power management feature. The first step is to ensure it is enabled in the server BIOS. On an HP DL385 G2, CPU power management is enabled by default. In this particular server model, it is configured via the BIOS by hitting <F9> at the end of the POST (would require a reboot obviously)

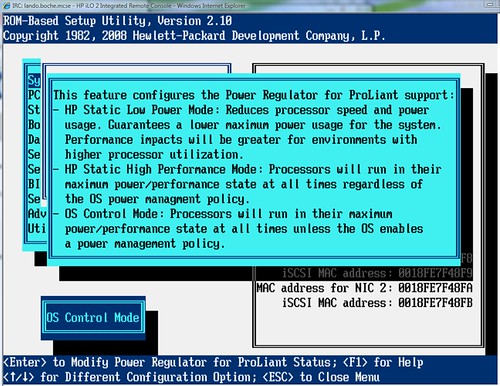
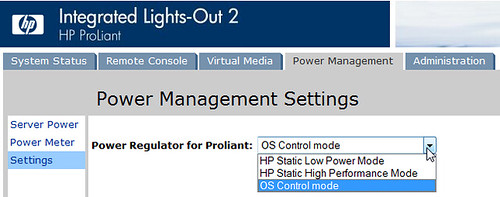
A slightly easier method might be to verify and/or configure the policy through HP’s out of band (OOB) iLO 2, however, a reboot will be requested by the iLO 2 for a policy change to take effect. On an HP server, configure for OS Control mode, but again, this appears to be the default for the HP DL385 G2 so hopefully no reboot is required for you to implement this power saving measure in your environment:

After enabling power management in the BIOS, the second step is to modify the Power Management Policy on each ESX(i) host from the default of static to dynamic. The definitions of these two settings can be found in the .PDF linked above and are as follows:

static – The default. The VMkernel can detect power management features available on the host but does not actively use them unless requested by the BIOS for power capping or thermal events.

dynamic – The VMkernel optimizes each CPU’s frequency to match demand in order to improve power efficiency but not affect performance. When CPU demand increases, this policy setting ensures that CPU frequencies also increase.

You might be asking yourself by this point “Ok, this is nice, but what’s the trade off?” Note the wording in the dynamic definition above “improves power efficiency but does not affect performance”. This is a win/win configuration change!

This step can be performed one of a few ways on each host (again, no reboot required for this change):

  1. Using the vSphere Client, change the Advanced host setting Power.CpuPolicy from static to dynamic
  2. Scriptable: Via the ESX service console, PuTTY, or script, issue the command esxcfg-advcfg -s dynamic /Power/CpuPolicy

The impact on my home lab was quite visible. After 12 hours, the blue area in the following 24 hour graph reflects average electrical consumption was reduced from an average 337 Watts down to 292 Watts. All things being equal and CPU loads balanced by DRS, that’s a reduction in energy consumption of over 13% per host:

An alternate graph shows Btu output dropped from 1,135 Btu to about 1,000 Btu. All things being equal, a reduction of about 135 Btu per host:

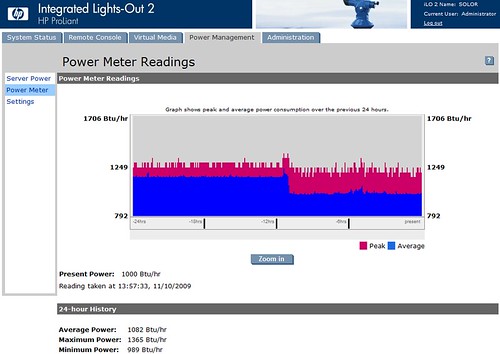
A Btu is heat – explained more at wiseGEEK’s What is a Btu? Heat is a byproduct of technology in the datacenter and in most cases is viewed as overhead expense because it requires cooling (additional costs) to maintain optimal operating conditions for the equipment running in the environment. If we can eliminate heat, we eliminate the associated cost of removing the heat. This is known as cost avoidance.

Eliminating heat is as much of an interest to me as reducing my energy bill. The excessive heat generated in the basement eventually finds its way upstairs causing the rest of the house to be a little uncomfortable. The air conditioner in my home wasn’t manufactured to handle the excessive heat. Now, I live in the midwest where we have some frigid winters. Heat in the home is welcomed during the winter months. I could turn off CPU Power Management raising the Btu index as well as my energy bill, in favor of reducing my natural gas heating bill. I don’t know which is more expensive. This could be a great experiment for the January/February time frame.

In summary, we can attack operating costs from two sides by using VMware CPU Power Management:

  1. Reduction in excess electricity used by idle CPU cycles
  2. Reduction in cooling costs by reducing Btu output

I’m excited to see what next month’s energy bill looks like.

Update 11-17-09:  I was just made aware that Simon Seagrave wrote an earlier article on CPU power management here.  Sorry Simon, I was unaware of your article and I did not intentionally copy your topic.  Your article covered the topic well.  I hope we’re still friends 🙂

VMware Workstation 7.0 Released – New and Improved!

November 8th, 2009 by jason No comments »

If you’re a regular follower of my blog, you’ve probably noticed that I typically focus on Datacenter products. I am a VMware Workstation user as well. VMware’s inaugural product is the first hypervisor I ever used and has a lot to do with my career shift and focus on the exciting world of virtualization. Although I don’t use Workstation quite as much as I used to, I still like to keep current with new releases. As a Virtual Infrastructure user, one reasons for this is that I get a preview of features in Workstation that will eventually make their way to Virtual Infrastructure in the product development cycle.

VMware Workstation 7.0 was released on October 27th and boasts an array of new features as well as support for new guest operating systems. I upgraded last week and started taking a look around. Having not read the “What’s New” release notes yet, I had noticed some features that, to me, looked new or improved.

The first thing I noticed about VMware Workstation 7.0, before installing it, is that VMware did away with separate license keys for Windows and Linux distributions. It has absolutely bugged me for years that I could not transfer my VMware Workstation installation from Windows to Linux or from Linux to Windows without purchasing an additional license. One license key now works with both Windows and Linux versions of VMware Workstation. I validated this by looking it up on VMware’s website. Here’s what I found:

“Q: Can I switch between VMware Workstation 7 for Windows and Linux?
A: Yes. Starting with VMware Workstation 7, you can switch between Windows and Linux version of VMware Workstation using the same license key. If you decide to switch host operating systems, you must uninstall Workstation from the host operating system you no longer plan to use. If you plan to run VMware Workstation 7 on both a Linux and Windows host, you need to purchase two licenses.”

Once installed, the first new feature that jumped out at me was during the creation of a new VM. The ability to assign CPU cores to a guest OS and its applications. Differentiating between CPU sockets and CPU cores has obvious licensing advantages for both applications and operating systems which licenses per socket. Support for 4 processors is also apparent:

The next item I saw was the ability to select VMware ESX as a guest operating system. This is handy new feature that will save time by eliminating the need to hack the .vmx file or manually add advanced settings in order to run an embedded hypervisor as well as nested VMs. I’ll add that for some reason, both ESX and ESXi seem to run a lot faster or more efficient in VMware Workstation 7. Two or more of the same workloads running concurrently in VMware Workstation 6 on my Dell Latitude E6400 laptop would create loads of I/O congestion resulting in long delays in keyboard and mouse response, as well as screen redraw. I can’t account for why but I’m certainly not complaining:

Next up is a virtual disk “Utilities” menu…

…which reveals an option to mount the virtual disk as a Windows drive letter in the host operating system. In the old days, VMware offered a VMware-mount.exe command line utility to accomplish this task. The integrated GUI version is a nice touch. Mounting a .vmdk disk in your native file system allows such tasks as out of band file injection, data rescue, etc. I’ve used the old command line utility many times in the past for refreshing DR images offline with application code updates:

The Virtual Network Editor looks like it got a face lift, with most of the configurable items streamlined into a single property sheet for better visibility and ergonomics:

This is cool, and sort of uhh… Citrix or Terminal Services ‘ish. Driverless printing from guest through the host operating system. A Virtual Printer device can be added in the virtual machine settings (the guest OS must be powered off)…

…which maps host printer connections (both local and network printers) inside the guest VM. Automatically imported printers have the comments “Printer created by TPAutoConnect“, indicating integrated technology from ThinPrint in VMware Tools:

This was the extent of my observations thus far while using VMware Workstation 7.0. If any of the items I talked about above existed in previous versions of VMware Workstation, please let me know. Since I do not use Workstation as much, it is possible that I missed an item or two while using an earlier version.

I decided to look at the VMware Workstation 7.0 Release Notes to see the complete list of improvements and new features:

New Support for 32-Bit and 64-Bit Operating Systems

    Operating System

    Host and Guest Support

    Windows 7 Home Basic
    Windows 7 Premium
    Windows 7 Business
    Windows 7 Enterprise
    Windows 7 Ultimate
    Host and guest
    Windows 2008 SP2, R2 Guest
    Windows Vista SP2 Guest
    Debian 5 Guest
    Ubuntu 9.04 Host and guest
    Red Hat Enterprise Linux 5.3 Host and guest
    CentOS 5.3 Guest
    Oracle Enterprise Linux 5.3 Guest
    OpenSUSE 11.x Host and guest
    Mandriva 2009 Host and guest
    SUSE Linux Enterprise 11.x Host and guest

New Features in VMware Workstation

  • Windows 7 — Create and run Windows 7 32-bit and 64-bit virtual machines using VMware Workstation. VMware Workstation has been enhanced for performance and to take advantage of the new Windows 7 features including Live Thumbnails and Aero Peek.
  • Aero Glass — A new Windows Display Driver Model (WDDM) graphics driver has been developed for Windows Vista and Windows 7 virtual machines. The WDDM driver can display the Windows Aero user interface, OpenGL 1.4, and Shader Model 3.0. For more information on the VMware recommended graphics hardware, see the VMware Workstation User’s Manual.
  • Windows XP Mode Compatible — Import a Windows XP Mode virtual machine using VMware Workstation 7.0 and run the virtual machine without being prompted to enter a Windows XP license key. VMware Workstation enables the Windows XP Mode virtual machine to take advantage of more than one processor, render high-end graphics, integrate seamlessly with Unity, and transfer files easily with drag and drop, and shared folders. VMware Workstation also has the ability to run concurrently with Windows XP Mode.
  • 3D Graphics Improvements for Windows XP guests — OpenGL 2.1 and Shader Model 3.0 support is now available for Windows XP virtual machines. The XPDM (SVGAII) graphics driver works with Windows XP, Windows Vista, and Windows 7. However, only Windows XP virtual machines install the XPDM graphics driver by default. To switch graphics drivers in the guest operating system, see How to Switch Between SVGAII and WDDM Drivers.
  • vSphere 4.0 and ESX Support — Install and run ESX 4.0 as a guest operating system. VMware Certified Professionals (VCPs) and technical professionals can install the latest server virtualization software and experiment with server setup, conduct training, show demos, and test production configurations. Running ESX as a guest eliminates the need to have spare hardware available to run ESX natively and enables ESX to run on systems that are not listed on the ESX hardware compatibility list (HCL). For more information on the supported processors and host operating systems, see Considerations for Running an ESX Guest.
    This feature is intended for educational and demonstration purposes only and should not be used in production environments. To use this feature, you must download vSphere 4.0 from the VMware Web site and follow the installation documentation provided with vSphere to install ESX.
  • Virtual Printing — Print from virtual machines without mapping network printers or installing printer drivers in the virtual machine. With virtual printing enabled in the virtual machine setting, all of the printers installed on the host operating system are available in the guest operating system. This functionality is enabled through a partnership with ThinPrint, Inc.
  • Four-Way SMP — Create and run virtual machines with a total of four processor cores, which can consist of four single-core processors, two dual-core processors, or one quad-core processor like the new Intel i7.
  • 32GB Guest Memory — Run virtual machines with up to 32GB of memory using VMware Workstation.
  • 256-bit Encryption — Secure your virtual machines with AES256-bit encryption to prevent unauthorized users from accessing or running the configuration files.
  • AutoProtect —Schedule snapshots of your virtual machine to be created at a regular interval to ensure that you always have a snapshot available to revert to when needed.
  • Advanced Linux Sound Architecture (ALSA) — ALSA significantly improves the sound of virtual machines running on a Linux host and streams the audio from each virtual machine on a separate channel so that multiple virtual machines can be heard simultaneously.
  • Cross-Platform License Keys — Use the VMware Workstation 7.0 license key on both the Windows and Linux versions. Make sure you read the EULA for the terms and conditions that must be met when switching platforms.
  • Pause a Virtual Machine — Free your CPU resources instantaneously without powering off or suspending the virtual machine.
  • Expand Virtual Disks — Increase the size of the virtual disk from within VMware Workstation. For Windows Vista and Windows 7 guests, the disk partitions can be adjusted without the use of additional software.
  • Compact Virtual Disks — Reclaim unused space from a virtual disk so that the host or another virtual machine can use it.
  • Shared Folder Compatibility — Increased compatibility with many Windows applications that previously were unable to read or write files to shared folders.
  • On-Demand VMware Tools Download — On-demand download capability provides the latest VMware Tools for the guest operating system. This feature reduces the overall download size of VMware products by downloading only the required set of VMware Tools and and enables VMware to release new versions frequently.
  • Drag and Drop Enhancements — Drag and drop enhancements include support for new file types including images and formatted text and extend the existing ability to drag and drop files to a broader set of guest and host operating systems.
  • Virtual Network Editor — User interface enhancements have simplified creating and configuring virtual networks.
  • Fuse Mount for Linux — Use Fuse to mount .vmdk disks on to the file system of Linux hosts.
  • Simplified Collection of Support Information — Gather detailed information about multiple virtual machines and the host machine at the same time. The information is packaged in a compressed file so that you can email it to VMware support or post it on the VMware Workstation forums.
  • IPv6 Support — Create a bridged connection to an IPv6 network on VMware Workstation virtual machines.

Developer Tools

  • Replay Debugging — Enhancements in replay debugging make the feature faster and easier to use. Developers can attach to a particular process instance, attach to a process in the middle of a recording, and ensure that the executables and symbols on the host machine match the guest. Developers can remotely view the exact state of the machine when the system failed and replay the recording to see the circumstances that led the system to fail. For more information about replay debugging, see the new Integrated Virtual Debugger for Visual Studio Developer’s Guide and technical note for Replay Debugging on Linux .
  • SpringSource Tools Suite Integration — Use the latest version of the SpringSource Tools Suite to run and debug Java applications in a VMware Workstation virtual machine without leaving the development environment. You can download the latest SpringSource Tools Suite from the Spring Source Web site.
  • Remotely Debug C and C++ Applications for Eclipse — Set a remote debugging session inside a controlled C and C++ environment where the guest operating system is different from the host. For more information about remotely debugging C and C++ for Eclipse, see the Integrated Virtual Debugger for Eclipse Developer’s Guide .
  • VMware Tools Configuration Utility – Use the new VMware Tools command-line interface (CLI) to automate configuration of VMware Tools in guest operating systems. With CLI you can modify VMware Tools settings, shrink virtual disks, connect and disconnect virtual devices, and more. For information on the VMware Tools configuration utility, see the new VMware Tools Configuration Utility User’s Guide.

Additional VMware Workstation 7.0 links:

http://www.vmware.com/products/workstation/new.html

http://www.vmware.com/files/pdf/ws_datasheet.pdf

http://www.vmware.com/support/pubs/ws_pubs.html

http://www.vmware.com/support/ws7/doc/releasenotes_ws7.html

There is some good stuff in this release. More than I originally thought. I’d like to take this moment to admit guilt in showing a lack of enthusiasm when Workstation 7 was first launched. My initial understanding of the major new features amounted to Aero support and VMware ESX as a guest OS. My reaction was “who cares”. I take it back. This is a solid release with increased configuration maximums as well as new and improved features.

Lab Manager 4 Installation Fails With vSphere VMXNET 3 NIC

November 7th, 2009 by jason No comments »

A few of the networking requirements for installing a VMware Lab Manager server are:

  1. At least one network card
  2. A static TCP/IP configuration (no DHCP)

Failure to meet the above requirements will result in error message # 5014 during the “Valid NIC Requirement” prerequisite check:

Lab Manager servers make fine virtualization candidates, therefore, it makes sense to deploy them as VMs on existing VMware virtual infrastructure so that they can take advantage of all the benefits VMware brings into the datacenter.

I ran into a new issue installing Lab Manager 4 in a vSphere VM which I configured with a VMXNET 3 virtual NIC. Already aware of the networking requirements, I had configured the virtual NIC with a static TCP/IP address, subnet mask, default gateway, and DNS servers. However, I was surprised to find out that my installation was failing the Valid NIC Requirement prerequisite.

So I resorted to what any certified professional would in this situation: GOOGLE. A quick search revealed scarce results but thankfully one solution. In this VMTN forums thread, a short discussion reveals that the VMXNET 3 virtual NIC is unexpectedly not compatible with the Lab Manager 4 installation prerequisites check. VMTN user MLaskowski012 explains:

“Talked to support and they said they are seeing the same issues. I guess nobody tested LabManager4 with the new hardware. BUT I think I figured out the trick. In device manager under NIC / Advanced if you change the Speed / Duplex from Auto Negotiation 10GB to 1GB Full, run the pre-check it will pass. Then right after you finish the install you can switch back to Auto or 10Gb. Not sure if there are any issues pass that…”

Viola! The trick works. Thank you MLaskowski012 for doing the legwork on this one. Unfortunately, no KB article from VMware yet on this (that I could find), but once again, as it has millions of times in the past, the VMTN community has fulfilled one of its primary purposes: technical support for the community, by the community.

Update 11/8/09: Via lab testing, the same failure and workaround applies to Lab Manager 3 installations with a VMXNET 3 virtual network adapter as well.

VMware ESX Guest OS I/O Timeout Settings (for NetApp Storage Systems)

October 29th, 2009 by jason No comments »

You may already be aware that installing VMware Tools in a Windows VM configures a registry value which controls the I/O timeout for all Windows disk in the event of a short storage outage. This is to help the guest operating system survive high latency or temporary outage conditions such as SAN path failover or maybe a network failure in Ethernet based storage.  VMware Tools changes the Windows default value of 10 seconds for non-cluster nodes, 20 seconds for cluster nodes, to 60 seconds (or x03c hex).

Did you know that disk I/O timeout is a configurable parameter in other guest operating systems as well? And why not, it makes sense that we would want every guest OS to be able to outlast a storage deficiency.

NetApp offers a document titled VMware ESX Guest OS I/O Timeout Settings for NetApp Storage Systems. It’s published as kb41511 and you’ll need a free NetApp NOW account to access the document. This white paper serves a few useful purposes:

  • Defines recommended disk I/O timeout settings for various guest operating systems on NetApp storage systems
  • Defines benchmark disk I/O timeout settings for various guest operating systems which could be used on any storage system, including local SCSI
  • In some cases provides scripts to make the necessary changes
  • Explains the methods to make the disk I/O timeout changes on the following guest operating systems:
    • RHEL4
    • RHEL5
    • SLES9
    • SLES10
    • Solaris 10
    • Windows

Now on the subject disk I/O timeouts, understand the above is to be used as chance for extending the uptime of a VM during adverse storage conditions. As in life, there are no guarantees. A guest OS with high disk I/O activity may not be able to tolerate sustained read and/or write requests for the duration of the timeout value. Windows guests may freeze or BSOD. Linux guests may go read-only on their root volumes which requires a reboot. Which brings me to the next point…

A larger timeout value isn’t necessarily better. In extending disk I/O timeout values, we’re applying virtual duct tape to an underlying storage issue which needs further looking into. Given the complex and wide variety of shared storage systems available to the datacenter today, storage issues can be caused by many variables including but not limited to disks (spindles), target controllers, fabric components such as fibre cables, SFP/GBICs, HBAs, fabric switches, zoning, network components such as copper cabling, NICs, network switches, routers, and firewalls. Also keep in mind that while the OS may survive the disk I/O interruption, application(s) running on the OS platform may not.  Applications themselves implement response timeout values which are likely going to be hard coded and non-configurable by a platform or virtualization administrator in the application itself.

Lastly, try to remember that if you go through the effort of increasing your disk I/O timeout values on Windows guests beyond 60 seconds, future installation of VMware Tools or other applications/updates may reset the disk I/O timeout back to 60 seconds.  What this means is that in medium to large environments, you’re going to need an automated method to deploy custom disk I/O timeout values at least for Windows guests.  For those with NetApp storage, NetApp pushes these standards firmly, along with other VMware best practices which I’ll save for a future blog article.

Update 4/28/10:  VMware Tools for vSphere installation doesn’t change the disk timeout setting if a custom value was previously set (ie. 190 seconds)

Update 9/12/11:  See also VMware KB article 1009465 Increasing the disk timeout values for a Linux 2.6 virtual machine

New Blog Theme

October 28th, 2009 by jason No comments »

Over the course of the past year, I’ve received some feedback that my dark blog theme, while nifty, was hurting readers’ eyes.  In fact, there are some readers who only read this blog through an RSS reader so that their eyes are not strained.  I’m in agreement and have been for quite some time.  The only reason I hadn’t changed it was because I didn’t want to be known as someone who changes themes often and for the heck of it.

I’ve chosen this new theme called Green Park 2. The green colored bar across the top gives it a “green feeling” which is quite appropriate for the blog’s subject of virtualization in the datacenter (and beyond).

Anyway, I hope you enjoy it.  Barring any problems, I intend to keep it around indefinitely.  Perhaps it will encourage a few of the RSS lurkers to come out of the woodwork.

TrainSignal vSphere Training DVD 1 Completed

October 23rd, 2009 by jason No comments »

This evening I finished viewing the first of three TrainSignal vSphere Training DVDs authored by VCP and CCIE David Davis. Having viewed TrainSignal’s last VMware Virtual Infrastructure training on VI3, I knew I was in for some good stuff.

DVD 1 starts off with introductions to the video’s instructor as well as a hypothetical company which is used as a focus and discussion point throughout the video series. Practical application of technologies to a role played scenario, the Wired Brain Coffee Company in this case, serves as positive reinforcement to the lessons being taught and is an effective method for knowledge retention, especially if the student is following along and working hands on in their own lab through the examples.

The video then sets a beginner’s pace as it covers VMware certification, virtualization basics. Moving on, it compares and contrasts VMware, Microsoft, and Citrix hypervisors. Beyond this comparison, the focus from here on out is on VMware products where a closer look is taken at the different components and tiers of vSphere.

Half way through the DVD, we’re finally to the point where we’re installing and configuring the vSphere products. One valuable offering from the video is a lesson describing the steps needed to install ESX and ESXi in VMware Workstation. This is what is called a nested hypervisor – an ESX(i) type 1 (bare metal) hypervisor running on top of a VMware Workstation type 2 (hosted) hypervisor. Nested hypervisors are not supported in production environments but they are quite helpful in lab, test, and portable environments.

Towards the end, lesson 17 provides a nice demonstration of a VMware Tools installation in a Linux guest operating system which isn’t nearly as straight forward as a VMware Tools on Windows installation. The last two lessons begin touching on some of the new advanced features that vSphere offers: Hot Add/Hot Plug virtual hardware and Host Profiles.

Thus far my feeling is this training is geared towards the beginner to intermediate level. I’m looking forward to DVD 2 where the instructor dives into more of the advanced design, configuration, and operational topics of VMware vSphere. I’ve attended VMware’s vSphere What’s New (2 day) and VMware’s vSphere Quick Start (5 day) classes. With approximately 150 new features making their debut in vSphere, I’ve yet to see anyone cover them all – that would be a tall order.

DVD 1 Lessons:

  1. Meet Your Instructor
  2. Our Scenario with the Wired Brain Coffee Company
  3. VMware Certification – Preparing for the VCP and VCDX
  4. Introduction to Virtualization
  5. Virtualization Products Compared
  6. VMware ESXi4 Free Edition for the SMB
  7. VMware vSphere 4 and ESX Essentials
  8. vSphere Management Options
  9. Installing the VMware vSphere Client
  10. Navigating vSphere Using the vSphere Client
  11. Running VMware ESX 4 in Workstation
  12. Installing VMware ESX 4
  13. Installing VMware ESXi Version 4
  14. Installing VMware vCenter 4
  15. vCenter4 – Configuring Your New Virtual Infrastructure
  16. Creating & Modifying Virtual Guest Machines
  17. Installing and Configuring VMware Tools
  18. Adding Virtual Machine Hardware with vSphere Hot Plug
  19. Using vSphere Host Profiles

Happy Birthday Blog

October 20th, 2009 by jason No comments »

This blog turned one year old on Sunday. The inaugural entry, My First Blog and How To Install WordPress, was posted on October 18th, 2008.

Happy Birthday Blog!

For some reason, it feels like I’ve been at this a lot longer than one year.

Some statistics related to this blog during the past 365 days:

  • 224 posts
    • 195 Virtualization related
    • 30 Non-virtualization related (typically other technologies and a few personal)
    • Average of one post per every 1 1/2 days
    • Using a very conservative estimate of 2 hours spent writing each post, total time spent writing:
      • 448 hours
      • 19 days
      • Almost 3 weeks
      • Doesn’t include any lab time
  • 179,389 Unique visitors
    • Generating 5,399,277 Hits
    • Consuming 71.36GB Send (upload) traffic
    • Costing $1,199.88 in bandwidth
    • Plus another $1,800 estimated in rack electrical/cooling
  • 743 legit comments (approved)
    • Average of 2 legit comments per day
  • 7,873 spam comments (blocked and IP banned)
    • Average of 22 spam comments per day
  • 90 Tags
  • 14 Active WordPress plugins
  • 7 Inactive WordPress plugins
  • 4 Sponsors
  • 1 Theme change
  • 3 VMware exams passed
    • VCDX Enterprise Administration exam
    • VCP4 exam
    • VCDX Design exam
  • 2 VMworlds attended
    • VMworld Europe 2009
    • VMworld 2009
  • 7th most popular virtualization blog as rated by the VMware community
  • 1 vCalendar idea
  • 1 vExpert award
  • 0 VMware NFR licenses received
    • Out of a dozen or so requests
    • Over the course of 2+ years
  • Established about a million virtualization industry
    • Contacts
    • Friends
    • Acquaintances
  • Through
    • Blog
    • Twitter
    • VMworld
    • LinkedIn

Thank you for reading. I look forward to another great year with more VMware virtualization information to share! A special thank you also goes out to other bloggers and VMware virtualization community members for sharing your time and knowledge and continuing to inspire me to do the same.