Dell Enterprise Manager Client Gets Linux Makeover

April 24th, 2015 by jason No comments »

Dell storage customers who have been watching the evolution of Enterprise Manager may be interested in the latest release which was just made available.  Aside from adding support for the brand new SCv2000 Series Storage Centers and bundling Java Platform SE 7 Update 67 with the installation of both the Data Collector on Windows and the Client on Windows or Linux (a prerequisite Java installation is no longer required), a Linux client has been introduced for the first time and runs on several Linux operating systems.  The Linux client is Java based and has the same look and feel as the Windows based client.  Some of the details about this release below.

Enterprise Manager 2015 R1 Data Collector and Client management compatibility:

  • Dell Storage Center OS versions 5.5-6.6
  • Dell FS8600 versions 3.0-4.0
  • Dell Fluid Cache for SAN version 2.0.0
  • Microsoft System Center Virtual Machine Manager (SCVMM) versions 2012, 2012 SP1, and 2012 R2
  • VMware vSphere Site Recovery Manager versions 5.x (HCL), 6.0 (compatible)

Enterprise Manager 2015 R1 Client for Linux operating system requirements:

  • RHEL 6
  • RHEL 7
  • SUSE Linux Enterprise 12
  • Oracle Linux 6.5
  • Oracle Linux 7.0
  • 32-bit (x86) or 64-bit (x64) CPU
  • No support for RHEL 5 but I’ve tried it and it seems to work

Although the Enterprise Manager Client for Linux can be installed without a graphical environment, launching and using the client requires the graphical environment.  As an example, neither RHEL 6 or RHEL 7 install a graphical environment by default.  Overall, installing a graphical environment for both RHEL 6 and RHEL 7 is similar in that it requires a yum repository. However, the procedure is slightly different for each version.  There are several resources available on the internet which walk through the process.  I’ll highlight a few below.

Log in with root access.

To install a graphical environment for RHEL 6, create a yum repository and install GNOME or KDE by following the procedure here.

To install a graphical environment for RHEL 7, create a yum repository by following this procedure and install GNOME by following the procedure here.

Installing the Enterprise Manager Client is pretty straightforward.  Copy the RPM to a temporary directory on the Linux host and use rpm -U to install:

rpm -U dell-emclient-15.1.2-45.x86_64.rpm

Alternatively, download the client from the Enterprise Manager Data Collector using the following syntax as an example:

wget em1.boche.lab:3033 –no-check-certificate https://em1.boche.lab:3033/em/EnterpriseManager/web/apps/client/EmClient.rpm

rpm -U EmClient.rpm

Once installed, launch the Enterprise Manager Client from the /var/lib/dell/bin/ directory:

cd /var/lib/dell/bin/

./Client

or

/var/lib/dell/bin/Client

We’re rewarded with the Enterprise Manager 2015 R1 Client splash screen.  New features are found here to immediately manage SCv2000 Series Storage Centers (the SCv2000 Series is the first Storage Center whereby the web based management console has been retired).

Once logged in, it’s business as usual in a familiar UI.

Dell, and before it Compellent, has long since offered a variety of options and integrations to manage Storage Center as well as popular platforms and applications.  The new Enterprise Manager Client for Linux extends that list of management methods available.

vCloud Director Database Migration

March 20th, 2015 by jason No comments »

This week I’ve been working on getting some lab infrastructure fitted with much needed updates. One of those components was an aging Microsoft SQL Server 2008 R2 server on Windows Server 2008 R2 which I had been using to host databases for various projects.  Since I had chosen to build the new SQL server in parallel, I’m benefiting with fresh and problem free builds of Microsoft SQL Server 2012 on Windows Server 2012 R2.  The downside is that I’m responsible for dealing with all of the SQL databases and logins and potentially scheduled jobs that must be migrated to the new SQL server.

vCloud Director is one of the last databases left to migrate and fortunately VMware has a KB article published which covers the step required to migrate a back end SQL database for vCloud Director.  The VMware KB article is 2092706 Migrating the VMware vCloud Director SQL database to another server.

Looking at the steps, the migration looks like it will be fairly simple.  VMware even provides the SQL queries to automate many of the tasks.  I’ll migrate my vCloud Director database using these steps in the following video.  I did run into a few issues which mostly boil down to copy/paste problems with the SQL queries as published in the KB article but I’ve provided the necessary corrections and workarounds in the video.

As shown in the video, I ran into a syntax issue with step four.

The SQL query provided by the KB article was:

USE master;
GO
EXEC sp_attach_db @dbname = N’vCD_DB_Name‘,
c:\Program Files\Microsoft SQL Server\MSSQL\Backup\vCD_DB_Name.mdf
c:\Program Files\Microsoft SQL Server\MSSQL\Backup\vCD_DB_Name.ldf
GO

The corrected SQL query syntax according to the Microsoft SQL Server Management Stuido appears to be:

USE [master]
GO
CREATE DATABASE [vCD_DB_Name] ON 
( FILENAME = N'c:\Program Files\Microsoft SQL Server\MSSQL\Backup\vCD_DB_Name.mdf' ),
( FILENAME = N'c:\Program Files\Microsoft SQL Server\MSSQL\Backup\vCD_DB_Name.ldf' )
 FOR ATTACH
GO

Another issue I’ll note that wasn’t captured in the video deals with step seven where the vCloud Director cell server is reconfigured to point to the new database.  The first time I ran that step, the process failed because the cell attempted to locate the SQL database in its original location which it actually found. When this occurred, the cell configuration script doesn’t prompt me to point to a new SQL instance.  In order for step seven to work correctly, I had to drop or delete the database on the SQL 2008 R2 server and rerun the vCloud Director configuration script.  What happens then is that the cell doesn’t automatically ‘find’ the old instance and so it correctly prompts for the new back end database details.  VMware’s KB article provides most of the steps required to migrate the database but it does need a step inserted prior to step seven which calls for the deletion of the original database instance.  Step two places the vCloud database in READ_ONLY mode but the vCloud cell configuration was still able to ‘see’ which causes step seven to fail.

Blake Garner (@trodemaster on Twitter) provided a helpful tip which will also work with step seven in lieu of dropping or deleting the database on the original SQL server:

You could also clear DB config from the /opt/vmware/vcloud-director/etc/global.properties and run configure again.

Overall the process was still fairly simple and painless thanks to VMware’s published documentation.

VMware Horizon View Agent 6.1.0 Installation Rollback

March 16th, 2015 by jason No comments »

With the release of vSphere 6 last week, I decided it was time to update some of the infrastructure in the home lab over the weekend. I got an early start Friday as I had my three remaining wisdom teeth pulled in the AM and took the rest of the day off work.  Now I’m not talking about jumping straight to vSphere 6, not just yet.  I’ve got some constraints that prevent me from going to vSphere 6 at the current time but I expect I’ll be ready within a month or two.  For the time being, the agenda involved migrating some guest operating systems from Windows Server 2008 R2 to Windows Server 2012 R2, migrating MS SQL Server 2008 R2 to MS SQL Server 2012, and updating templates with current VMware Tools, and tackling VMware Horizon View getting Composer and the Connection Server migrated from version 5.3 to 6.1.0 including the pool guests and related tools and agents.

I won’t bore anyone with the details on the OS and SQL migrations, that all went as planned. Rather, this writing focuses on an issue I encountered while upgrading VMware Horizon View Agents in Windows 7 guest virtual machines. For the most part, the upgrades went fine as they always have in the past. However I did run into one annoying Windows 7 guest VM which I could not upgrade from View agent 5.1 to View agent 6.1.0. About two thirds of the way through the 6.1.0 agent upgrade/installation when the installation wizard is installing services, a ‘Rolling back action‘ process would occur and the upgrade/installation failed.

The View agent installation generates two fairly large log files located in C:\Users\<username>\AppData\Local\Temp\.  I narrowed down the point in time the problem was occurring in the smaller of the two log files.

svm: 03/16/15 10:54:52 — CA exec: VMEditServiceDependencies
svm: 03/16/15 10:54:52 Getting Property CustomActionData = +;vmware-viewcomposer-ga;BFE;Tcpip;Netlogon
svm: 03/16/15 10:54:52 INFO: about to copy final string
svm: 03/16/15 10:54:52 INFO: *copyIter = RpcSs
svm: 03/16/15 10:54:52 INFO: newDependencyString = RpcSs
svm: 03/16/15 10:54:52 INFO: *copyIter = vmware-viewcomposer-ga
svm: 03/16/15 10:54:52 INFO: newDependencyString = RpcSs vmware-viewcomposer-ga
svm: 03/16/15 10:54:52 ERROR: ChangeServiceConfig failed with error: 5
svm: 03/16/15 10:54:52 End Logging
svm: 03/16/15 10:54:53 Begin Logging
svm: 03/16/15 10:54:53 — CA exec: VMEditServiceDependencies
svm: 03/16/15 10:54:53 Getting Property CustomActionData = -;vmware-viewcomposer-ga;BFE;Tcpip;Netlogon
svm: 03/16/15 10:54:53 Cannot query key value HKEY_LOCAL_MACHINE\SYSTEM\CurrentControlSet\Services\Tcpip\DependOnService for size: 2
svm: 03/16/15 10:54:53 Cannot query key value HKEY_LOCAL_MACHINE\SYSTEM\CurrentControlSet\Services\Netlogon\DependOnService for size: 2
svm: 03/16/15 10:54:53 End Logging

In addition, the Windows event log reflected Event ID: 7006 “The ScRegSetValueExW call failed for DependOnService with the following error: Access is denied.

I had made a few different attempts to install the 6.1.0 agent, each time trying a different approach. Checked registry permissions and dependencies, relaxed registry permissions, enabled auditing, temporarily disabled Avast Antivirus, etc.  The VMware Horizon View Agent installs a handful of components. Although I didn’t know yet what the issue was on the OS, I had the problem narrowed down to the VMware Horizon View Composer Agent portion of the installation which installs VMware Horizon View Composer Guest Agent Server service (vmware-viewcomposer-ga is the name of the service if you’re looking in the registry).

After doing some more digging, I found out that some antivirus applications like Panda have a a self-preservation mechanism built in which can cause unexpected application problems. Avast has one as well and it’s called the avast! self-defense module. This defense mechanism works independently of normal real time antivirus scans which I had disabled previously.  I had never run into a problem with Avast in the past but in this particular instance, Avast was blocking the modification of Windows services and dependencies. The easy solution, and I wish I had known this from the start but I don’t invest much time in antivirus or malware unless I absolutely have to, was to disable the avast! self-defense module which can be found in the Troubleshooting area of the Avast settings.

Once the avast! self-defense module was disabled, the installation of the VMware Horizon View Agent 6.1.0 agent, including the VMware Horizon View Composer Agent portion, completed successfully. After the agent installation completed, a reboot was performed and I re-enabled the avast! self-defense module.

Thus far I’m impressed with VMware Horizon 6.1. Not much has changed from UI/management perspective but stability and cleanup within Composer operations has improved. I built up and tore down a 28 Windows 7 guest VDI pool and whereas this has lead to precarious pool states and manual cleanup steps in the past, it has worked flawlessly so far.  I’m definitely looking forward to the jump to vSphere 6 infrastructure in the coming weeks. All but one of the other lab infrastructure components have been upgraded and are ready at this point so it shouldn’t be much longer until I have vSphere 5.x in my rear view mirror.

VMware vRealize Operations Manager 6.0.1 & Dell Storage Speed Run

March 11th, 2015 by jason No comments »

For the most part – 12:38 was my time.

There are a few spots where I could improve but what you see here is what you get – a quick video I threw together outlining a simple VMware vRealize Operations Manager 6.0.1 appliance deployment, including:

  • vCenter adapter configuration
  • Active Directory role integration
  • Dell Storage Solutions Pack installation and configuration
  • Dashboard sharing

Obviously I trimmed some of the “wait” intervals but the goal here was to cover the quick and easy steps to get vR Ops 6.x up and running from ovf download to collecting in a very short amount of time.

In case you are unaware, VMware vRealize Operations Manager 6.0.1 was released a little under two weeks ago and it includes some improvements over the December 6.0.0 release:

Updates cover all major areas of the product including installation, migration, configuration, licensing, alerting, dashboards, reports, and policies. To take advantage of the following significant enhancements, upgrade to version 6.0.1.

Improved scaling numbers

  • The number of objects that a single large node supports has been increased to 12,000. Also, in multi-node configurations, a four large-node configuration can manage up to 40,000 objects and an eight large-node configuration can manage up to 75,000 objects. For details on scaling numbers and a link to a Sizing Guideline Worksheet, see KB 2093783.

vSphere v6.0 interoperability support

  • With this release, vSphere v6.0 can function both as a platform for vRealize Operations Manager installation, and as an environment to which vRealize Operations Manager can connect for operational assurance.

User interface improvements

  • Corrections in the Views and Reports content for vSphere Hosts and Clusters.
  • Addition of Hierarchical View in the Topology widget.
  • Enhancement to the Geo widget displays objects on a world map.

Licensing improvements

  • New functionality provides a way to use the REST API to add a license key.

Metrics switched to Collection OFF to improve performance

  • Extraneous metrics are switched to Collection OFF in the default Policy. An option to enable Collection is available. However, maintaining metrics in the OFF state saves disk space, improves CPU performance, and has no negative impact on the vRealize Operations Manager functionality to collect and analyze data. For a list of metrics with Collection switched to OFF, see KB 2109869.

Alert Definition Updates

  • Improved alert definitions for vSphere clusters, hosts, and virtual machines, to better detect CPU and memory problems.
  • Improved alert definitions for hosts and virtual machines in the vSphere 5.5 Hardening Guide, to identify and report more non-compliance issues.
  • Additional alert definitions to detect duplicate object names in vCenter and vSphere Storage Management Service errors. Note: To identify duplicate object names in the vCenter Server system, the name-based identification feature must be enabled for the vSphere adapter.


I spent a fair amount of time with vC Ops 5.x and I’ll be the first in line to say vR Ops 6.x has a much more polished look and feel which generally makes consumption of this datacenter management tool much more of a pleasure to work with in terms of installation, configuration, and daily use. But don’t take my word for it, see for yourself:

Dell Compellent Storage Center Command Set Shell cmdlets

January 9th, 2015 by jason No comments »

If you manage Dell Compellent storage, you may or may not be aware that Windows PowerShell cmdlets are available to ease management pain by way of automation and consistency. While I am able to recognize when scripting is the right tool for the job, I do not author PowerShell scripts on a regular basis. For that reason, I’m not as deeply familiar with all of the cmdlets available within the Dell Compellent Storage Center Command Set Shell as I would like to be.

So how do I get started – what are the cmdlets? There are a few different ways to retrieve a list of cmdlets made available by a PowerShell snapin or module.

VMware vSphere PowerCLI simplifies the process by providing a cmdlet called Get-VICommand. When executed, it returns a list of all the cmdlets provided by the VMware.VimAutomation.Core snapin used to manage a vSphere environment via PowerShell. As of this writing in the 5.5.x generation of vSphere, there are a few other vSphere specific snapins installed with PowerCLI but the cmdlets provided by those aren’t returned by Get-VICommand. Those snapins are:

  • VMware.VimAutomation.Vds – This Windows PowerShell snap-in contains cmdlets that let you manage vSphere Distributed Switches.
  • VMware.VimAutomation.License – This Windows Powershell snap-in contains cmdlets for managing License components.
  • VMware.DeployAutomation – Cmdlets for Rule-Based-Deployment
  • VMware.ImageBuilder – This Windows PowerShell snap-in contains VMware ESXi Image Builder cmdlets used to generate custom images.
  • VMware.VimAutomation.Cloud – This Windows Powershell snap-in contains cmdlets used to manage VMware vCloud Director.

However, not all PowerShell snapins ship with a native shortcut to retrieve a list of their respective cmdlets. In these cases, use Get-Command. Now Get-Command by itself returns cmdlets for all snapins. For a snapin specific list, either of the following will work:

Get-Command -Module “snapin_name”
Get-Command | Where-Object{$_.PSSnapin.Name -eq “snapin_name”}

In the case of Dell Compellent Storage Center Command Set Shell, the snapin is named Compellent.StorageCenter.PSSnapin. To retrieve a list of Dell Compellent cmdlets, use one of the following:

Get-Command -Module “Compellent.StorageCenter.PSSnapin”
Get-Command | Where-Object{$_.PSSnapin.Name -eq “Compellent.StorageCenter.PSSnapin”}

At the time of this writing, there are 105 cmdlets:

Get-Command -Module Compellent.StorageCenter.PSSnapin | Measure-Object

Count    : 105
Average  :
Sum      :
Maximum  :
Minimum  :
Property :

Those who don’t use PowerShell on a regular basis may find the above difficult to easily recall from memory. I had a discussion with Justin Braun (author of The Braun Blog – check out his Dell Compellent articles here) and Mike Matthews (a peer in my office who specialize in Microsoft SQL Server, PowerShell, and is an all around good guy). Is there an easier and persistent method to retrieve cmdlets from a given snapin? What resulted was a function that can be added to a PowerShell profile which performs just like VMware’s Get-VICommand (I’ll be original and call this one Get-SCCommand to get the list of Storage Center cmdlets).

Edit the PowerShell profile (%profile). It’s default location is:

%USERPROFILE%\Documents\WindowsPowerShell\Microsoft.PowerShell_profile.ps1

If the path and profile doesn’t already exist, it can be created in PowerShell using the following cmdlet:

new-item -itemtype file -path $profile -force

If using PowerShell ISE, the default profile location is:

%USERPROFILE%\Documents\WindowsPowerShell\Microsoft.PowerShellISE_profile.ps1

Add the following to verify the Dell Compellent snapin is loaded. If not, load it.

If ( !( Get-PSSnapin | Where-Object { $_.Name -eq “Compellent.StorageCenter.PSSnapin” } ) )
{
Add-PSSnapin Compellent.StorageCenter.PSSnapin | Out-Null
}

Add the Get-SCCommand shortcut function:

Function Get-SCCommand { Get-Command -Module “Compellent.StorageCenter.PSSnapin” }

Save the profile.

Now open any PowerShell environment and use Get-SCCommand which shows a list of 105 Dell Compellent cmdlets (There are 49 additional cmdlets in the compellent.replaymanager.scripting snapin for Replay Manager):

It works with PowerShell ISE as well when the Microsoft.PowerShellISE_profile.ps1 profile is modified:

How about PowerGUI? Yes…

Of course the shortcut function provided in the example above is specific to the Dell Compellent snapin but it should work for for any PowerShell snapin including the list of VMware snapins not included in Get-VICommand discussed at the top of the article.

For more on scripting Storage Center, visit the Dell Storage PowerShell Community. Rick Gouin also has a nice collection of scripts that he has authored.

Have a great weekend!

A Common NPIV Problem with a Solution

December 29th, 2014 by jason 1 comment »

Several years ago, one of the first blog posts that I tackled was working in the lab with N_Port ID Virtualization often referred to as NPIV for short. The blog post was titled N_Port ID Virtualization (NPIV) and VMware Virtual Infrastructure. At the time it was one of the few blog posts available on the subject because it was a relatively new feature offered by VMware. Over the years that followed, I haven’t heard much in terms of trending adoption rates by customers. Likewise, VMware hasn’t put much effort into improving NPIV support in vSphere or promoting its use. One might contemplate, which is the cause and which is the effect. I feel it’s a mutual agreement between both parties that NPIV in its current state isn’t exciting enough to deploy and the benefits fall into a very narrow band of interest (VMware: Give us in guest virtual Fibre Channel – that would be interesting).

Despite its market penetration challenges, from time to time I do receive an email from someone referring to my original NPIV blog post looking for some help in deploying or troubleshooting NPIV. The nature of the request is common and it typically falls into one of two categories:

  1. How can I set up NPIV with a fibre channel tape library?
  2. Help – I can’t get NPIV working.

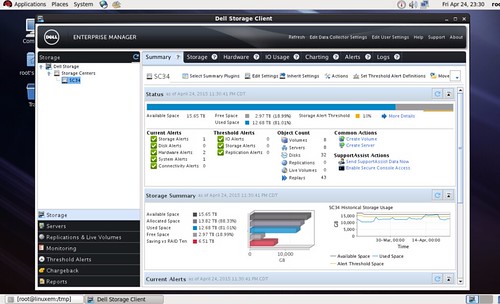
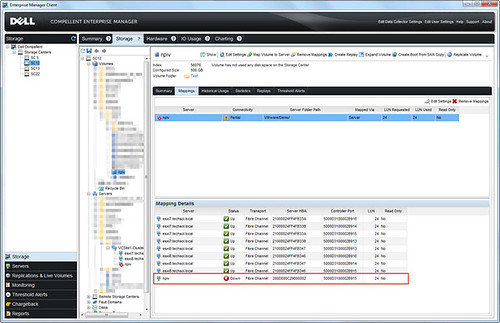
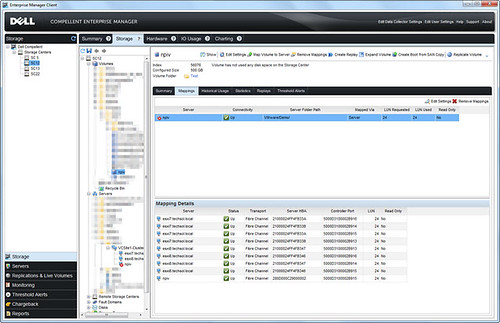
I received such a request a few weeks ago from the field asking for general assistance in setting up NPIV with Dell Compellent storage. The correct steps were followed to the best of their knowledge but the virtual WWPNs that were initialized at VM power on would not stay lit after the VM began to POST. In Dell Enterprise Manager, the path to the virtual machine’s assigned WWPN was down. Although the RDM storage presentation was functioning, it was only working through the vSphere host HBAs and not the NPIV WWPN. This effectively means that NPIV is not working:

In addition, the NPIV initialization failure is reflected in the vmkernel.log:

2014-12-15T16:32:28.694Z cpu25:33505)qlnativefc: vmhba64(41:0.0): vlan_id: 0x0
2014-12-15T16:32:28.694Z cpu25:33505)qlnativefc: vmhba64(41:0.0): vn_port_mac_address: 00:00:00:00:00:00
2014-12-15T16:32:28.793Z cpu25:33505)qlnativefc: vmhba64(41:0.0): Assigning new target ID 0 to fcport 0x410a524d89a0
2014-12-15T16:32:28.793Z cpu25:33505)qlnativefc: vmhba64(41:0.0): fcport 5000d3100002b916 (targetId = 0) ONLINE
2014-12-15T16:32:28.809Z cpu27:33505)qlnativefc: vmhba64(41:0.0): Assigning new target ID 1 to fcport 0x410a524d9260
2014-12-15T16:32:28.809Z cpu27:33505)qlnativefc: vmhba64(41:0.0): fcport 5000d3100002b90c (targetId = 1) ONLINE
2014-12-15T16:32:28.825Z cpu27:33505)qlnativefc: vmhba64(41:0.0): Assigning new target ID 2 to fcport 0x410a524d93e0
2014-12-15T16:32:28.825Z cpu27:33505)qlnativefc: vmhba64(41:0.0): fcport 5000d3100002b915 (targetId = 2) ONLINE
2014-12-15T16:32:28.841Z cpu27:33505)qlnativefc: vmhba64(41:0.0): Assigning new target ID 3 to fcport 0x410a524d9560
2014-12-15T16:32:28.841Z cpu27:33505)qlnativefc: vmhba64(41:0.0): fcport 5000d3100002b90b (targetId = 3) ONLINE
2014-12-15T16:32:30.477Z cpu22:19117991)WARNING: ScsiPsaDriver: 1272: Failed adapter create path; vport:vmhba64 with error: bad0040
2014-12-15T16:32:32.477Z cpu22:19117991)WARNING: ScsiPsaDriver: 1272: Failed adapter create path; vport:vmhba64 with error: bad0040
2014-12-15T16:32:34.480Z cpu22:19117991)WARNING: ScsiPsaDriver: 1272: Failed adapter create path; vport:vmhba64 with error: bad0040
2014-12-15T16:32:36.480Z cpu22:19117991)WARNING: ScsiPsaDriver: 1272: Failed adapter create path; vport:vmhba64 with error: bad0040
2014-12-15T16:32:38.482Z cpu22:19117991)ScsiNpiv: 1152: NPIV vport rescan complete, [5:24] (0x410943893dc0) [0x410943680ec0] status=0xbad0040
2014-12-15T16:32:38.503Z cpu22:19117991)ScsiScan: 140: Path ‘vmhba2:C0:T3:L24’: Peripheral qualifier 0x1 not supported
2014-12-15T16:32:38.503Z cpu22:19117991)WARNING: ScsiNpiv: 1141: Physical uid does not match VPORT uid, NPIV Disabled for this VM
2014-12-15T16:32:38.503Z cpu22:19117991)ScsiNpiv: 1152: NPIV vport rescan complete, [3:24] (0x410943856e80) [0x410943680ec0] status=0xbad0132
2014-12-15T16:32:38.503Z cpu22:19117991)WARNING: ScsiNpiv: 1788: Failed to Create vport for world 19117994, vmhba2, rescan failed, status=bad0001
2014-12-15T16:32:38.504Z cpu14:33509)ScsiAdapter: 2806: Unregistering adapter vmhba64

To review, the requirements for implementing NPIV with vSphere are documented by VMware and I outlined the key ones in my original blog post:

  • NPIV support on the fabric switches (typically found in 4Gbps or higher fabric switches but I’ve seen firmware support in 2Gbps switches also)
  • NPIV support on the vShpere host HBAs (this typically means 4Gbps or higher port speeds)
  • NPIV support from the storage vendor
  • NPIV support from a supported vSphere version
  • vSphere Raw Device Mapping
  • Correct fabric zoning configured between host HBAs, the virtual machine’s assigned WWPN(s), and the storage front end ports
  • Storage presentation to the vSphere host HBAs as well as the virtual machine’s assigned NPIV WWPN(s)

If any of the above requirements are not met (plus a handful of others and we’ll get to one of them shortly), vSphere’s NPIV feature will likely not function.

In this particular case, general NPIV requirements were met. However, it was discovered a best practice had been missed in configuring the QLogic HBA BIOS (the QLogic BIOS is accessed at host reboot by pressing CTRL + Q or ALT + Q when prompted). Connection Options remained at its factory default value of 2 or Loop preferred, otherwise point to point.

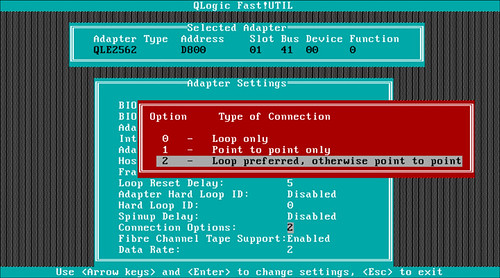
Dell Compellent storage with vSphere best practices call for this value to be hard coded to 1 or Point to point only. When the HBA has multiple ports, this configuration needs to be made across all ports that are used for Dell Compellent storage connectivity. It goes without saying this also applies across all of the fabric attached hosts in the vSphere cluster.

Once configured for Point to point connectivity on the fabric, the problem is resolved.

Despite the various error messages returned as vSphere probes for possible combinations between the vSphere assigned virtual WWPN and the host WWPNs, NPIV success looks something like this in the vmkernel.log (you’ll notice subtle differences showing success compared to the failure log messages above):

2014-12-15T18:43:52.270Z cpu29:33505)qlnativefc: vmhba64(41:0.0): vlan_id: 0x0
2014-12-15T18:43:52.270Z cpu29:33505)qlnativefc: vmhba64(41:0.0): vn_port_mac_address: 00:00:00:00:00:00
2014-12-15T18:43:52.436Z cpu29:33505)qlnativefc: vmhba64(41:0.0): Assigning new target ID 0 to fcport 0x410a4a569960
2014-12-15T18:43:52.436Z cpu29:33505)qlnativefc: vmhba64(41:0.0): fcport 5000d3100002b916 (targetId = 0) ONLINE
2014-12-15T18:43:52.451Z cpu29:33505)qlnativefc: vmhba64(41:0.0): Assigning new target ID 1 to fcport 0x410a4a569ae0
2014-12-15T18:43:52.451Z cpu29:33505)qlnativefc: vmhba64(41:0.0): fcport 5000d3100002b90c (targetId = 1) ONLINE
2014-12-15T18:43:52.466Z cpu29:33505)qlnativefc: vmhba64(41:0.0): Assigning new target ID 2 to fcport 0x410a4a569c60
2014-12-15T18:43:52.466Z cpu29:33505)qlnativefc: vmhba64(41:0.0): fcport 5000d3100002b915 (targetId = 2) ONLINE
2014-12-15T18:43:52.481Z cpu29:33505)qlnativefc: vmhba64(41:0.0): Assigning new target ID 3 to fcport 0x410a4a569de0
2014-12-15T18:43:52.481Z cpu29:33505)qlnativefc: vmhba64(41:0.0): fcport 5000d3100002b90b (targetId = 3) ONLINE
2014-12-15T18:43:54.017Z cpu0:36379)WARNING: ScsiPsaDriver: 1272: Failed adapter create path; vport:vmhba64 with error: bad0040
2014-12-15T18:43:56.018Z cpu0:36379)WARNING: ScsiPsaDriver: 1272: Failed adapter create path; vport:vmhba64 with error: bad0040
2014-12-15T18:43:58.020Z cpu0:36379)WARNING: ScsiPsaDriver: 1272: Failed adapter create path; vport:vmhba64 with error: bad0040
2014-12-15T18:44:00.022Z cpu0:36379)WARNING: ScsiPsaDriver: 1272: Failed adapter create path; vport:vmhba64 with error: bad0040
2014-12-15T18:44:02.024Z cpu0:36379)ScsiNpiv: 1152: NPIV vport rescan complete, [4:24] (0x4109436ce9c0) [0x410943684040] status=0xbad0040
2014-12-15T18:44:02.026Z cpu2:36379)ScsiNpiv: 1152: NPIV vport rescan complete, [2:24] (0x41094369ca40) [0x410943684040] status=0x0
2014-12-15T18:44:02.026Z cpu2:36379)ScsiNpiv: 1701: Physical Path : adapter=vmhba3, channel=0, target=5, lun=24
2014-12-15T18:44:02.026Z cpu2:36379)ScsiNpiv: 1701: Physical Path : adapter=vmhba2, channel=0, target=2, lun=24
2014-12-15T18:44:02.026Z cpu2:36379)WARNING: ScsiPsaDriver: 1272: Failed adapter create path; vport:vmhba64 with error: bad0040
2014-12-15T18:44:04.028Z cpu2:36379)WARNING: ScsiPsaDriver: 1272: Failed adapter create path; vport:vmhba64 with error: bad0040
2014-12-15T18:44:06.030Z cpu2:36379)WARNING: ScsiPsaDriver: 1272: Failed adapter create path; vport:vmhba64 with error: bad0040
2014-12-15T18:44:08.033Z cpu2:36379)WARNING: ScsiPsaDriver: 1272: Failed adapter create path; vport:vmhba64 with error: bad0040
2014-12-15T18:44:10.035Z cpu2:36379)WARNING: ScsiPsaDriver: 1272: Failed adapter create path; vport:vmhba64 with error: bad0040
2014-12-15T18:44:12.037Z cpu2:36379)ScsiNpiv: 1152: NPIV vport rescan complete, [4:24] (0x4109436ce9c0) [0x410943684040] status=0xbad0040
2014-12-15T18:44:12.037Z cpu2:36379)ScsiNpiv: 1160: NPIV vport rescan complete, [2:24] (0x41094369ca40) [0x410943684040] vport exists
2014-12-15T18:44:12.037Z cpu2:36379)ScsiNpiv: 1701: Physical Path : adapter=vmhba3, channel=0, target=2, lun=24
2014-12-15T18:44:12.037Z cpu2:36379)ScsiNpiv: 1848: Vport Create status for world:36380 num_wwpn=1, num_vports=1, paths=4, errors=3

One last item I’ll note here for posterity is that this particular case, the problem does not present itself uniformly across all storage platforms. This was an element that prolonged troubleshooting to a degree because the vSphere cluster was successful in establishing NPIV fabric connectivity to two other types of storage using the same vSphere hosts, hardware, and fabric switches. Because of this in the beginning it seemed logical to rule out any configuration issues within the vSphere hosts.

To summarize, there are many technical requirements outlined in VMware documentation to correctly configure NPIV. If you’ve followed VMware’s steps correctly but problems with NPIV remain, refer to storage, fabric, and hardware documentation and verify best practices are being met in the deployment.


BenQ W1070 and the Universal Ceiling Mount

September 15th, 2014 by jason No comments »

Over the weekend I hung my first theater projector, the BenQ W1070 1080P 3D Home Theater Projector (White), using the BenQ 5J.J4N10.001 Universal Ceiling Mount, both available of course through Amazon.com. While I didn’t expect the installation to be overly complex, I did employ a slow and methodical planning approach before drilling large holes into the new knockdown theater ceiling.

After unboxing the projector and the universal ceiling mount kit, I looked at the instructions, the parts, and the underside of the projector. If you’re reading this, it’s probably because you’re in the same boat I was in – the diagrams don’t closely resemble the configuration of what you’ve got with the W1070. Furthermore, reading some of the reviews on Amazon seems to suggest this universal ceiling mount kit doesn’t work with the W1070 without some modifications to the mounting hardware. I read tales of cutting and filing as well as adding longer bolts, tubing, and washers to compensate for the placement of the mounting holes on the W1070. Not to worry, none of that excess is needed. If you concentrate more on the written instructions rather than the diagrams for mounting the hardware to the projector, it all actually works and fits together as designed with no modifications necessary. The one exception to this is that not all of the parts provided in the kit are used. This perhaps is what leads to some of the initial confusion in the first place. The diagrams suggest a uniform placement of four (4) mounting brackets on the underside of the projector in a ‘cross’ pattern. While this may be the case for some projectors, it’s not at all a representation of the W1070 integration.

For openers, the BenQ W1070 has only three (3) mounting holes meaning only three (3) mounting brackets will be used and not all four (4). Furthermore, the mounting holes are not placed uniformly around the perimeter of the projector. That, combined with the uneven surface of the projector can lead to uncertainty that these products were meant for each other and if so, then how. Simply follow the directions and screw the three brackets into place while allowing a little give so that you can swing the brackets into a correct position. I say _A_ correct position because there are nearly countless positions in which you can configure them and it will still work correctly resulting in a firm mount to the ceiling.

The image below shows an example of how I configured mine:

Next, place the mounting plate on top of the mounting brackets. Slide the mounting screws in the brackets, and gently swing the brackets themselves, so that the screws can extend through one of the channels in the mounting plate. Gently remove the mounting plate and torque the screws attaching the bracket to the projector.

I took some additional steps which may not have been necessary with modern projector technology but nonetheless the methodical approach helps me sleep better at night and reassures me I’m not destroying my ceiling in the wrong spot. I used a felt tip marker to mark a center point on the projector relative to the telescoping pole that will mount to the plate.

I then temporarily removed the mounting plate to measure the telescoping ceiling mount offset relative to the front and center of the projector lens. This measuring translates into the offset for the ceiling mount relative to the center of the room and distance to the projection wall. Performed correctly, it allowed me to mount the front of the lens 10’10” from the projection wall (sweet spot for my calculated screen size, seating, zoom, etc.) as well as mount the lens exactly in the middle of the room from a side to side lateral perspective.

In closing, the only other thing I’d add here is that if your lag bolts are not hitting studs in the ceiling, don’t bother with the plastic sheetrock inserts. While they may work, I don’t trust them for the amount of money I spent on the projector and I certainly don’t want the projected image wiggling because the projector isn’t firmly mounted to the ceiling. Only one of my lag bolts hit a stud. For the remaining bolts, I went to home depot and purchased some low cost anchor bolts (these are the ones I used along with a fender washer) good for 100lbs. each. Suffice to say, the projector is now firmly hung from the ceiling.